|
To add a new report, click on the  button on the main toolbar. To edit a report, select it in the list of records and click on the button on the main toolbar. To edit a report, select it in the list of records and click on the  button. button.
▪The reports included through the "Add" button are identified as reports of the "New" type in the R column on the main screen list of records. ▪The system reports cannot be edited, but it is possible to copy their records and customize them as desired. Thus, the reports made from the copy will be identified as "Customized" and may be edited. |
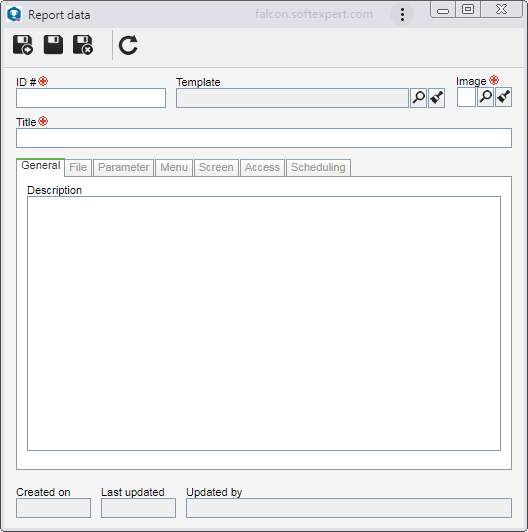
The following fields are available in the report data screen:

Field
|
|
ID #
|
Enter a number or code to identify the report.
|
Template
|
Fill out this field to apply a template to the report. In this case, select the template that will be applied to the report. Whenever the template is edited, the reports associated to it will automatically be altered.
If the report does not need a template (for example: label report), keep this field blank.
|
Image
|
Select the image that will represent the report button on the screen of the component where it will be available to be generated.
|
Title
|
Enter the title of the report. This title will be shown in the report button, on the screen of the component where it will be available to be generated.
|
After saving the record for the first time, the following tabs will also be available:
Use the Description field to record important information about the report.
|
This tab displays the template files that compose the report. The .properties and .class files must be created by the person who generates the report, but they are not required. They are not necessary when creating a new report. On the side toolbar, the following buttons are available:

|
Click on this button to add a template file to the report. On the panel that will be displayed, drag and drop the files on the indicated area or click on the Select file button, browse through the files saved in the computer and select the desired files. Wait until the file is completely loaded. Once done, click on Finish.
|

|
Click on this button to edit the default template file selected from the list of records. It will only be enabled if the default template file is selected. See more details about this operation in the Editing a template file section.
|

|
Click on this button to delete the template file selected from the list of records.
|

|
Click on this button to define the selected template file as default. The default file is the main file, which contains all other referenced files.
|
|
This tab displays the editable parameters of the report, if any. They are used when you wish for the user to enter some data or for the system to transmit said data to the report. Refer to the Editing a report parameter section for a description of how to edit the displayed parameters.
|
This tab displays the SE Suite components and menus in which the report will be available to be generated. On the side toolbar, the following buttons are available:

|
Click on this button to associate a report with an SE Suite component and menu. On the screen that will be opened, select, in the respective field, the SE Suite component in which the report will be available. Next, in the Menu tab, check the component menus in which the report must be displayed. Use the side toolbar buttons to check all the displayed options and uncheck all the checked options. After performing the desired definitions, save the record.
|

|
Click on this button to disassociate the report from the component/menu selected in the list of records.
|
|
This tab displays the system screens generated from any type of action (usually a data screen), such as: audit data, document data etc. Records will only be shown in this tab if SoftExpert has added them or if there already is a report on the corresponding data screen. Use the  button on the side toolbar to disassociate the report from the data screen selected on the list. button on the side toolbar to disassociate the report from the data screen selected on the list.
|
In this tab, it is possible to establish who will be able to access it and the report operations that could be performed or not. On the side toolbar, the following buttons are available:

|
Click on this button to add access to the security list of the report. See further details about this operation in the Configuring the access to the report section.
|

|
Click on this button to edit the access selected in the security list of the report.
|

|
Click on this button to disassociate from the security list of the report the selected access.
|
|
Through this tab, it is possible to automate the "New" type report e-mail sending to certain users. On the side toolbar, the following buttons are available:

|
Click on this button to add a new report sending scheduling. See further details about this operation in the Creating a report scheduling section.
|

|
Click on this button to edit the scheduling selected on the list of records.
|

|
Click on this button to delete the scheduling selected on the list of records.
|
For the other report types (System and Customized), the scheduling can be performed through the report viewer.
|
|
After performing the desired configurations, save the record.
|


