|
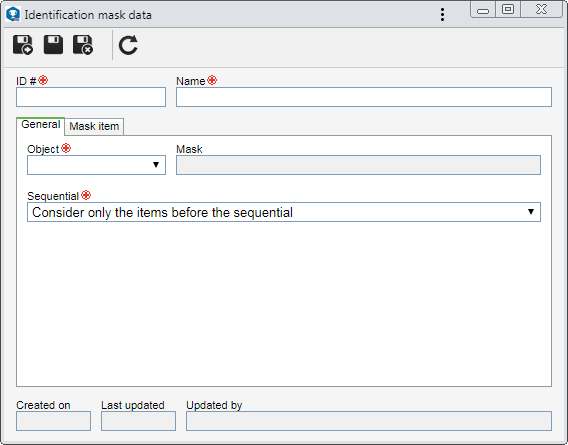
To add a new identification mask, click on the  button on the main toolbar. To edit the data of a mask, select it in the list of records and click on the button on the main toolbar. To edit the data of a mask, select it in the list of records and click on the  button. button.
On the screen that will be opened, enter an ID # and a name for the identification mask. The following tabs are also available:

Note: To successfully add an identification mask, it is necessary to fill out the required fields in the General tab. After saving the data for the first time, the Mask item tab will be available to be filled out.
Field
|
Object
|
Select one of the available options to define the object in which the identification mask will be applied.
|
Mask
|
Displays the format of the mask that has been created according to the configurations performed in the "Mask item" tab.
|
Sequential
|
Select one of the following options to define how the sequencing of the identification mask will be performed:
▪Consider only the items before the sequential: The system will sequence values from the prefix of the "Sequential" item, that is, if a variable-valued item is configured before the sequential, then the sequential will be restarted every time the prefix value changes. Items that are configured after will not restart the sequential value. The sequential will not be restarted when the item values that are after it are edited. ▪Consider the items before and after the sequential: The system will also sequence the items that are after the "Sequential" item. In that case, the sequential will be restarted when the item values that are after it are edited. ▪Do not consider items: The system will always sequence from the previous sequence, without restarting its value in case a prefix or suffix value is edited. |
|
Use this tab to add the items that will compose the ID #s generated through the mask. On the side toolbar, the following buttons are available:

|
Click on this button to add a new item to the mask. See further details in the "Adding an item to the mask" topic below.
|

|
Click on this button to edit the item selected in the list of records.
|

|
Click on this button to delete the item selected in the list of records from the mask.
|

|
Click on this button to move the item selected in the list of records, up.
|

|
Click on this button to move the item selected in the list of records, down.
|
Adding an item to the mask
|
To add an item, click on the  button on the side toolbar. On the screen that will be displayed, configure the following fields: button on the side toolbar. On the screen that will be displayed, configure the following fields:
Type
|
Object property
|
The item that will compose the identification mask will be a property of the object to which the mask will be applied.
|
Attribute
|
The item that will compose the mask will be an attribute created in the system.
|
Sequential
|
The item that will compose the mask will be a sequential number. It is important to point out that items of this type may appear only once in the mask.
|
Fixed value
|
The item that will compose the identification mask will be a fixed value defined by the user.
|
Date and time
|
The item that will compose the identification mask will be a selected date and time format.
|
Sequence
|
Enter the sequence of the item in the identification mask, that is, the order in which the item will be concatenated when generating the ID # through the mask. For example: If it is defined that the "Object fixed value" item has the order 1 and the "Sequential 000" item has the order 2, when generating an ID # with this mask, it will be: Object001.
|
The completion of this field will vary according to the option selected in the "Type" field. This field will not be available if the selected type is "Date and time".
Item
|
Object property
|
The item that will be used will be a company type.
|
Attribute
|
Select the attribute that will be used as an item. The possible attributes must be duly created through the Configuration  Attribute menu. On the selection screen, it is possible to locate the desired attribute through its translation; however, if the selected attribute is of the "List of values" type, the value without translation will be used in the mask, that is, the translated values will not be applied to the mask. Attribute menu. On the selection screen, it is possible to locate the desired attribute through its translation; however, if the selected attribute is of the "List of values" type, the value without translation will be used in the mask, that is, the translated values will not be applied to the mask.
|
Fixed value
|
Enter a value that you wish to use as an item.
|
Format
|
This field will not be available if the previously selected type is "Fixed value". Its completion will vary according to the option selected in the "Type" field. If the selected type is "Date and time", select the desired year, month, day, hour, minute, or second format. For the other types, enter a character set to define the format that the ID mask item will be displayed.
Click on the  toolbar button to check the valid characters for each type. toolbar button to check the valid characters for each type.
|
After that, save the record. Repeat the procedure to add all desired items and compose the identification mask.
|
|
After setting the necessary configurations, save the record.
|


