|
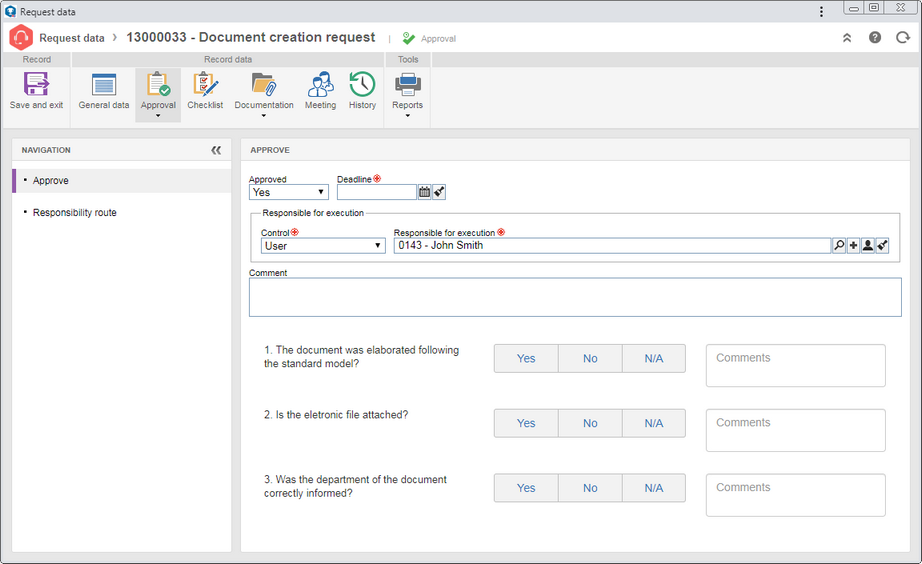
To approve a request, on the main screen list of records, locate and select the request and click on the  toolbar button. toolbar button.
Fill out the following fields on the screen that will be displayed:

In the Navigation panel, the following sections may be available:
Field
|
|
Approved
|
Select the "Yes" option to approve or the "No" option to reject the request.
|
Deadline
|
This field will only be displayed if a deadline for finishing the request has been set in the type. It will be filled out with the deadline defined at the time of the request issuance and can only be edited if the "Allow changing deadline for issue/approval" option is checked in the request type.
|
Responsible for execution
|
This field will only be available if in the request type, the Define responsible user in the request approval/issue or the Variable option is selected in the "Responsible for execution" field. In that case, define the user, department, position, department + position or team that will be responsible for the request execution in question. This field is not available for editing if the Fixed option is selected in the "Responsible for execution" field and will not appear depending on the operation type defined for the request.
|
Comment
|
Enter important information regarding the approval of the request. If the request is rejected, it is required to complete this field. In that case, you must enter an explanation for rejecting it.
|
Checklist
|
The checklist will only be displayed if the responsibility route member who is performing the approval has an associated checklist. This checklist is intended to assist the responsible party for the approval or failure of the request. In order to answer the checklist questions, select the desired option: Yes, No or N/A. The answers may have already been selected by the system according to the standard defined when recording the checklist. Moreover, filling in the Comments fields may be mandatory or not, also according to the configurations established when creating the checklist.
|
|
The Responsibility route section will only be enabled for editing if the "Edit the approval flow?" option was checked at the time of the definition of the responsibility route member who is executing the approval. In it, it is possible to edit the flow of the members responsible for approving the request. On the side toolbar, the following buttons are available:

|
Click on this button to add a new responsible user for the approval. Refer to the Configuring a responsibility route section to obtain a detailed description on how to perform this operation. Note that by adding a new responsible user in a route, associated with the request approval, this addition will not be replicated to the route record made by the Configuration  Responsibility route menu. Responsibility route menu.
|

|
Click on this button to edit the data of the responsible for approval selected in the list of records.
|

|
Click on this button to delete the responsible for approval selected in the list of records.
|

|
Click on this button to identify the approval status (AS column), that is, the action that was taken by the members of the responsibility route.
|
It will not be possible to add, edit, or delete members who have already executed their approval task.
|
|
If the "Allow changing deadline for issue/approval" option is checked in the request type, you can edit the data in the "General data" section. Otherwise, they are only available for viewing, as are the other sections of the request data screen. Refer to the Issuing a request section for a detailed description of the other sections shown in the request data screen.
|
After filling in all the required fields, save the record.
If the request is rejected, it will be sent again to the issue step for the issuer to make the required adjustments.
If the request is approved, it will be sent to execution. View the task for the request execution that will be generated by the system in the Object types and their operations section.
▪The request approval can also be performed through the Request approval task. ▪The issuer of the request can perform its tracking through the Request tracking menu. ▪The system will request the countersign when performing this operation if the "Request user countersign when performing critical operations in the components" option is checked in the SE Configuration component (CM008). |
|


