|
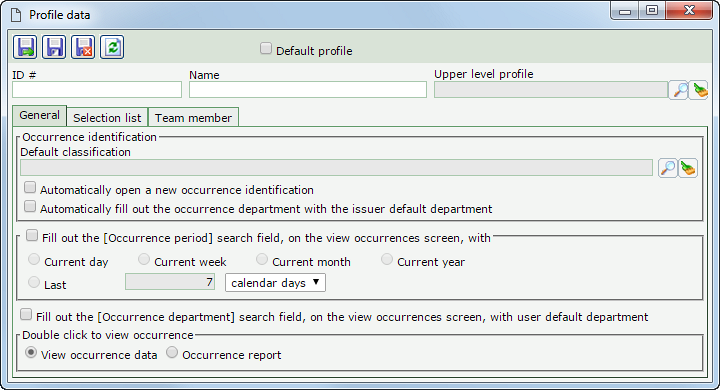
To add a new profile, click on the  button on the main screen toolbar. To edit the data of a profile, select it in the list of records and click on the button on the main screen toolbar. To edit the data of a profile, select it in the list of records and click on the  button. button.
On the screen that will be opened, enter an ID # and a name for the profile. Fill out the Upper level profile field for the profile to be hierarchically recorded below the selected profile. In this case, select the desired profile. If a profile is selected in the main screen hierarchy, this field will be filled out by the system, but it is possible to edit it.
Check the Default profile option to set the profile as default in the system. Keep this option unchecked if this profile is not the default.

Note: To successfully add a profile, it is necessary to fill out the fields in the General tab. After saving the data for the first time, the other tabs will be available to be filled out.
Field
|
|
Default classification
|
Fill out this field to define a classification that will be displayed as selected by the system in the identification of an occurrence. To do that, select the desired classification. If this field is not filled out during the occurrence identification, it will be necessary to select a classification.
|
Automatically open a new occurrence identification
|
Check this option so that, when selecting the Occurrence identification option from the menu, the data screen of the occurrence is opened automatically, i.e., the system will not display the screen with the records that have already been created.
|
Automatically fill out the occurrence department with the issuer default department
|
By checking this option, the "Identification occurrence department" field will be automatically filled out with the department of the user issuing the occurrence.
|
Fill out the [Occurrence period] search field, on the view occurrences screen, with
|
Check this option and define a default value for the Occurrence period filter, located in the view occurrences screen, which will be displayed automatically filled out.
|
Fill out the [Occurrence department] search field, on the view occurrences screen, with user default department
|
Check this option to indicate that the Occurrence department filter, on the view occurrences screen, will be automatically filled out with the default department of the logged user.
|
Double click to view occurrence
|
Check this option to define whether, when double-clicking a record from the analytical search result of occurrences, the system should display the screen with the data of the occurrence in view mode or the default occurrence report.
|
|
Use this list tab to define how the selection lists will be displayed in the system, in addition to entering whether the search will be performed automatically. To do that, simply check the desired options in the respective columns.
|
Use this tab to define the users who will be part of the profile being created. To do that, click on the  button on the side toolbar and, on the data screen that will be displayed, use the following fields: button on the side toolbar and, on the data screen that will be displayed, use the following fields:
▪Department: Fill out this field so that all users of the selected department are part of the profile. In that case, select the desired department. ▪Position: Fill out this field so that all users with the selected position are part of the profile. In that case, select the desired position. If the previous field is filled in, only the positions referring to the selected department will be displayed. ▪User: Fill out this field for a specific user to be part of the profile. In this case, select the desired user. After that, save the record. Repeat the procedure to add all desired members.
Use the other side toolbar buttons to associate and delete a member selected in the list of records.
|
After performing the desired configurations, save the record.
|


