|
To add a new attribute, click on the  button on the main toolbar. To edit the data of an attribute, select it in the list of records and click on the button on the main toolbar. To edit the data of an attribute, select it in the list of records and click on the  button. button.
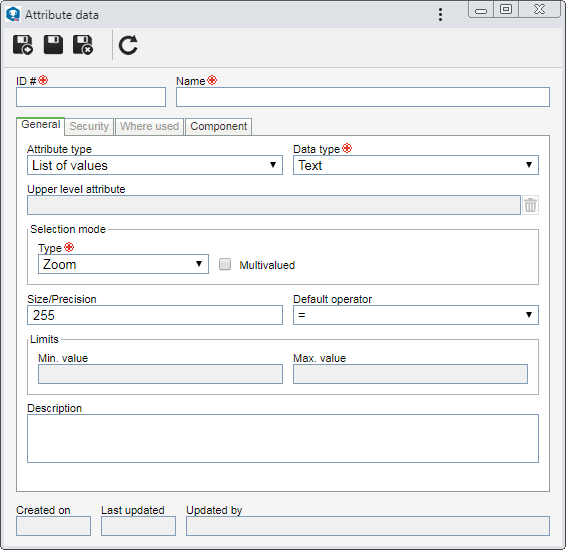
On the screen that will be opened, enter an ID # and a name for the attribute. The following tabs are also available:

Note: To successfully add an attribute, it is necessary to fill out the required fields in the General tab. After saving the data for the first time, the other tabs will be available to be filled out. The availability of some tabs will vary according to the configurations performed in the "General" tab.
Field
|
Attribute type
|
Select one of the following options to define the attribute type:
▪List of values: Allows defining a list of possible values for the attribute. Thus, when entering the attribute value, only the values that are in the list can be selected. The list of values is determined on the "List of values" tab, which will be enabled once this record is saved for the first time. ▪Indeterminate: Allows assigning any value to the attribute. ▪External attributes: This option is similar to the list of values attribute type, except that instead of having its values stored directly in the system database, they will come from another database. For that reason, the "Data type" field is disabled. The connection with the database from which possible attribute values will be retrieved is done on the External attribute tab, which will be enabled once this record is saved for the first time. |
Data type
|
Select the data type that will be selected as attribute value:
▪Text: Allows entering characters and numbers. ▪Numeric: Allows entering numbers only. ▪Date: Allows entering dates only. ▪Memo: This option will only be displayed if the attribute type is "Indeterminate". It allows entering a larger number of characters, if compared to the "text" type field. ▪Currency: Allows entering values according to currency used by the system. ▪Hour: Allows entering only hours and minutes, in the "0000:00" format. |
Upper level attribute
|
If the attribute being configured is listed as the lower level of another attribute, after saving the record for the first time, this field will display the related attribute. See more details in the Relationship section. Use the  button next to this field to delete the relationship that was set. button next to this field to delete the relationship that was set.
|
Selection mode
|
This field is available for attributes of the "List of values" and "External attribute" type. In this case, select how the selection of its value will be performed: Zoom or Combo. See in the image below an example of how each option will be displayed.
|
Mask
|
This field will be available if the attribute type is "Indeterminate" and the data type is "Text". In this case, select one of the following options to define the value allowed for the attribute.
▪Free format: Allows entering characters and numbers (text). If needed, use the Size/Precision field to restrict the number of characters that may be entered. ▪Simple mask: The allowed values are configured through a mask. To do that, use the Mask field that will be enabled. For further details on this operation, see the Indeterminate attribute mask section. ▪Regular expression: The allowed values are configured through regular expressions. To do that, use the Mask field that will be enabled. For further details on this operation, see the Indeterminate attribute mask section. |
Size/Precision
|
This field will only be available for attributes with "Text" and "Numeric" data types. In this case, enter the maximum number of characters that may be used by the attribute.
|
Default operator
|
Select the default operator that will be used in the searches of the system. Thus, when creating a filter for the attribute in order to retrieve a specific record, the defined operator will be displayed as selected by the system.
|
Disposition
|
This field will be available if the attribute type is "Indeterminate" and the data type is "Memo". In this case, enter the maximum number of lines the attribute value may have.
|
Limits
|
This field will only be available for attributes with "Numeric", "Date" or "Currency" data types. In the respective fields, enter the maximum and minimum limits the value entered for the attribute may have.
|
Description
|
Record important information about the attribute.
|
 This image represents attributes associated with a record.
|
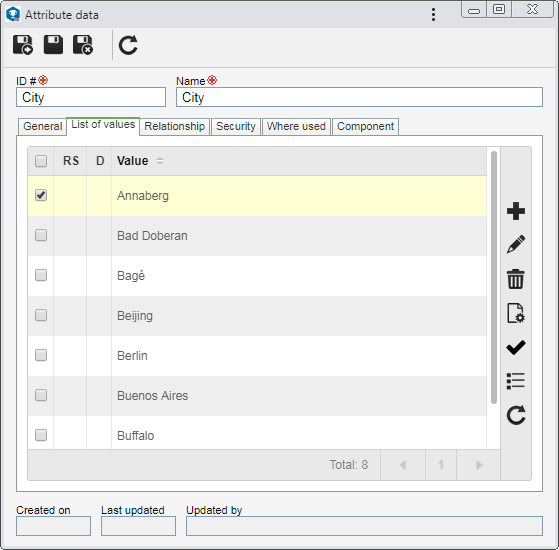
This tab will only be displayed if the "List of values" option is selected in the "Attribute type" field of the General tab. Use it to create a list with the possible value options that the attribute may take. On the side toolbar, the following buttons are available:

|
Click on this button to add a value to the listing. On the screen that will be opened, enter the attribute value in the respective field and save the record. Repeat the procedure to add all desired values.
|

|
Click on this button to edit the value selected in the list of records.
|

|
Click on this button to delete the value selected in the list of records. To perform this operation, it is necessary to confirm the request made by the system.
|

|
Click on this button to enable or disable the value selected in the list of records. To perform this operation, it is necessary to confirm the request made by the system.
|

|
Click on this button to turn the value selected in the list of records into the "default" value. Thus, when the attribute is associated with a record, the system will complete it with the configured default value.
|
 This image exemplifies the listing of the values of an attribute of the "List of values" type with "Text" data type.
|
This tab will only be displayed if the "External attribute" option is selected in the "Attribute type" field of the General tab. See how to complete it in the External attribute section.
|
This tab will only be displayed if the "List of values" or "External attribute" option is selected in the "Attribute type" field of the General tab. See how to complete it in the External attribute section.
|
On this tab, it is possible to define the security list for the attribute. Enable the desired option:
Private
|
Public
|
Only the users defined in this tab will be able to edit or view the attribute. To do that, use the following columns:
▪Edit: Define which users, teams, departments and/or positions will have permission to edit the attribute. ▪View: Define which users, teams, departments and/or positions will have permission to view the attribute. |
All system users will be able to view the attribute, but only the users defined in the respective column will be able to edit it.
Therefore, the View column will be disabled (since the attribute can be viewed by any user).
In the Edit column, define which users, teams, departments and/or positions will have permission to edit the attribute data.
|
To add a user, team, department, or position to the security list, simply type the desired name in the available field and select the corresponding option in the list that will be displayed or press "Enter" on the keyboard.
To delete a user, team, department, or position from the security list, click on the  button next to the desired record. button next to the desired record.
|
The user that created the attribute and the system admin will always have permission to access the record, even if they are not added in this tab.
|
|
This tab displays the records with which the attribute is associated. To do that, the system displays the components and the record number of each component that uses the attribute in question. When clicking on a component, all the record types that use it, are listed. When clicking on a record type, the system displays a listing with the records data that contain the attribute.
|
This tab displays the SE Suite components that use the attribute. When you wish to use the same attribute in several components, the association of attributes from other components may be done through the association of an existing record, available next to the add button in attribute creation, or through the SE Administration component.
|
After setting the necessary configurations, save the record.
Refer to the Adding attributes section for more information about associating attributes and filling out their values.
|
|


