|
In order to be able to create incidents, it is necessary for the process to be with the automation configured and that there is no error in the flowchart modeling. If the process is duly configured and has no modeling errors, it may be associated with the incident type you wish. Then, to verify if the process has been modeled correctly and whether it is configured with the automation for SE Incident, or to perform this configuration, see the following steps:
1.
|
First, access the data of the process that will be automated to SE Incident.
▪Simplified revision: The process data may be edited through the PM022 menu (File  Process) after enabling its editing. Process) after enabling its editing. ▪ISO9000/Workflow based revision: The process data may be edited only when it is under revision. To do that, it is necessary to access the PM047 menu (Management  Revision) to create the revision, and the data must be edited through the "Process revision" task that will be sent to the revision drafter (ISO9000) or the activity executor (Revision workflow). Revision) to create the revision, and the data must be edited through the "Process revision" task that will be sent to the revision drafter (ISO9000) or the activity executor (Revision workflow).
Refer to the documentation of the SE Process component for more information on revising and/or enabling the editing of a process.
|
|
2.
|
In the process data, access the General data  Automation section: Automation section:

|
3.
|
The "Enable automation" option should be checked, if not, check it and fill in the remaining fields with the automation that will be configured:
▪In order to be able to instantiate the processes in SE Incident, select the "Incident" option in the Component field. The Incident object and Life cycle operation will be filled out automatically as they are the only options in each field. ▪In order to initialize the incident manually, keep the "Disable manual start" option unchecked, otherwise, the incident can only be created through a schedule or through another process, such as a sub-process. ▪In the "Restrictions on smartphones" field, it is possible to disable the start of problems and/or the execution of activities on smartphones.
|
4.
|
Save the process after performing the necessary changes.
|
1.
|
To be able to instantiate the process through SE Incident, it is necessary for at least the first activity in the flowchart to have an associated status. This status helps identify the status in which the instance is found. To do that, access the process flowchart.
▪Simplified revision: The process flowchart may be edited through the PM022 menu (File  Process) after enabling its editing. Process) after enabling its editing. ▪ISO9000/Workflow based revision: The process flowchart may be edited only when it is under revision. To do that, it is necessary to access the PM047 menu (Management  Revision) to create the revision, and the modeling must be performed through the "Process revision" task that will be sent to the revision drafter (ISO9000) or the activity executor (Revision workflow). Revision) to create the revision, and the modeling must be performed through the "Process revision" task that will be sent to the revision drafter (ISO9000) or the activity executor (Revision workflow).
Refer to the documentation of the SE Process component for more information on modeling the process flowchart.
|
|
2.
|
In the data of each activity, it will be possible to define the status the incident will have when enabling the respective activity. It will also be possible to configure whether it will be possible to fill out the loss events during the execution of each activity. For these configurations, access the Configurations  Status section and fill out/check the following fields: Status section and fill out/check the following fields:
Incident status: Select the status of the incident as soon as the activity in question becomes enabled for execution. Select the incident status that is being handled with the activity. This status may be previously created through the "File  Automation Automation  Status" menu or through the Status" menu or through the  button placed next to this field. It is important to note that filling out this field is required on the data screen of the first activity of the process flowchart. button placed next to this field. It is important to note that filling out this field is required on the data screen of the first activity of the process flowchart.
|
Loss event: Check this option to enable, in this activity, the filling of the operational loss container on the form. To do that, it is necessary that the form (whose loss event container must be properly enabled and modeled) is associated with this activity.
|
|
3.
|
After filling all the necessary fields, save the record.
|
1.
|
If there is a need to integrate SE Incident with SE Action Plan, you will first need to enable the integration with the action plan. First, locate the desired process and access its flowchart in edit mode.
|
2.
|
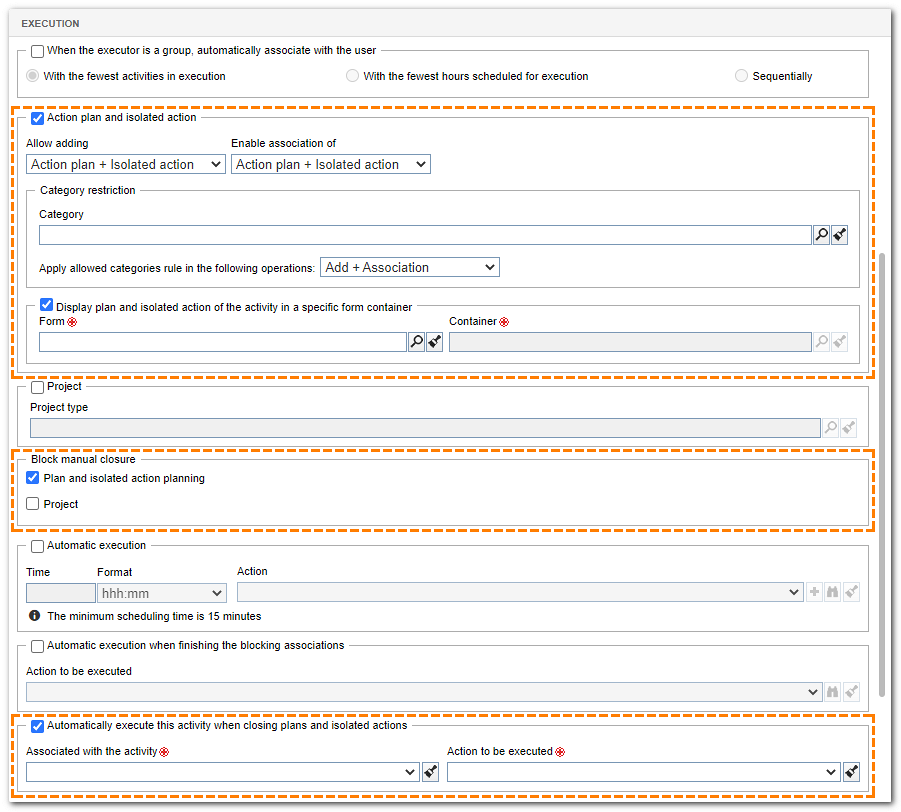
While the flowchart is open, configure how the integration of the action plan will take place during the execution of each incident activity. To do that, when accessing the Configurations  Execution section in the activity data, the following fields will be available for the action plan: Execution section in the activity data, the following fields will be available for the action plan:

Action plan and isolated action: Check this option so that at the time of the activity execution it is possible to plan new action plans/isolated actions or associate isolated actions/action plans already recorded in the system. In order to use this resource, SE Action plan must have an active license key in SE Suite. The following fields will be enabled:
▪Allow adding: Define whether it will be possible to add only action plans (Action plan), only isolated actions (Isolated action) or both (Action plan + Isolated action) to the activity. ▪Allow associating: Define whether it will be possible to associate only action plans (Action plan), only isolated actions (Isolated action) or both (Action plan + Isolated action) to the activity. ▪Category restriction: Select the Category that will classify the action plans or isolated actions that may be associated with the treatment of the incident at the time of the activity execution. This restriction causes a plan (or isolated action) to be recorded in the category defined in this field during its creation. In the association case, only the actions or plans created in the category listed in this field will be listed. Use the "Apply allowed categories rule in the following operations" field to define if the restriction will be applied only to the addition or the association or to both cases (Addition + Association). ▪Display plan and isolated action of the activity in a specific form container: Check this option so that the action plans for this activity are displayed in a specific form container. To do this, it is necessary that the form (whose container of action plan must be properly enabled and modeled) is associated with this activity. In the Form field, select the form associated with the activity and, in the Container field, select the container that corresponds to the area of the form where the action plans of the activity in question will be displayed. This configuration allows action plans to be added, associated, or just viewed on the form. |
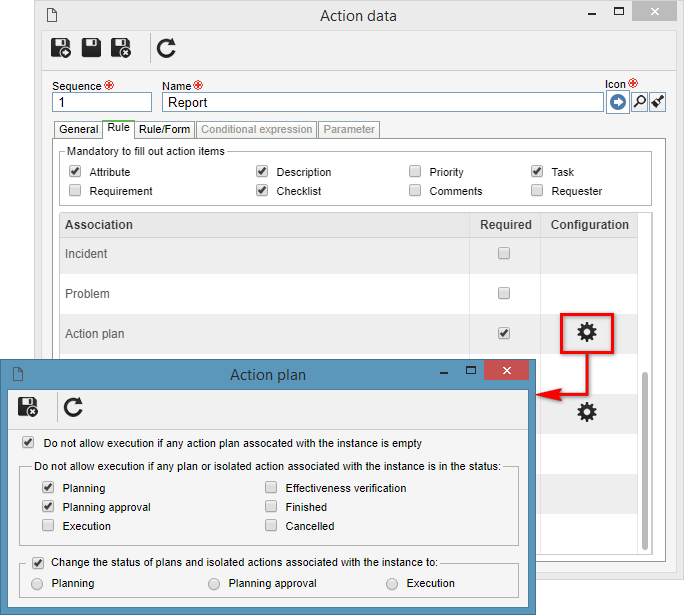
Block manual closure of the action plan and isolated action planning: Check the "Plan and isolated action planning" option so that the action plan/isolated action created from the incident being treated in the activity cannot be closed through the SE Action Plan component. That is, if this option is checked, the isolated action/action plan will only end after this activity has been performed. For that, it is necessary that, when configuring the activity action (Configurations  Action) on the Rule tab on the action data screen, the Action) on the Rule tab on the action data screen, the  button in the Configurations columns is clicked and, in the "Edit the status of action plans associated with instance to" option, define one of the following statuses: Planning approval or Execution. button in the Configurations columns is clicked and, in the "Edit the status of action plans associated with instance to" option, define one of the following statuses: Planning approval or Execution.
|
Automatically execute this activity when closing the plans and isolated actions: Check this option so that the activity in question is automatically executed by the system as soon as the plans/isolated actions associated with a particular activity of the incident are closed. To do that, in the "Associated in the activity" field, select the activity in which the action plan or isolated action will be associated and the "Action to be executed".
|
|
3.
|
Then, still in the activity data, access the Configurations  Action section and access the action data that can only be performed if there is integration with the Action plan. Action section and access the action data that can only be performed if there is integration with the Action plan.
|
4.
|
In the action data, access the Rule tab and, in the association options, check the association with SE Action Plan as required. To perform the configuration of the integration, click on the button in the Configuration column:

|
5.
|
On the screen that opens, you will be able to perform the following configurations:
Do not allow execution if any action plan associated with the instance is empty: Check this option to prevent the activity from being performed with the action if the action plan associated with the incident has no action, that is, if the action plan is empty.
Do not allow execution if any plan or isolated action associated with the instance is in the status: Check this option to prevent the activity from being executed with the action if the action plan associated with the incident is in a given situation. Next, check the action plan status that will prevent the execution of the incident activity.
Change the status of plans and isolated actions associated with the instance to: Check this option to change the status of the action plan associated with the incident to Planning, Planning approval or Execution.
|
6.
|
Save the record after performing the necessary configurations.
|
1.
|
Another important factor for the process automation configuration for SE Incident is the evaluation of the process to be instantiated. To quickly execute this evaluation, select the process on the main screen of the File  Process (SE Process) menu. Process (SE Process) menu.
The process evaluation is also available in the process flowchart modeling, through the process creation menu or through the "Revision execution" task, when the process has revision control.
|
|
2.
|
After that, click on the "Evaluate process for instantiation" option located in the More grouper on the toolbar.
|
3.
|
On the screen that opens, in the Evaluation result field, it must return the result "There are no errors", otherwise the errors will be listed, and all should be corrected.
|
|


