|
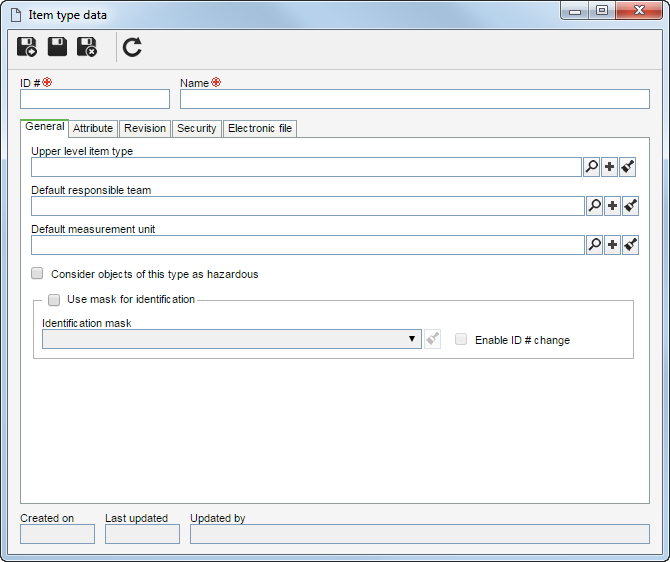
To create an item type, click on the  button on the main screen toolbar. To edit a type, select it in the list of records and click on the button on the main screen toolbar. To edit a type, select it in the list of records and click on the  button. button.
Then, fill out the following fields on the data screen that will be displayed:

Note: In order for the options in this screen to be available for configuration, it is necessary for the record to have been saved at least once.
Field
|
Upper level item type
|
Select the item type that, in the main screen hierarchy, is one level above the record in question. This field will be automatically filled out by the system if, in the main screen hierarchy, an item type is selected.
|
Default responsible team
|
Select the default team responsible for the items created in this type. The default team may be changed when creating the items of this type.
|
Default measurement unit
|
Select the default measurement unit of the items created in this type. The default measurement unit may be changed when creating the items of this type.
|
Consider objects of this type as hazardous
|
Check this field to indicate that the items of this type are hazardous. This field is for information purposes only and does not generate tasks in the system.
|
Use mask for identification
|
Select whether the automatic identification resource will be used when creating the items of this type. If affirmative, fill out the fields described below:
▪Identification mask: Select the identification mask that will be used to automate the generation of the ID #s of the items of this type. The mask configuration must be performed through the Configuration  Identification mask menu. Select then, in this field, the desired identification mask. Identification mask menu. Select then, in this field, the desired identification mask. ▪Enable ID # change: If this field is checked, when creating an item of this type, it will be allowed to manually change the ID # generated by the mask. Otherwise, it will not be allowed. |
|
Use this tab to associate the attributes that complement the items of this type.

|
Click on this button to associate an attribute that was previously created in the system with the record. See how to perform this operation in the Adding an attribute section.
|

|
Click on this button to disassociate the attribute selected in the list of records from the record.
|
|
Use the Revision tab to configure the revision control for the items and item family classified with the type in question. For the changes to the items and families of this type to be controlled by means of revisions, check the Revision control option. Refer to the Revision section for more details on how to perform the configuration of the revision control.
|
On the Security tab, the security configuration is executed for the item type in question. To do that, in the upper part of the tab, select one of the following options:
Option
|
Public
|
Any user will have access permission to the item type.
|
Restricted
|
Only a restricted group of users will have access permission to the item type. In that case, refer to the Security section for more details on how to set access permissions.
|
|
Use this tab to configure the information related to the electronic files of the item. For that, fill in the following fields:
Field
|
File type
|
Select the file type that will be associated with the items of this type:
▪Single: Allows associating only one electronic file to the item in question. ▪Multiple: Allows associating multiple electronic files to the item in question. ▪Complex: Allows associating complex files to the item in question. In that case, in the respective field, select the desired complex file container. |
Complex file container
|
If the type file, defined in the field above, is complex, select the respective container.
|
Allow editing the container structure
|
Check this field to enable editing the container structure. Otherwise, editing will be blocked.
|
Use this tab to configure the storage type of the electronic files of the items of this type. For that, fill in the following fields:
Current
|
Database
|
Select this option to have the electronic files stored in a database. In this case, the files will always be saved in a compressed mode. If the files are stored in a database, in PostgreSQL environments, it will not be possible to store files with 30 MB or more. To enable the storage, we recommend selecting the controlled directory option.
|
Controlled directory
|
Select this option to have the electronic files stored in the controlled directory. At this point, the following fields will be enabled:
▪Saving mode: Select whether the files will be stored regularly or in a compressed form. ▪Path: Select the controlled directory in which the electronic files will be stored. Use the other buttons next to the field to add a new controlled directory and use it to store the files in the current step and clear the field. |
Block
|
Select the respective fields to block the later addition or deletion of electronic files, when creating the item. These fields will only be available for selection if the revision of the items of this type is controlled by the system.
|
If the item type has revision control, the fields above must be filled in for each status of the item revision (Current, Under Revision, and Obsolete).
|
|
|
Save the record after filling out the necessary fields.
|


