|
To create a knowledge base, access the "File  Knowledge base" menu and click on the Knowledge base" menu and click on the  button. button.
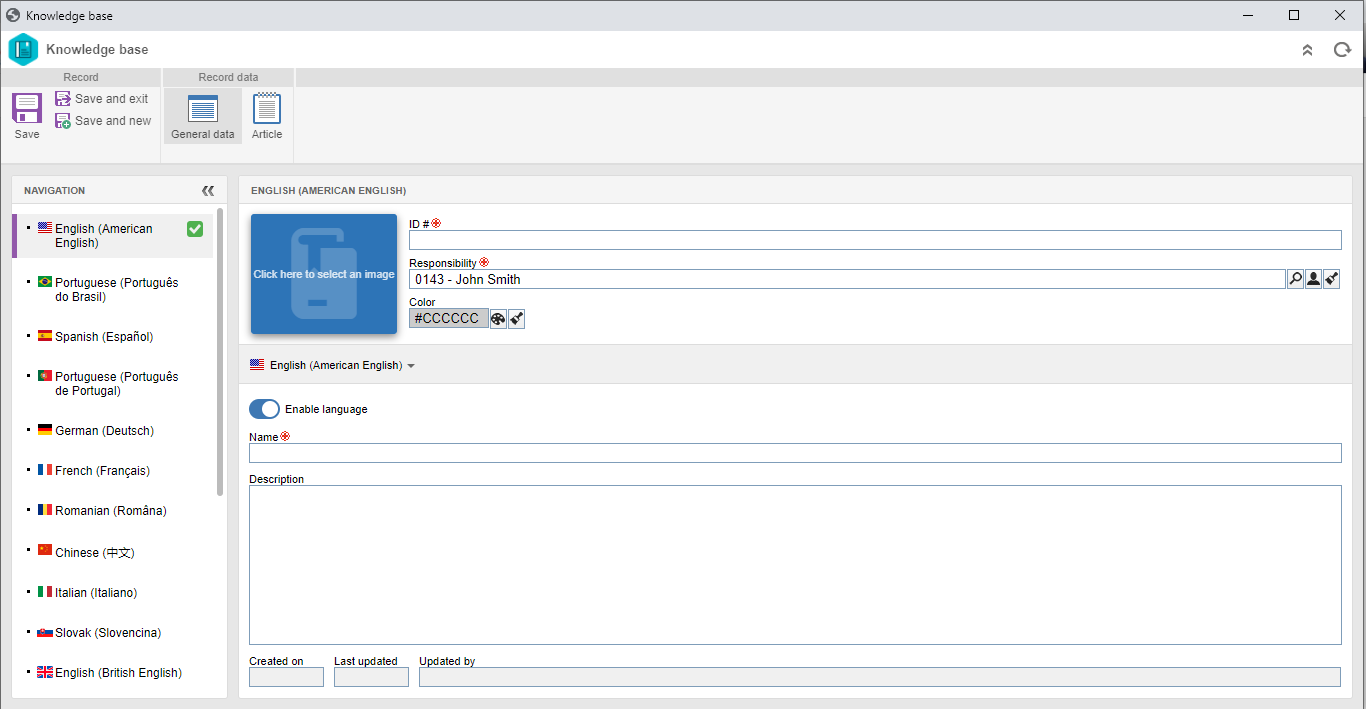
At this point, the knowledge base data screen will be displayed:

Fill out the following fields:
ID #: Enter the ID # of the knowledge base.
Responsible: Enter the user responsible for the knowledge base. During creation, this field is automatically filled out with the logged user (who is creating it), but it can be edited by another user.
Color: Define a color for the knowledge base.
If desired, it is also possible to add a presentation image to the knowledge base. To do so, click on the button with the folder icon and select one of the images displayed by the system, or upload a file from your computer.
The color and the image defined at this point are displayed in the knowledge base card when the portal is configured to display all bases.
To create a knowledge base, it is necessary to fill out the fields in the General data section. After saving the data for the first time, the Security and Category sections will be available to be filled out.
|
In addition to the ID #, responsible party and color of the knowledge base, there are other fields that must be filled out in the General data section, which vary according to the language:
▪Enable language: This option will be enabled for the system language. Use the navigation panel to access other languages that may be enabled (or disabled) for the knowledge base. ▪Name: For each enabled language, it is necessary to enter a name in the respective language. Thus, the name of the knowledge base will be displayed according to the language of the user who is accessing it or to the language configurations defined in the "Configuration  Language" menu. Language" menu. ▪Description: Just like the name, the description can vary according to the language in which it is being accessed. Thus, for each enabled language, enter the description of the knowledge base in the respective language.
|
Use identification mask: Select this field to enable the mask identification resource for the articles in this knowledge base. Then, fill out the following fields:
▪Identification mask: Select the desired identification mask from those created through the "Configuration  Identification mask" menu. Identification mask" menu. ▪Enable ID # change: If this field is selected, when creating an article, it will be possible to manually change the ID # generated through the mask. Otherwise, it will not be allowed. |
Revision: Select the revision process for the articles of this knowledge base:
▪Simplified: If this option is selected, the articles in this knowledge base will have a simplified control, but there will be a history to allowing viewing the changes that were performed. ▪ISO9000: If this option is selected, the articles in this knowledge base will have an ISO9000 based revision control. ▪Workflow: If this option is selected, the articles in this knowledge base will have a revision control based on a process instantiated in the SE Workflow component. In that case, a process (SE Process) must be properly configured and modeled. Refer to the Revision process configuration section for more details about the revision process configuration.
|
|
|
|
Use this section to configure the security list for the knowledge base. The following buttons are available:

|
Click on this button to add a new access control to the knowledge base. See further details on this operation in the Knowledge base security section.
|

|
Click on this button to edit a knowledge base access control. See further details on this operation in the Knowledge base security section.
|

|
Click on this button to delete an access control from the knowledge base. Select the desired record and click on this button.
|
|
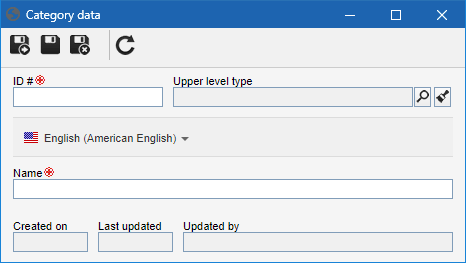
In this section, it is possible to define the categories in which the articles of this knowledge base can be classified. Use the buttons in this section to add, edit, or delete categories. To create a new category, click on the  button, and to edit an existing category, select the desired record and click on the button, and to edit an existing category, select the desired record and click on the  button. At this point, the category data screen will be displayed: button. At this point, the category data screen will be displayed:

ID #: Enter the ID # of the category.
Upper level type: Select the process type that is one level above this record in the category hierarchy.
Language: This option displays the language in which the name of the category will be recorded. The displayed languages are the languages enabled in the knowledge base.
Name: Enter the name of the category according to the selected language. Note that, by switching the language, the ID # does not change, but the Name does, that is, the category name will be displayed according to the language in which the system is being used.
Save the record and create as many categories as necessary.
|
|
|


