|
On the main screen toolbar, click on the  button. button.
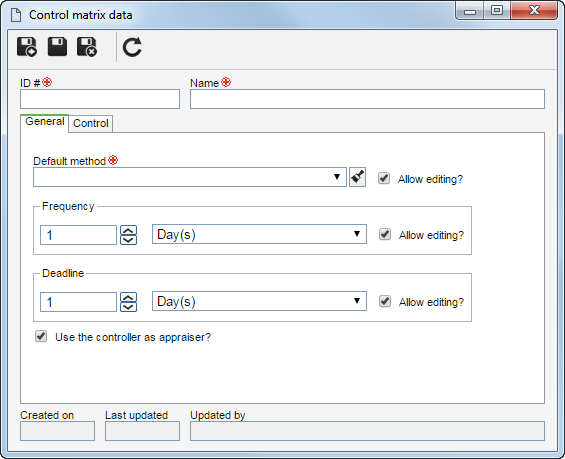
On the data screen that will be displayed, enter an ID # and a name for the control matrix. Then, fill out the fields in the following tabs:

Field
|
Default method
|
Select the method that will be used by default in the evaluation of the projects the matrix will be associated with.
|
Frequency
|
Enter the days, weeks or months ranges that the projects of the type the matrix will be associated with must go through approval.
|
Deadline
|
Enter the number of days, weeks or months that the responsible party will have to evaluate the projects the matrix will be associated with.
|
Allow editing?
|
By default, the system displays the option checked. Keep it checked so that, through the Management  Evaluation control menu, it is possible to edit the method, frequency, or deadline of the evaluation of a determined project. Uncheck this option so that it is not possible to edit the method, frequency or deadline set in the control matrix. Evaluation control menu, it is possible to edit the method, frequency, or deadline of the evaluation of a determined project. Uncheck this option so that it is not possible to edit the method, frequency or deadline set in the control matrix.
|
Use the controller as appraiser?
|
By default, the system displays the option checked. Keep it checked for the responsible party defined in the Controller field, described right below, to also be the appraiser of the projects of the type to which the matrix will be associated with. If this option is unchecked, the project appraiser will be, by default, the party responsible for the project.
|
|
Default control
|
Define who will have control over the evaluation of the projects of the type the matrix will be associated with:
Default control: Define who will be responsible, by default, for the projects of the type the matrix will be associated with. For that, select one of the following options in the Controller field:
▪Project leader: Allows the project leader to also have control over the project evaluation. ▪Project leader department: Allows the users who belong to the same department as the leader to have control over the project evaluation. ▪Specific team: Allows the members of a team to have control over the project evaluation. In the Team field that will become enabled, select the desired team. ▪Specific responsibility: Allows a system user to have control over the project evaluation. In the Responsibility fields that will be enabled, select the desired user. |
Specific control
|
It is possible to add specific controls which will complement the default control. To do that, use the following buttons on the side toolbar:

|
Click on this button to add a specific control. On the data screen that will be displayed, select the Department to which the responsible for the control belongs. Keep the Add lower level items option checked so that the lower levels of the selected area are also considered. After that, define the Controller, as described in step 04.
|

|
Click on this button to edit the specific control selected in the list of records.
|

|
Click on this button to delete the specific control selected in the list of records.
|
|
|
After filling all the required fields, save the record.
|


