|
After clicking on the  button in the data collection configuration data, the system will display the characteristic data screen, according to its type. button in the data collection configuration data, the system will display the characteristic data screen, according to its type.
 Variable type characteristics |
 Attribute type characteristics |
The data screens of variable and attribute characteristics are similar; however, the description will be made only once, identifying where they differ.
|
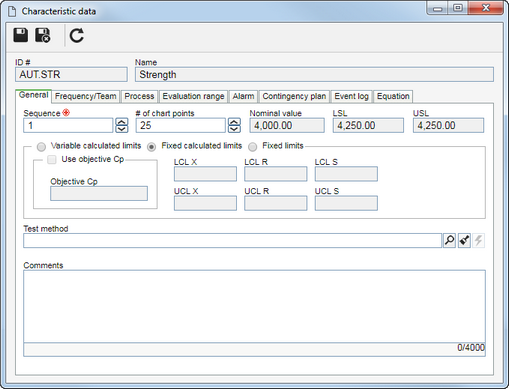
In the General tab the system makes available general information about the characteristic in question:
In the General tab, the following fields will be available:
Field
|
|
Sequence
|
This field indicates the sequence of the characteristic in the data collection.
|
# of chart points
|
Enter the number of points that will appear in the charts of the characteristic.
|
Nominal value
|
This field displays the nominal value of the characteristic, as configured in the SE PDM component.
|
LSL
|
Lower Specification Limit according to the lower tolerance defined for the characteristic. This information was defined through the SE PDM component.
|
USL
|
Upper Specification Limit according to the upper tolerance defined for the characteristic. This information was defined through the SE PDM component.
|
In the fields below, define the limits of the characteristic:
Field
|
|
Variable calculated limits
|
The limits vary from sample to sample.
|
Fixed calculated limits
|
The limit is the same for all the samples.
|
Fixed limits
|
The limits will have fixed values. In that case, the following fields will be enabled:
If the Use objective Cp option is checked, it is possible to define a value you would like to assign to the capability index. Otherwise, it is necessary to assign values to the limits described as follows:
▪LCL X: Lower control limit for the Average chart. ▪UCL X: Upper control limit for the Average chart. ▪LCL R: Lower control limit for the Range chart. ▪UCL R: Upper control limit for the Range chart. ▪LCL S: Enter the lower control limit for the Standard Deviation chart. ▪UCL S: Enter the upper control limit for the Standard Deviation chart. |
Test method
|
Select the document that will assist in the SPC study. If SE SPC is integrated with SE Document, the system will allow associating documents from the latter.
|
Comments
|
Enter the comments about the characteristic in question.
|
|
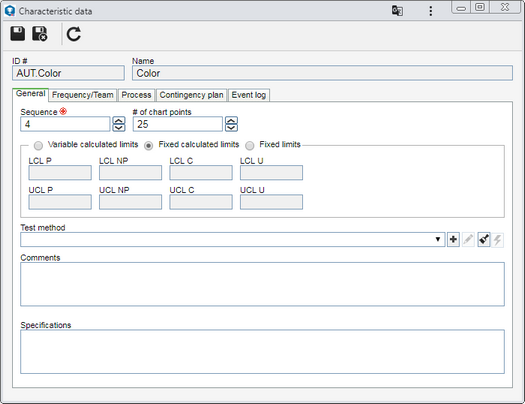
In the General tab, the following fields will be available:
Field
|
|
Sequence
|
This field indicates the sequence of the characteristic in the data collection.
|
# of chart points
|
Enter the number of points that will appear in the charts of the characteristic.
|
Variable calculated limits
|
Select this option for the limits to vary from sample to sample.
|
Fixed calculated limits
|
Select this option for the limit to be the same for all the samples.
|
In the fields below, define the limits of the characteristic:
Field
|
|
Variable calculated limits
|
The limits vary from sample to sample.
|
Fixed calculated limits
|
The limit is the same for all the samples.
|
Fixed limits
|
Select this option for the limits to have the fixed values. In that case, the fields below will be enabled:
▪LCL P: Lower control limit for the sample fraction defective. ▪UCL P: Upper control limit for the sample fraction defective. ▪LCL NP: Lower control limit for the number of defective items in the sample. ▪UCL NP: Upper control limit for the number of defective items in the sample. ▪LCL C: Lower control limit for the number of nonconformities. ▪UCL C: Upper control limit for the number of nonconformities. ▪LCL U: Lower control limit for the number of defects per inspection unit. ▪UCL U: Upper control limit for the number of defects per inspection unit. |
Test method
|
Select the document that will assist in the SPC study. If SE SPC is integrated with SE Document, the system will allow associating documents from the latter.
|
Comments
|
Enter the comments about the characteristic in question.
|
Specifications
|
Enter the specifications of the characteristic.
|
|
|
Use the Frequency/Team tab to define the frequency, as well as the team responsible for the analysis and collection of the characteristic. For that, fill in the following fields:
Field
|
|
Control time frequency
|
Select this option to indicate that the frequency between collections will be controlled. After that, select the control type that will be performed:
▪# of samples: For this control type, enter the number of samples and the time unit that will be used to control the frequency. Example: 3 samples per hour. ▪Interval: For this control type, enter an interval, that is, how often data collection will be performed. If the data collection is not performed in the defined interval, the event log will be automatically opened to enter an occurrence. |
Name
|
Enter how frequently the data will be collected, for example, every two lots, every operator change, among others. Remember that this field will only be displayed if the Control time frequency option is not selected, that is, when the frequency is not controlled.
|
Analysis team
|
Select the team responsible for the analysis of the characteristic in question. The team must be created in the SE PDM component.
|
Data collection team
|
Select the team responsible for collecting the data of the characteristic in question. The team must be created in the SE PDM component.
|
|
Use the Process tab to define the process components. For that, fill in the following fields:
Field
|
|
Machine
|
Select the machine that will operate the gage. The possible machines are created and controlled through the SE Asset component.
|
Operator
|
Select the user who will operate the machine. Click on the  button to fill out this field with the logged user data. button to fill out this field with the logged user data.
|
Inspector
|
Select the inspector responsible for the machine. Click on the  button to fill out this field with the logged user data. button to fill out this field with the logged user data.
|
Gage
|
Select the gage that will be operated. The possible gages are created and controlled through the SE Asset component.
|
Work shift
|
Select the work shift during which the data will be collected.
|
Lot
|
Enter the item lot number.
|
PO
|
Enter the production order number.
|
Remember that the fields in this tab will be displayed as configured on the "General parameters" screen. Those that are required must have their values filled out.
|
|
The evaluation range tab will only be displayed for the variable type characteristics. Click on the  button on this tab to create the evaluation ranges of the characteristic in question. The evaluation ranges serve to manage the collected data by means of a chart. Fill out the following fields on the data screen that will be displayed: button on this tab to create the evaluation ranges of the characteristic in question. The evaluation ranges serve to manage the collected data by means of a chart. Fill out the following fields on the data screen that will be displayed:
Field
|
|
Name
|
Enter a name for the evaluation range.
|
Color
|
Select the identification color for this range in the evaluation range charts.
|
Lower range limit
|
Select the operator (>=, >) and the evaluation range start value.
|
Upper range limit
|
Select the operator (<=, <) and the evaluation range end value.
|
In practice: We can mention a unilateral specification whose initial value (Lower limit) is equal to 10.00 and nominal value equal to 15.00 with no upper limit. The following evaluation ranges may be created:
Range 01 (Bad) >= 10.00 and < 12.00
Range 02 (Good) >=12.00 < 15.00
|
The Alarm tab will only be displayed for the variable type characteristics. In that case, configure the alarms that may be triggered when entering the values read in the data collection. After that, fill out the following fields:
Field
|
|
Non-conforming measurements
|
Select this option and, after that, enter the acceptable percentage from the specification limits. Non-conforming measurements aim at avoiding typing mistakes, by defining an acceptable range for the input values. The system will not accept values that exceed the non-conforming measurements.
|
|
The Contingency plan tab displays the contingency plans that may be used to treat the nonconformities that may occur in the measurement collection of the characteristic in question. Remember that the possible contingency plans were associated with the characteristic through the SE PDM component. Click on the  button to view the data of the selected action plan. button to view the data of the selected action plan.
|
In the Event log tab, the rules to generate the logbook for the characteristic in question are available:
The configuration of the rules to generate the event log are inherited from the General parameters. Configure the rules in this section if the characteristic in question needs a specific event log generation configuration.
|
|
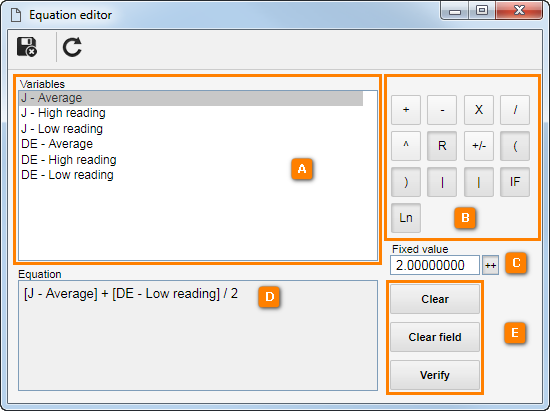
On the Equation tab, it is possible to build an equation to automatically calculate, from other characteristics, the value of a specific characteristic.
To build an equation, first, click on the  button and execute the following procedure: button and execute the following procedure:

1.
|
Double-click on the desired variable (A). The selected option is displayed in the Equation field (D).
|
2.
|
If needed, click on the variable just once and assign a Fixed value (C) to it. Click on the ++ button (C) to add this value to the equation.
|
3.
|
After that, select one of the operations (B) that, like the variable, will be displayed in the Equation (D) field.
|
4.
|
Repeat this procedure until the Equation (D) is complete.
|
5.
|
Use the Verify (E) button to check out the equation, Clear field (E) to start a new equation or just Clear (E) to delete the last data reported.
|
6.
|
Save the record after building the whole equation.
|
|
|
The Attribute tab will only be displayed for the In progress product or Finished product type collections. In this case, the variable attributes associated with the characteristics of the items (SE PDM) of the type collections will be presented. In addition to the characteristics associated with the item, in SE PDM, the system allows associating other attributes for better aid during data collection.
|
Save the record after filling out the necessary fields.
|


