|
The resources are the equipment and the people necessary to perform a nonproject task. Through the Allocation  Resource section, it is possible to perform the following operations: Resource section, it is possible to perform the following operations:
1.
|
On the side toolbar, click on the  button. button.
|
2.
|
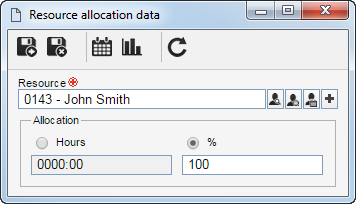
Fill in the following fields on the data screen that will be displayed:

Resource: This field will be filled in by the system with the party responsible for the task; however, it is possible to edit it. In that case, use the following buttons next to the field to select the desired resource:

|
Click on this button and, on the screen that will be displayed, locate and select the resource you wish to allocate to the task in question.
|

|
Click on this button to allocate a resource to the task, taking into consideration the amount of available time it has in a determined period. To do that, on the screen that will be displayed, use the search filters to define the number of necessary available time and, after that, locate and select the desired resource.
|

|
Click on this button and, in the calendar that will be displayed, view the availability of the resources. Locate and select the resource you wish to associate with the task in question.
|

|
Click on this button and select the option that corresponds to the resource you wish to add and allocate to the task: asset or generic. See how to perform this operation in the Creating resources section.
|
Allocation: Select one of the following options:
▪Hours: Enter the number of total hours the user will remain allocated to the task. These hours will be distributed according to the task duration and taking into consideration the hours per day configured in the calendar (SE Administration). For example: if the task duration is 3 days and 24h is entered, the system will allocate the resource 8h per day (if the hours per day configured in the calendar applied to the resource is 8h per day). ▪%: Enter the time percentage the user will remain allocated to the task. For example: when entering 50%, the system will allocate the resource 4h per day to the task (if the hours per day configured in the calendar (SE Administration) applied to the resource is 8h per day). Following the same example, if entering 100%, the resource will be allocated 8 hours per day to the task. ▪All day: This option will only be displayed if the resource selected before is an asset. In that case, the resource will be allocated by the hours equal to one day while the task lasts. For example: If the hours per day configured in the calendar applied to the resource is 8h per day and the task duration is 3 days, the system will allocate the asset 8h per day.
When allocating an asset type resource, the system will create a reservation for the resource is SE Asset. When the task is executed, the system will create a check-out for usage record in SE Asset.
|
|
3.
|
After filling in all the necessary fields, save the record.
|
4.
|
Use the other buttons on the toolbar of the resource allocation screen, as needed:

|
Click on this button to view the calendar of the resource that is being allocated.
|

|
Click on this button to view the usage chart of the resource being allocated.
|
|
1.
|
On the side toolbar, click on the  button. button.
|
2.
|
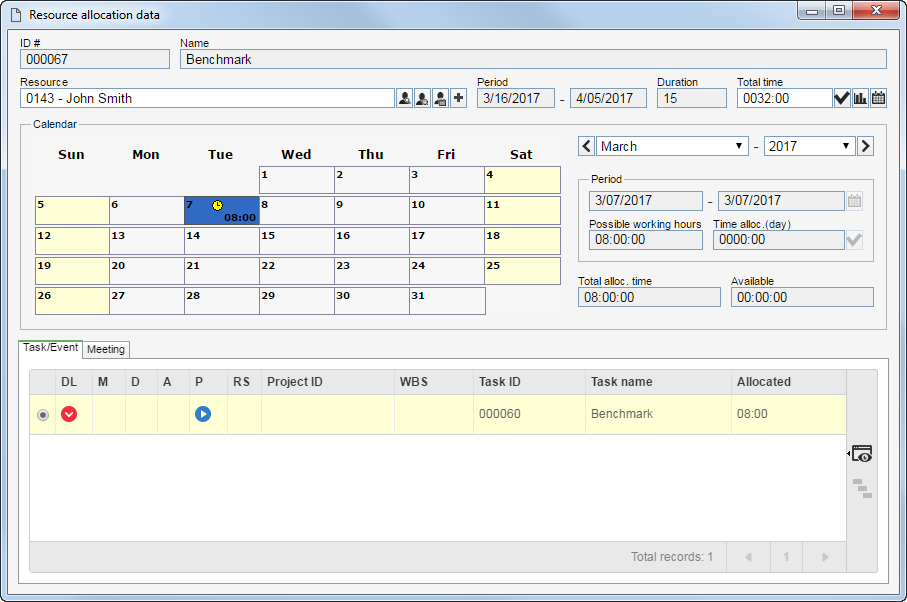
At this point, the resource calendar screen will be displayed. The ID #, Name, Period, and Duration fields will be filled in with the respective information regarding the task.

Resource: This field will be filled in by the system with the party responsible for the task; however, it is possible to edit it. In that case, use the following buttons next to the field to select the desired resource, See the detailed description of the buttons in the "Allocating a resource to the task" section.
Total time: Enter the desired total quantity of hours you wish to allocate the task in question and click on the  button. Notice that the calendar displayed on this screen will display the entered hours distributed in the duration days of the task. Use the other buttons next to the field to view the histogram and the resource calendar. button. Notice that the calendar displayed on this screen will display the entered hours distributed in the duration days of the task. Use the other buttons next to the field to view the histogram and the resource calendar.
All day: This option will only be displayed if the resource selected before is an asset. Check it for the resource to be allocated by the hours equivalent to one day, while the task lasts.
Calendar: This section displays, in a calendar, the days which the resource selected before is allocated. Select, in the field next to this section, a month and a year to view, in the calendar, the days the resource is allocated in. It is also possible to navigate through the calendar through the arrows located next to this field. As needed, use also the field in the Period section to configure the resource allocation in a specific interval of the period which it is allocated to. For that, define the end day of the interval (this operation may be performed by clicking a specific day in the calendar) and, after that, enter the time period you wish to allocate the resource for. Use the Possible working hours field as a base for the number of hours which the resource may be allocated.
The "Total alloc. time" and "Available" fields will be filled in with the respective information referring to the amount of allocated and available time of the resource.
|
|
3.
|
In the Task/Event tab is displayed the project tasks, nonproject tasks and monitored events which the resource selected before is allocated in the period displayed in the calendar. Use the buttons located on the side toolbar to view the data of the object selected in the list of records.
|
4.
|
In the Meeting tab is displayed the data of all scheduled or created meetings, related to the resource of the task in question. Refer to the specific documentation of the SE Meeting component for more information on meeting scheduling and minutes.
|
1.
|
On the side toolbar, click on the  button. button.
|
2.
|
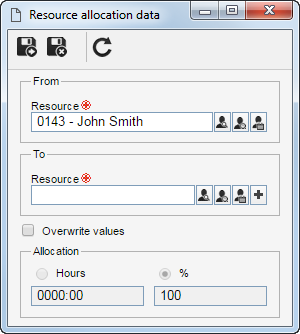
Fill in the following fields on the data screen that will be displayed:

From: Select the allocated resource you wish to replace.
To: In the Resource field select the resource that will replace the resource selected in the From field. To do that, use the buttons next to the field to select the resource, select the resource taking into account the number of available hours it has, select the resource through a calendar, or add a new resource and allocate it to the task.
Overwrite values: Check this option so that the hours at which the resource will remain allocated to the task are also overwritten. In that case, in the Allocation field, select one of the following options:
▪Hours: Enter the number of total hours the user will remain allocated to the task. These hours will be distributed according to the task duration and taking into consideration the hours per day configured in the calendar (SE Administration). For example: if the task duration is 3 days and 24h is entered, the system will allocate the resource 8h per day (if the hours per day configured in the calendar applied to the resource is 8h per day). ▪%: Enter the time percentage the user will remain allocated to the task. For example: when entering 50%, the system will allocate the resource 4h per day to the task (if the hours per day configured in the calendar (SE Administration) applied to the resource is 8h per day). Following the same example, if entering 100%, the resource will be allocated 8 hours per day to the task.
|
3.
|
After filling in all the necessary fields, save the record.
|
|


