|
To create a new risk, click on the  button on the main screen toolbar. On the screen that will open, select the type that will classify the record. button on the main screen toolbar. On the screen that will open, select the type that will classify the record.
To edit the data of a risk, select it in the list of records and click on the  button. button.
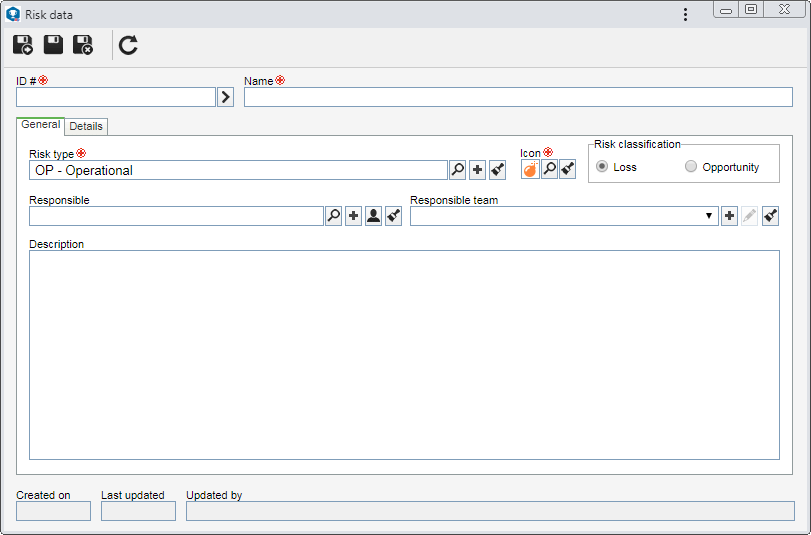
On the risk data screen, enter the ID # and name of the record.

To create a risk, it is necessary to fill out the required fields in the General tab. After saving the data for the first time, the other tabs will be available to be filled out. See the description for each available tab:
On the General tab, enter general information about the risk.
Field
|
Risk type
|
This field is filled out by the system with the risk type selected previously; however, it is possible to edit it. In this case, select the type that will classify the risk in question. Use the other buttons to add a new type to sort the risk and clear the field.
|
Icon
|
Select the icon that will identify the risk.
|
Risk classification
|
Define whether the risk being created is classified as loss or an opportunity. The risk classification determines whether the control effectiveness is used to minimize or maximize the value of the residual risk. For example: When risk is classified as "Opportunity", the controls act to increase exposure to the original risk. In this way, the effectiveness increases the value of the residual risk, since it is desired that the risk is manifested.
|
Responsible
|
Select the user who will be responsible for the risk, that is, it will be possible to edit user data. Use the other buttons next to the field to add a new user and define it as responsible, fill in the field with the data of the logged user and clear it.
|
Responsible team
|
Enter the team responsible for the risk, that is, like the responsible user, only the users of the team selected in this field can change the data of this risk. Use the other buttons next to the field to add a new team and define it as responsible for the program, edit the data of the selected team and clear the field, respectively.
|
Description
|
Enter important information about the risk.
|
|
Use this tab to enter the details related to the risk:
Field
|
Association
|
Access the corresponding subsection to perform the following associations:
▪Consequence: Associate the consequences that the risk could generate. To do that, click on the  side toolbar button in this section and on the screen that will open, locate and select the desired consequence. side toolbar button in this section and on the screen that will open, locate and select the desired consequence. ▪Best practice: Associate best practices that should be applied to risk. To do that, click on the  side toolbar button in this section, and on the screen that will open, locate and select the desired best practices. side toolbar button in this section, and on the screen that will open, locate and select the desired best practices. ▪Objective: Associate the objectives that you wish to achieve with the risk. To do this, click on the  side toolbar button in this section and on the screen that will open, locate and select the desired objective. side toolbar button in this section and on the screen that will open, locate and select the desired objective. ▪Treatment: Associate the treatments that should be applied to risk. To do this, click on the  side toolbar button in this section and on the screen that will open, locate and select the desired treatment. side toolbar button in this section and on the screen that will open, locate and select the desired treatment. ▪Risk source: Associate the risk sources. To do that, click on the  side toolbar button in this section, and on the screen that will open, locate and select the desired risk source. side toolbar button in this section, and on the screen that will open, locate and select the desired risk source. ▪Control: Associate the controls that should be applied to risk. To do this, click on the  side toolbar button in this section and on the screen that will open, locate and select the desired control. side toolbar button in this section and on the screen that will open, locate and select the desired control. ▪Document: Associate the documents related to the risk. Refer to the Adding documents section for further details on how to add and/or associate documents from SE Document. |
Attachment
|
Add the attachments related to the risk. Refer to the Adding attachments section for further details on how to add and/or associate attachments.
|
Associated record
|
This section will present the analyses to which the risk was associated.
|
Attributes
|
If in the Attribute tab of the previously selected type, attributes were associated, they will be displayed on this section, and it will be possible to identify them by name. In that case, enter their values. Those attributes that are required must necessarily, have their values filled in. The blocked attributes will be filled by the system according to the default value set when associating it with the risk type. Remember that the procedure to fill out an attribute, varies according to the configurations established when the attribute was registered.
|
|
Save the record after filling out the necessary fields.
|


