Click on the Click on the  button. At this point, a screen with the following options will be displayed: button. At this point, a screen with the following options will be displayed:
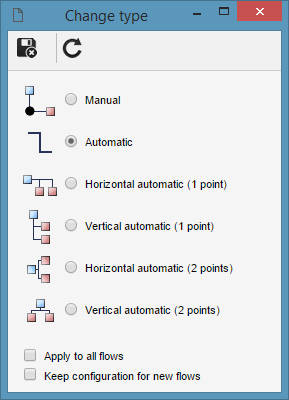
Manual: Check this option to make the connector line configuration manual, that is, the user can add as many points as necessary. To add more points, check the connector and click on the  button that will be displayed next to the button. To delete, click on the point you wish to delete and click DELETE. button that will be displayed next to the button. To delete, click on the point you wish to delete and click DELETE.
Automatic: Check this option to make the connector line configuration automatic, that is, when any item is moved, the connector line will automatically adjust it, creating the necessary points.
Horizontal automatic (1 point): Check this option so that the arrow of the connector is automatically organized every time one of the items which it connects is dragged. In this option, the connector will start with a horizontal line and an orthogonal point that will make the connection to the other item.
Vertical automatic (1 point): Check this option, so that the arrow of the connector is automatically organized, every time one of the items which it connects is dragged. In this option, the connector will start with a vertical line and an orthogonal point that will make the connection to the other item.
Horizontal automatic (2 points): Check this option, so that the arrow of the connector is automatically organized, every time one of the items which it connects is dragged. In this option, the connector will start with a horizontal line and an orthogonal point that will make the connection to the other item.
Vertical automatic (2 points): Check this option so that the arrow of the connector is automatically organized every time that one of the items which it connects is dragged. In this option, the connector will start with a vertical line and two orthogonal points will make the connection to the other item.
Apply to all flows: By checking this option, the connector type used will be applied to all flowchart connectors. For instance, if the user has selected a "Horizontal automatic (1 point)" type connector and this option has been checked, all flowchart connectors will be changed to "Horizontal automatic (1 point)".
Keep configuration for new flows: By checking this option, the connector type used will be applied to new flowchart connectors. For instance, if the user has selected a "Vertical automatic (1 point)" type connector and this option has been checked, the new connectors will be "Vertical automatic (1 point)".
|