|
See how to monitor a requirement:
1.
|
In the list of records on the main screen, select the required requirement.
In the list of records on the main screen will only be presented the requirements whose first revision is approved. If the requirement is found under revision and this is not its first revision, its current revision will be presented in the list of records.
|
|
2.
|
After that, click on the  toolbar button. toolbar button.
|
3.
|
At this point, the following screen will be displayed:
|
4.
|
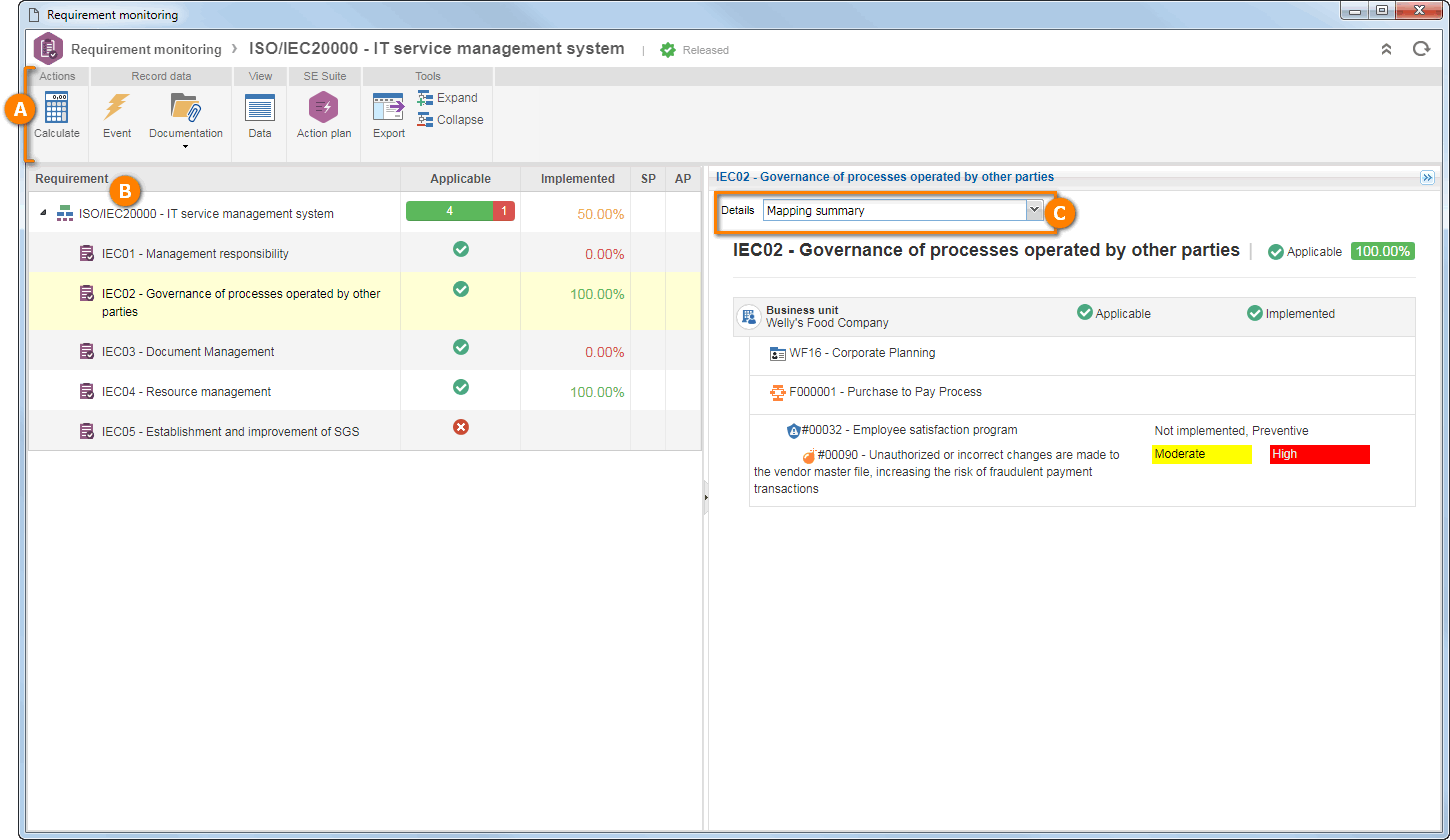
On the toolbar (A), the following options are available:
Option
|
Calculate
|
Allows the user to manually perform the requirement coverage calculation. Note that the coverage calculation is done considering only the sheet requirements.
|
Event
|
Allows adding and/or associating incidents/problems/workflows that highlight the requirement selected in the structure. See more details about this operation in step 7.
|
Documentation
|
Allows adding attachments and documents to the requirement structure selected in the structure. See more details about this operation in steps 8 and 9.
|
Data
|
Allows you to view the data screen of the requirement selected in the structure.
|
Action plan
|
Allows adding and/or associating action plans or isolated actions that highlight the requirement selected in the structure. See more details about this operation in step 8.
|
Expand
|
Allows viewing the requirements that are associated with the lower levels of another requirement in the structure. This option will only be available if there are requirements with lower levels in the structure.
|
Collapse
|
Hides the requirements that are at the lower levels of another requirement. This option will only be available if there are requirements with lower levels in the structure.
|
|
5.
|
In the requirement structure (B), the following columns are available:
Column
|
Applicable
|
In the requirements that have sub-requirements, the number of sheet requirements (those that do not have sub-requirements) belonging to them is displayed, that is, the ones that are applicable and how many are not applicable. When it comes to sheet requirements, in this column, the applicable requirements are identified with the  icon, while the non-applicable are identified with the icon, while the non-applicable are identified with the  icon. icon.
|
Implemented
|
This column displays the percentage of implementation of the requirements. For this, the arithmetic mean of the implementation of all lower-level requirements is made to reach the value of the top-level requirement. Note that only the sheet requirements that are applicable will be considered in the calculation. For example, in a requirement that has 4 sheet requirements, two of which are applicable and two are not, the calculation will be done as follows: (0 + 100 + 0 + 100)/4 = 50%. With this, the percentage of implementation of the top-level requirement will be 50%.
|
E
|
Indicates whether the requirement has an event (incident, problem, or workflow) related to it.
|
AP
|
Indicates whether the requirement has an action plan or an isolated action related to it.
|
|
6.
|
The Mapping summary option, will only be displayed in the Details (C) field, present at the top of the requirement data panel, if the requirement selected in the structure is a sheet requirement. When you click on it, the business unit and the departments and/or controls for which the requirement has been mapped will be displayed, as well as the mapping of applicability and implementation, carried out for each of them, according to the configurations performed in their type. To view the requirement mapping data, position the mouse over the business unit or department to which the requirement was mapped and click on the  button. button.
|
7.
|
When selecting the Event option, in the Details (C) field, presented in the upper part of the requirement data panel, it is possible to add and/or associate incidents/problems/workflows that highlight the requirement selected in the structure (B). To do this, use the following buttons on the side toolbar of this section:

|
Click on this button and select the desired option to start an Incident, Problem or Workflow. On the screen that will be displayed, select the type that will classify the event that you wish to create. The Title and Description fields will be enabled to be filled according to the configurations made in the process. Save the record. If the starter is also the executor of the first activity of the flow, the activity data screen will be displayed.
|

|
Click on this button and, on the screen that will be opened, first select the event you want to associate with the requirement (incident, problem, or workflow), and then locate it and select it. Save your selection.
|

|
Click on this button to delete the selected event in the list of records and thus disassociate it from the requirement.
|

|
Click on this button to view the event data screen (incident, problem, or workflow) selected in the list of records.
|
▪For this feature to work correctly it is necessary that the SE Incident, SE Problem, and SE Workflow components are part of the solutions acquired by your organization. ▪Get more information about incidents, problems, and workflows by viewing the specific documentation of these components. |
|
8.
|
When selecting the Action plan option, in the Details (C) field, presented in the upper part of the requirement data panel, it is possible to add and/or associate the action plans or isolated actions that highlight the requirement selected in the structure (B). To do this, use the following buttons on the side toolbar of this section:
|
Click on this button and select the desired option:
▪Action plan: On the screen that will be displayed, select first, whether the new action plan will be blank or created from a template. Then, at the bottom of the screen, locate and select the category or action plan template, according to the option previously selected, and save the selection you made. At this point, the data screen of the action plan structure will be presented, making it possible to configure. ▪Isolated action: On the screen that will be displayed, select the category that will sort the isolated action. Save your selection. At this point, the action data screen will be displayed, making it possible to configure. |

|
Click on this button and on the screen that will be opened, select first, whether to associate to the requirement an action plan or an isolated action and then locate and select the desired record. Save your selection.
|

|
Click on this button to delete the selected record in the listing and thus disassociate it from the requirement.
|
|
Click on this button to view the selected record data screen in the list.
|
▪In order for this feature to work correctly, it is necessary for the SE Action plan component to be part of the solutions acquired by your organization. ▪Get more information about action plans and isolated actions by viewing the specific documentation of the SE Action plan component. |
|
9.
|
By selecting the Attachment option in the Details (C) field, it is possible to save the attachments associated with the requirement during its creation.
|
10.
|
By selecting the Document option in the Details (C) field, it is possible to add or associate documents related to the requirement.

|
Click on this button to save the electronic file of the document selected in the listing.
|
|
Click on this button to view the data screen of the document selected in the listing.
|
|
11.
|
After monitoring the desired information, close the screen.
|
|