Examples |
|
|
See some examples of rule configuration using the responsive form.
Change the display of a field according to an option selected in the listTo change the display of a field or section after selecting an option from a list field (simple, advanced or data source), define the rule in the field in which the option will be selected. See more details in the following steps: 1. Access the responsive form designer and create a rule.
2.Add the "Create conditional expression" action to the rule.
3.In the conditional expression, configure the following fields: i.In the "Options for value" field of the first expression, select the "Form field" option. ii.In the "Form field" field, select the field that has the options that will change the properties of other form fields. iii.For this example, the "Function" field does not need to be configured. iv.In the "Operator" field, select the "Equal" option. v.In the "Options for value" field of the second expression, select the "Fixed value" option. vi.In the "Data type" field, select the "Text" option. vii.In the "Value" field, enter the name of the option of the form field selected in step (ii). The value must be filled out exactly like the field option. viii.Click on "Apply".
4.Select the conditional expression that was created and click on the "Add action" button.
5.Add the "Set property" action to the conditional expression.
6.In the Set property action, configure the following fields: i.In the "Form field" field, select the field or section whose display will change according to the selected option. ii.In the "Property" field, select which property of the field or section will change. iii.In the "Value" field, select the following options: ▪Yes: Select this option for the field/section to be visible, enabled or required. ▪No: Select this option for the field/section to be hidden, disabled or not required. iv.Click on "Apply".
7.If there are other fields that need to be visible, enabled or required, repeat steps 5 and 6, using the necessary fields.
8.Repeat steps 5 and 6 for each field or section that must be displayed or hidden as soon as the list option is selected. Remember that if the selected option is switched for another option when completing the form, it will be necessary for the fields that were visible to be hidden. Then, define the properties of all fields for the selected option.
9.Repeat steps 2 through 8 for all list options that will change the properties of form fields. If there is more than one option that changes the properties of the same fields, in the same way, configure several conditions (with the logical operator OR between conditions) in the same conditional expression.
10.After finishing the creation of the rule, save the form.
11.Now, access the "Form" tab on the responsive form designer.
12.Select the field that has the options that will change the display of the form fields.
13. After selecting the field, click on the
14. In the "Rules" section of the configuration panel, select the rule that was created in the "Change" field.
15. Save the form. Click on the "Preview" button and test the form, selecting the options configured in the conditional expression. If a field is not changing, access the rule configurations and check if no configurations are missing.
16.If the test is successful, save and close the form.
See below a draft of how the conditional expression rule can be configured:
Calculate a total value based on the values of other fields
If you need, for example, to calculate a total obtained by multiplying the unit value by the number of items, simply use an expression. See below how to perform this configuration: 1.Access the responsive form designer and create an expression in the respective tab.
2.On the expression screen, define a name for it.
3.In the expression configuration, select, in the "Value source" field, the "Form field" option.
4.Then, select, in the "Form field" field, the field that has the value of the item.
5.To obtain the total value of this example, it is necessary to execute a multiplication; then, click on "Add item". Note: At this point, two new lines will be displayed: one to select an operation from the expression and the other to select the second part of the operation. If it is necessary to perform a calculation with more values, simply add items as needed.
6.In the second part of the expression, select the "Multiply" operation and the "Form field" option in the "Value source" field.
7.In the "Form field" field, select the field that has the number of items.
8.Then, click on "Save and close".
9.Now, access the "Rule" tab on the responsive form designer and create a rule.
10. Add the "Set property" action to the rule.
11.In the action configuration, fill out the fields in the following way: ▪Element: Select the form field in which the total value of items must be displayed. ▪Property: Select the "Dynamic value" option. ▪Variable: Select the previously created variable.
12.Save the action.
13. Access the "Form" tab. The total value must be displayed as soon as the unit value and the item quantity are entered in the respective fields. Then, it is necessary to select the rule created in the "Remove focus" field of both fields that have the operation values.
14.Select the field that will receive the value of the item. 15. After selecting the field, click on the "Configure elements" button.
16. In the "Rules" section of the configuration panel, select, in the "Remove focus" field, the previously created rule.
17.Now, select the field that will receive the quantity of items.
18. After selecting the field, click on the "Configure elements" button.
19. In the "Rules" section of the configuration panel, select, in the "Remove focus" field, the previously created rule.
20. Save the form. Click on the "Preview" button and test the form, filling out the unit value and item quantity fields. If the total value is not being calculated, check if the rule has been added to all fields that have values used in the operation. Check also if the variable has been properly configured.
21.If the test is successful, save and close the form.
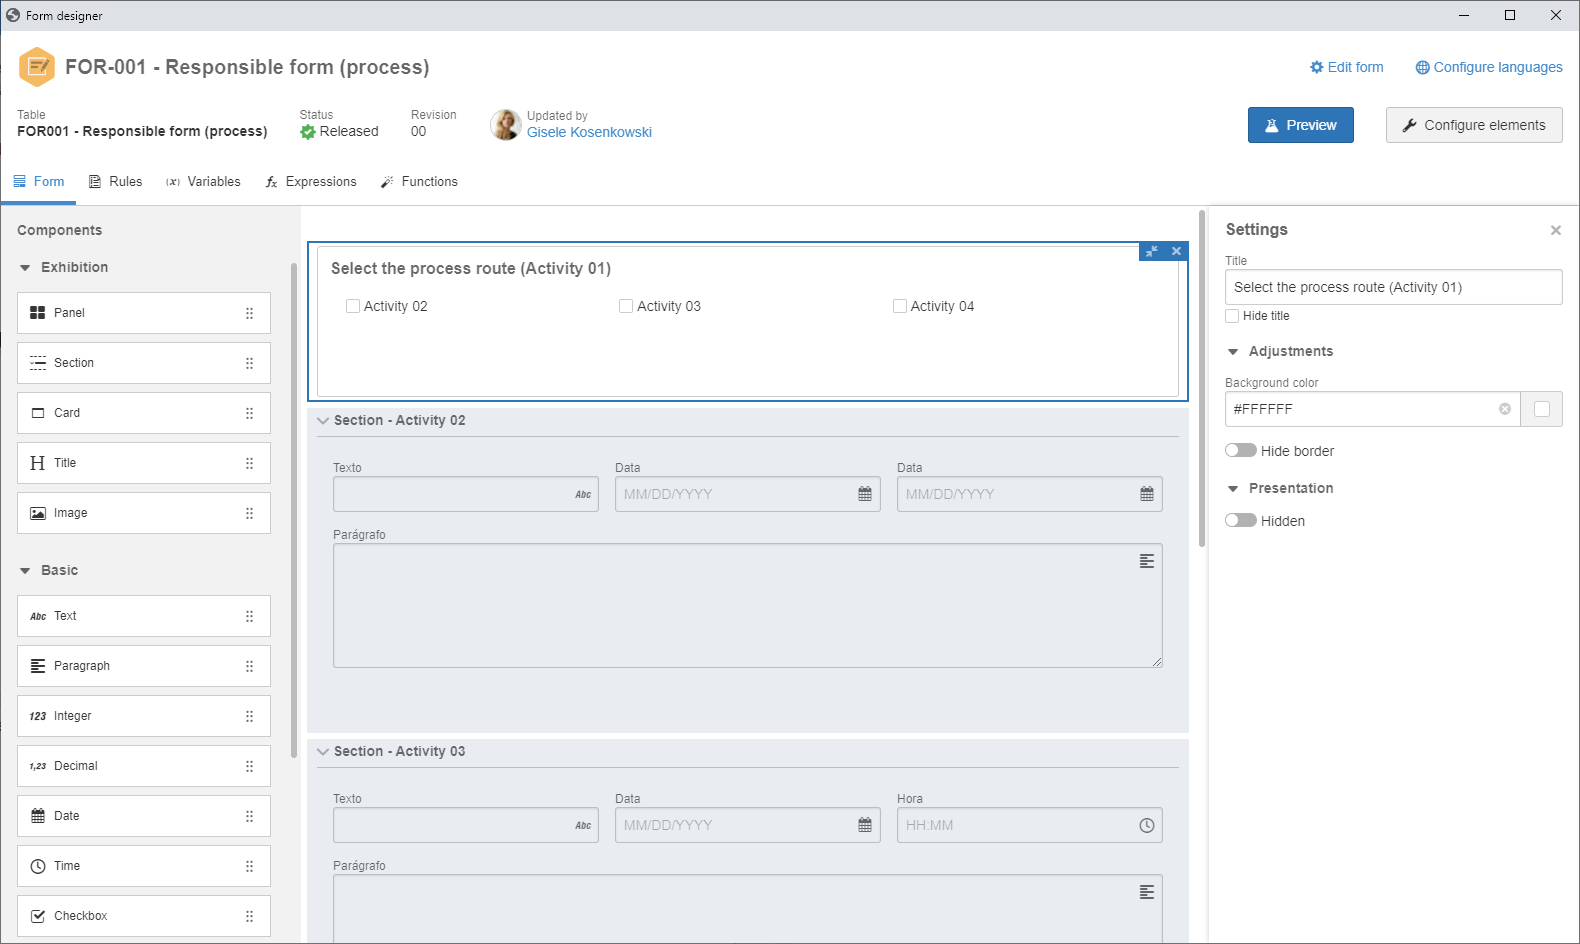
Display section when the form is being executed in a certain process activityThe following example will display the steps of the rule configuration to enable sections in specific process activities.
1.After designing the process and the form, access the "Rules" tab and create a rule. Note: In this example, the sections that will be visible have been designed to be hidden by default. Use the rules to change the properties of each section.
2.Add the "Create conditional expression" action to the rule.
3.In the conditional expression, configure the following fields: a.In the "Options for value" field of the first expression, select the "Process instance data" option. b.In the "Value" field, select the "Activity" option. c.For this example, the "Function" field does not need to be configured. d.In the "Operator" field, select the "Equal" option. e.In the "Options for value" field of the second expression, select the "Fixed value" option. f.In the "Data type" field, select the "Text" option. g.In the "Value" field, enter the name of the activity in which the section will be visible. Note: Enter the name of the activity exactly as it is written in the process. If the activity name is in uppercase and it is in lowercase in the Value field, the conditional expression will read it as two different values and return False, causing the section not to be visible during the instance activity execution. In this example, in each conditional expression, it is checked if the activity name is "Activity 02", "Activity 03", "Activity 04" and "Activity 05". h.Click on "Apply".
4.Add the "Set property" action to the conditional expression.
5.In the action configuration, fill out the fields in the following way: a.In the "Form field" field, select the section that will be visible. Note: In this example, in the action to set the property of each conditional expression, the "Section - Activity 02", "Section - Activity 03", "Section - Activity 04" and "Section - Activity 05" fields are selected. b.In the "Property" field, select the "Visible" option. c.In the "Value" field, select the "Yes" option for the section to be visible. d.Click on "Apply".
6.Repeat steps 2 through 5 for all sections that will be visible.
7.As an example, in the following image, in the "Section - Activity 05" conditional expression, the rule verifies if the process activity name is different from "Activity 05", because if true (True), the "Section - Activity 05" section must be hidden.
8.In the upper part of the form designer screen, click on "Edit form".
9.In the "Load form" field, add the rule that was created. This way, the rule will be executed whenever the form is loaded (opened) in the process activities.
10.Instantiate the process and execute the activities to check if the sections are visible as configured in the rules. This example can also be applied to other field types with other property types. If during activity execution, the form fields do not have the desired properties, revise the rules of your form.
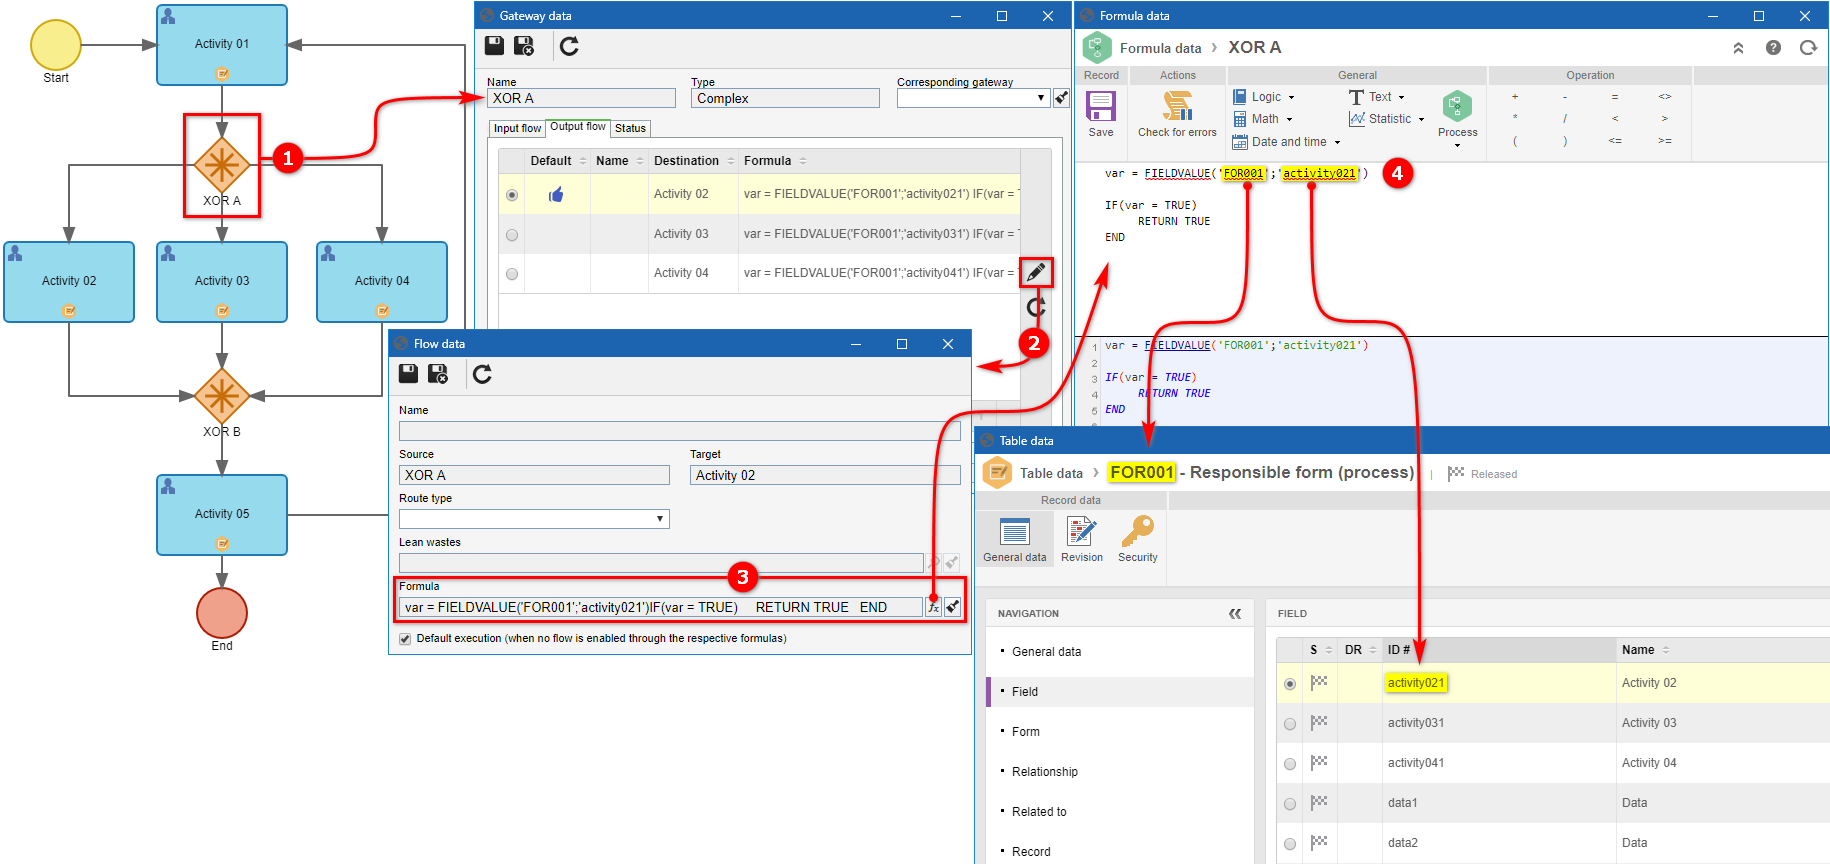
Enable a gateway route in the instance according to the option selected in a list fieldThe following example will display the steps for the configuration of a gateway (XOR A) that has 3 output flows that will be enabled if the checkbox fields are checked during the process instance execution. First, access the form in the activity prior to the gateway, which is "Activity 01" in our example. See in the following steps how to configure the gateway:
1.Open the process flowchart for editing. Then, double-click on the gateway that has the outputs that will be enabled according to the options checked in the form.
2.On the gateway data screen, access the "Output flow" tab. Access the flow data, clicking on the Note: It is also possible to access the flow data by double-clicking on each connector of the output flow on the process designer screen.
3.For each output flow, define the formula that will enable the respective flow. To do that, click on the
4.In the Formula editor, define a condition to check if the value of the form field is filled out with the necessary value to enable the flow (and return the value "TRUE"). In this example, the following formulas have been defined in each output flow:
|