Table creation |
|
|
To create or edit a table, first access the "File
On the screen that opens, fill out the required fields in the "General data" section so that it is possible to save the record for the first time. After creation, in addition to the Field, Form, Relationship and Related to sub-sections of the General data section, the Revision and Security sections will be enabled. See how to configure them in the following sections:
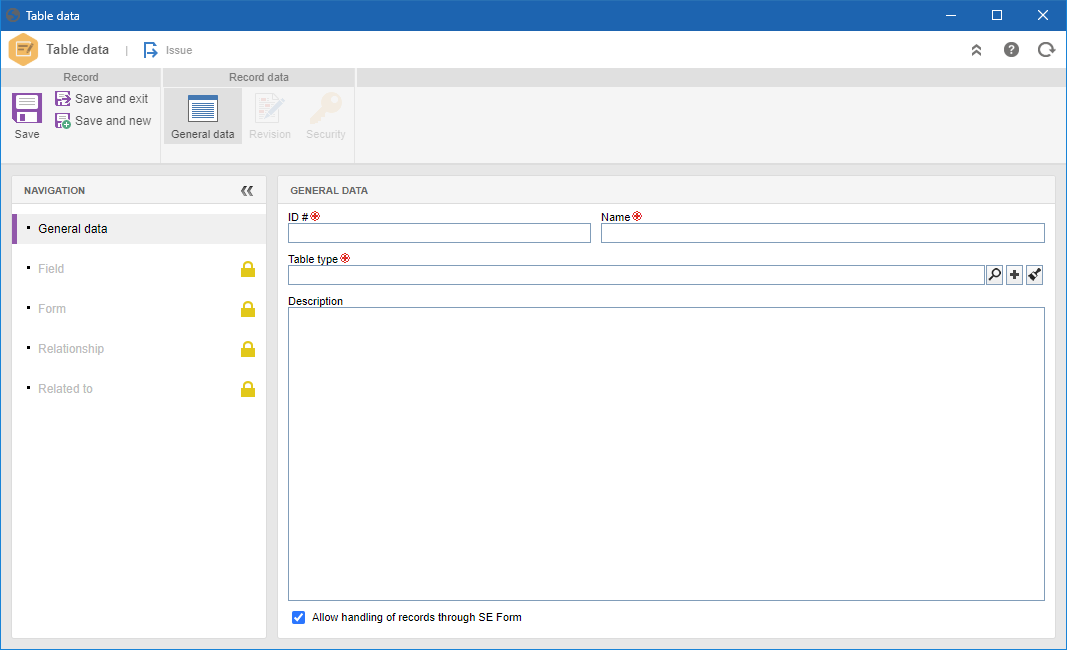
General dataIn this section, in addition to the table identification information, it will be possible to configure the fields and relationships to be used in the forms, as well as to add or edit table forms.
General dataFill in the following fields: ID #: Enter the ID # of the table. This field will only be enabled for completion when creating the table, that is, after saving the record for the first time, this field will be disabled. Name: Enter a name for the table. Table type: Enter the table type in question. If a type is selected previously in the main screen hierarchy, this field will be automatically filled in by the system. This field will only be enabled for completion when creating the table, that is, after saving the record for the first time, this field will be disabled. Description: Enter a description for the table in question. Allow records manipulation through SE Forms: Select this option so that the record of the table in question may have its data edited in the execution menu.
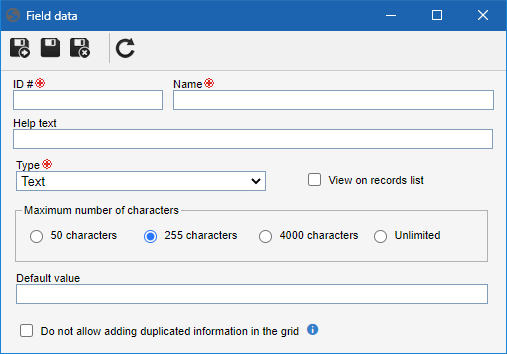
FieldThis section will display the fields that will store the information filled out in the table forms. The fields can be created both through this section and through the form. Fields that have already been released with the table cannot have their ID #s and types changed. Here's how to register a new field through this section: 1.
2.Fill in the following fields: ID #: Enter a number or code to identify the field in question. This field cannot be edited after saving the table. Name: Enter a name for the field in question. Help text: Enter the text that will be displayed when the mouse is positioned in the form field that has the association with the field in question. Type: Enter the field type in question: text, number, long number, decimal, date, time, boolean, file or rich text. This field cannot be edited after saving the table. View on records list: Check this field for the field in question to be displayed in the listings of the Execution Maximum number of characters: If the selected type is "Text", enter the number of characters that the value of the field in question will have. The system provides the options for 50, 255, 4000 characters and unlimited. Default value: Enter the default value of the field. Limits: This section is displayed only when the selected type is "Number", "Decimal", or "Date". Use this section to configure a value limit for the field. If you do not wish the field to have its value limited, leave the fields in this section empty: ▪Min. value: Enter the lowest value the field may have. The field may not have values lower than the one entered in this field. ▪Max. value: Enter the highest value the field may have. The field may not have values higher than the one entered in this field. Do not allow adding duplicated information in the grid: Check this option to prevent the duplication of information that has already been added to the form grid in the same process instance. Do not allow adding duplicated information to the grid (Except for null values): Check this option to prevent the duplication of information that has already been added to the form grid, except for null values.
3.Save the field.
Form This section will list the forms of the table. It will be possible to add, edit or delete forms through the buttons available in this section:
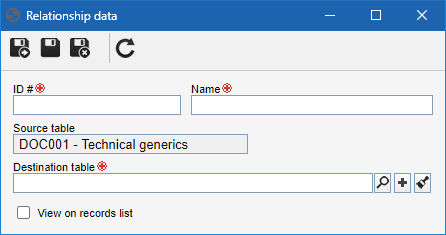
RelationshipThis section will display the relationships of the table. Relationships can be registered both by this section and by the form. Only relationships that have already been released with the table may have their display configuration changed in the list of records. See below how to register a new relationship through this section: 1.
2.Fill in the following fields: ID #: Enter a number or code to identify the relationship in question. Source table: This field will be automatically filled in by the system with the source table, that is, the table that contains the relationship being created. Target table: Select, in this field, the target table, that is, the table that will be related to the table in question. View on records list: Check this field so that the “Destination” table fields are displayed in the listings of the Execution
3.Save the relationship.
Related toThis section will display the relationships in which the table has been listed.
RevisionIn this section, it is possible to enable the revision control of forms belonging to the table in question. To do that, check the "Control form revision" option and fill in the other fields, according to what has been described in the Revision section.
SecurityUse this section to define the table security. If the "Inherit table type security list" option is checked, the system will display the users, departments, positions, or teams and their respective controls on the table in question. However, if this field is unchecked, then the users, departments, positions, or teams that will have access to the table in question must be defined. To do that, click on the |