|
To configure an event, in the main screen toolbar, click on the  button. To edit a record, select it in the list of records and click on the button. To edit a record, select it in the list of records and click on the  button. button.
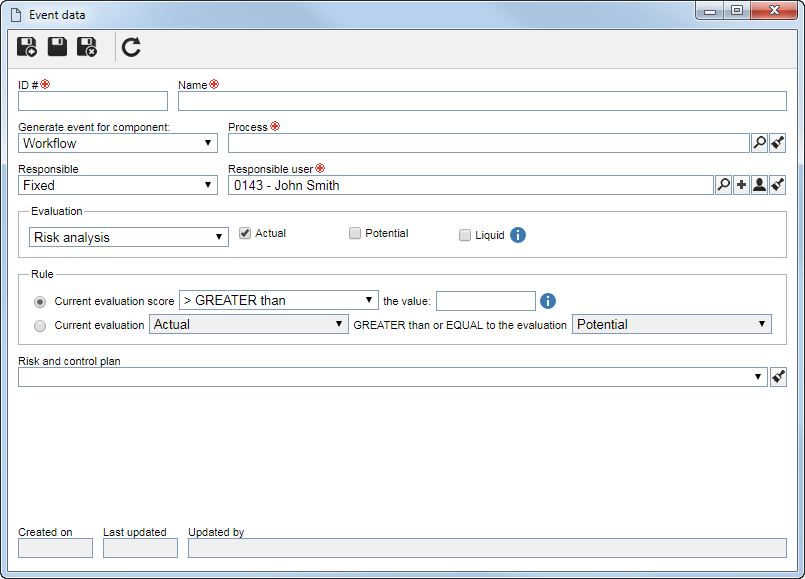
On the data screen that will be displayed, fill out the following fields:
General
|
ID #
|
Enter a number or code to identify the event.
|
Name
|
Enter a name for the event.
|
Generate event for component
|
Select one of the following options to define the component in which the action triggered by the event will be performed:
▪Workflow: The system starts a workflow for the event. In the Process field, which will be displayed, select the process that should be instantiated. In order for the workflow to be successfully started, the process must be automated with SE Risk and other data properly configured in the SE Process component and must not contain errors in its modeling. Note that in order for this feature to function correctly, it is necessary that the SE Workflow component be part of the solutions acquired by your organization. For more details on workflows, see the SE Workflow component manual. ▪Incident: The system will record an incident related to the event. In the Incident type field, which will be displayed, select the type that will classify the incident that will be recorded. In order for this feature to function properly, it is necessary for the SE Incident component to be part of the solutions acquired by your organizations. For more details on incidents, see the SE Incident component manual. ▪Problem: The system will record a problem related to the event. In the Problem type field, that will be displayed, select the type that will sort the problem that will be recorded. In order for this feature to function properly, it is necessary for the SE Problem component to be part of the solutions acquired by your organizations. For more details on problems, see the SE Problem component manual. ▪Alert (e-mail): An email notification will be sent to the party in charge of the event. In order for this feature to work correctly, it is necessary that in the SE Configuration component, the mail server is properly configured and tested, the "Enable system notification" option from the Notification menu is checked and that in the SE Administration component, the e-mails are duly filled on the user data screen that will be notified. |
Responsible
|
Select one of the following options to set the responsible for the event that will be generated:
▪Fixed: The party responsible will be a certain user. To do so, in the Responsible user field, select the desired user. Use the other buttons next to the field to add a new user to the system and set it up as responsible, fill in the field with the logged-on user data and clear it. ▪Risk and control analysis: The responsible party will be the user and team responsible for the risk and/or control analysis that generated the event. Note: If the Workflow, Incident or Problem option is selected in the "Generate event for the component" field, the party responsible for the event will be the starter of the generated workflow/incident/problem. If the "Alert (e-mail)" option is selected, the party responsible in charge of the event will receive the notification of the e-mail.
|
Evaluation
|
Select whether the event is being configured for a Risk Analysis (in this case, check the corresponding options for the evaluations in which the rule should be applied to) or for a Control Analysis. Note that the option names corresponding to the Risk Analysis evaluations will vary depending on the settings you make in the view profile.
|
Rule
|
Select one of the available rules so that when it is met, the configured event is triggered. When selecting the first rule, it is necessary to define in the first field that will be enabled, if the current evaluation score will be greater, greater than or equal to, equal to, less than or equal to or less than the value entered in the second field that will be enabled. When selecting the second rule, it is necessary to define whether the result of the current evaluation selected in the first field must be greater than or equal to the evaluation selected in the second field.
|
Risk and control plan
|
Select the risk plan to associate with the event you created. Associate as many plans as needed. As plans are associated, they will be displayed in the area just below the field. To discard a plan, position the mouse over it and click on the Close option. To discard all plans, click on the  button, located next to the field. button, located next to the field.
|
After setting the necessary configurations, save the record.
▪The system will only verify the validation of the rules in relation to the risk and control plan, once it has been approved, that is, while the plan is in "Draft", the system will not verify the validation of the rules. When the risk and control plan is approved, the event will be generated according to the compliance with the defined rules. ▪With each new risk or control evaluation and when the plan is approved, the system will validate the rules to generate the event or not. |
|