|
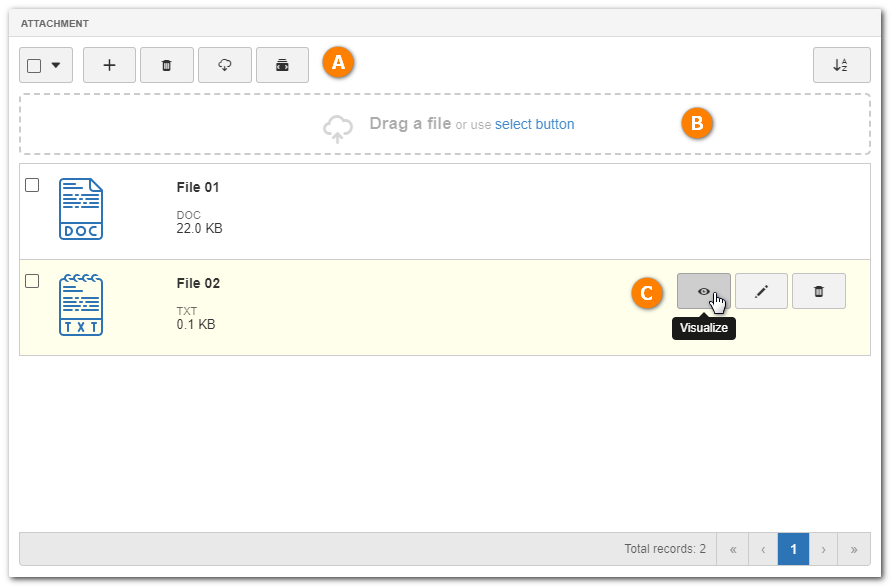
Some data screens allow adding attachments. The section, in which it allows the addition of attachments, is shown as follows:

A
|
The attachments section has buttons that allow you to add, delete and download attachments. The addition of attachments by means of the "add" button is more detailed than the addition through the drag-n-drop resource. See the following details of addition of attachments via this button.
|
B
|
Through the drag-n-drop resource, it is possible to add a file as an attachment just by dragging it to the dotted region. This area also allows you to add attachments through your machine's file explorer.
|
C
|
For each attachment in this section, buttons that allow viewing, editing and deleting will be displayed. Just hover over the attachments and the buttons will be displayed.
|
Detailed addition of attachments
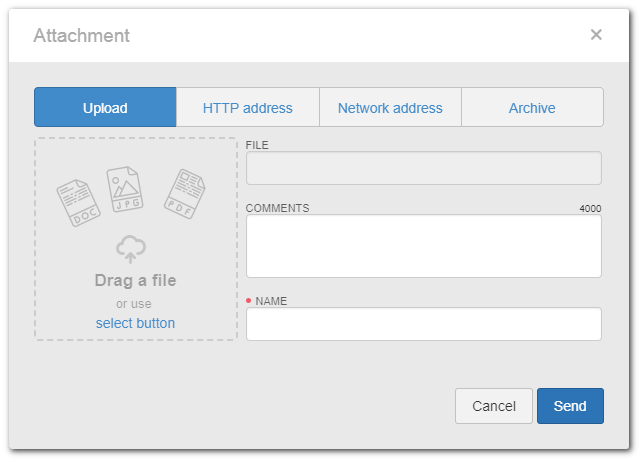
1.To create a new attachment, in more detail, click on the  (A) button. The following screen will be displayed: (A) button. The following screen will be displayed: 
2.Then select, at the top of the screen, the type of attachment that is being created. The information to be filled in varies depending on the type of attachment selected:
If the selected type is Upload, it indicates that the attachment is an electronic file.
File: In this field, it will be displayed the electronic file of the attachment. Drag or select the desired file for the dotted area next to the fields in this section.
Comments: Enter a comment or brief summary about the attachment.
Name: Enter a name for the attachment.
|
If the selected type is HTTP address, it indicates that the attachment is a web page
URL: Enter in this field, the URL used to access the attachment.
Comments: Enter a comment or brief summary about the attachment.
Name: Enter a name for the attachment.
|
If the selected type is Network address, it indicates that the attachment is a file located on the organization network address.
File path: Enter in this field, the path with the file.
Comments: Enter a comment or brief summary about the attachment.
Name: Enter a name for the attachment.
|
If the selected type is Archive, it indicates that the attachment is an object or file on paper.
Comments: Enter a comment or brief summary about the attachment.
Name: Enter a name for the attachment.
|
3.To save the attachment data, click on the Send button. After that, the attachment will be displayed in the list of the Attachment section.
It is important to point out that certain extensions can be blocked for uploading, according to what was set in the parameters of the SE Configuration component.
|
|


