|
To plan an audit plan, in the main screen toolbar, click on the  button. Select the option that will be displayed: button. Select the option that will be displayed:
▪Plan from a template: Select this option to import the configurations of a determined audit template for the audits of the plan in question. Search and select, then, the template that will be copied. ▪Plan from an audit: Select this option to import the configurations of a determined audit for the audits of the plan in question. Search and select, then, the audit that will be copied.
On the screen that will be opened, fill out the fields of the following sections:
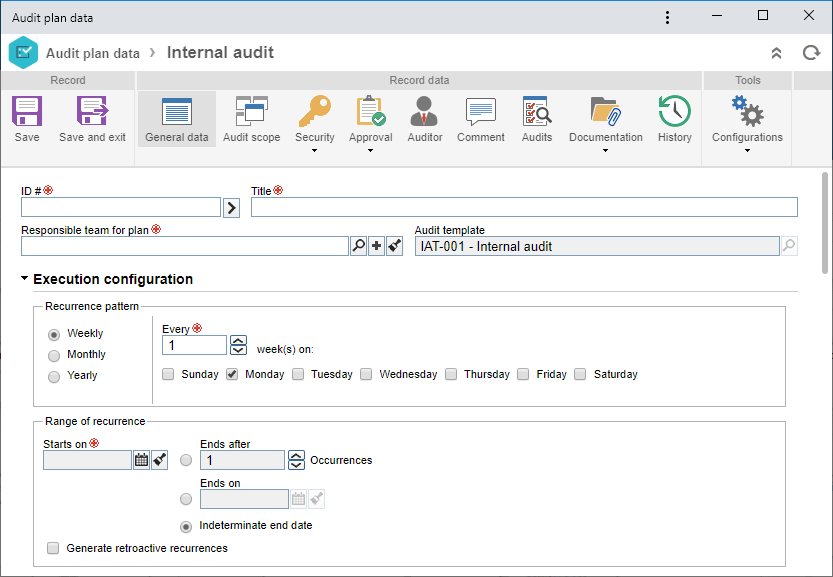
General data
ID #: Enter a number or code to identify the audit plan. If you prefer, use the arrow next to this field to generate an automatic identifier. Do not forget that if in the category of the audit template, the usage of the identification mask has been configured, the corresponding mask will be displayed when the automatic ID # is generated. Remember that the ID # generated through the mask may only be edited if the "Enable generated ID # change" option is checked on the category data screen.
Title: Enter a title for the audit template.
Responsible team for plan: Select the team responsible for tracking the plan.
Audit template: This field will only be displayed if the audit plan has been created from an audit template. In this case, the field will be filled out by the system with the previously selected audit template.
Execution configuration
Fields
|
Recurrence pattern
|
Select the desired frequency for the audit plan recurrence:
▪Weekly: The recurring task will occur every determined number of weeks and on specific days. In the Every ___ week(s) on field, enter the number of desired weeks and, after that, check the days of the week corresponding to the days in which the task will occur. For example: every single week, every Monday, Wednesday, and Friday. ▪Monthly: The audit will occur on a specific day of the month. For that, select one of the following options: oDay __ every __ month(months): Select this option for the audit to occur on a determined day every determined number of months. For example: Day 15 every 1 month. oThe ____ of each __ month(months): Select this option for the audit to occur on a determined day every determined number of months. For example: The last Wednesday of each month. ▪Yearly: The audit will occur on a specific day of the year. For that, select one of the following options: oOn ____: Select this option for the audit to occur on a specific date of the year. For example: On June 29th. oThe ____ of __: Select this option for the audit to occur on a determined day of the month in the year. For example: The last Wednesday of June. |
Range of recurrence
|
In this section, define the period during which the audit recurrence will be applied:
▪Start: This field is filled in by the system with the audit start date; however, it is possible to edit it. In this case, enter the date the audit will be valid from, then, select one of the following options to set the end of recurrence. •Ends after __ occurrences: Recurrences of such audits will be ended when reaching a certain number of occurrences. Then, determine this amount. •Ends on __: Enter a specific date on which the audit will end. •Indeterminate end date: The recurrences of the audits of this plan will not have a specific deadline to be ended. ▪Generate retroactive recurrences: Check this option to make it possible to expedite the retroactive of audits already performed. This feature allows you to create, for example, previously executed audits, outside the system, etc. |
Generate activities in the step of
|
Enter whether the audit activities will be generated in the Planning, Preparation, or Execution step. Then, in the Create before ___ (days) field, enter the number of days in advance that the audit will be generated by the system.
|
Audits
Use this section in the upper part of the data screen to advance the creation of audits for the purpose of generating reports, charts, and studies. To do that, click on the Generate future audits button and fill out the following fields of the screen that will be displayed:
Add ____ audit(s): Select this option to enter the number of audits you wish to add in the audit plan.
Create until: Select this option to enter the deadline for the creation of future audits.
After entering the data of the selected option, click on the Save button. Once done, the future audits will be generated in the list of records.

|
Click on this button to delete the audit selected in the list of records.
|

|
Click on this button to view the audit criterion requirement screen selected in the list of records.
|

|
Click on this button to view the results of the audit selected in the list of records. See more details in the Audit evaluation result section.
|

|
Click on this button to view the data screen of the audit selected in the list of records.
|
This section will ONLY describe the fields referring to the audit plan. The description of the other options is similar to that of the audit planning step, and it can be viewed in the Editing the audit data section.
|
Save the record.
|