Task:
|
Draft, Review, Approval, and Release
|
Who receives it:
|
Users who are associated as responsible through the Participant  Step tab of the item revision data screen; users responsible for the execution of the activity of the process associated in the item type; or users responsible for the execution of the task of the project associated in the item type. Remember that an item may only be revised if the respective control has been configured in its type. Step tab of the item revision data screen; users responsible for the execution of the activity of the process associated in the item type; or users responsible for the execution of the task of the project associated in the item type. Remember that an item may only be revised if the respective control has been configured in its type.
|
When:
|
▪Draft: This is the first step of the revision process. The drafter must view the item data and, if needed, make the necessary changes. This task is generated when a new item is created in the system or a new revision is created through the Management Item revision menu. ▪Review, Approval, and Release: In the steps after the draft step, the changes made to the item by the revision drafter must be viewed. If a participant does not agree with some change made or has comments to enter about the revision, he/she may enter critiques and send them to the drafter. This step is generated when the previous step of the revision is finished, following the order: Review Approval Release, if the configured respective participants exist. |
Purpose:
|
Allow the items saved in the system to be revised, keeping the history of all changes made.
|
How to execute this task:
1.Select the desired item from the list of pending records.
See a quick and easy way of executing the revision of an item in the "Execute the item revision" topic of the SE PDM Quick Guide!
|
2.After that, click on the  button on the toolbar. Fill in the following fields on the data screen that will be displayed: button on the toolbar. Fill in the following fields on the data screen that will be displayed:
Remember that the displayed screen will vary according to the revision type configured in the item type:
▪Revision by process: when clicking on this button, the system will display the Workflow activity execution screen. See how to execute the task in the Revision process section. ▪Revision by project: when clicking on this button, the system will display the revision project task data screen. See how to execute the task in the Revision project section. |
The actions of approving or rejecting a revision step may require some fields to be forcibly filled in according to the configurations set on the general parameters screen in SE PDM.
|
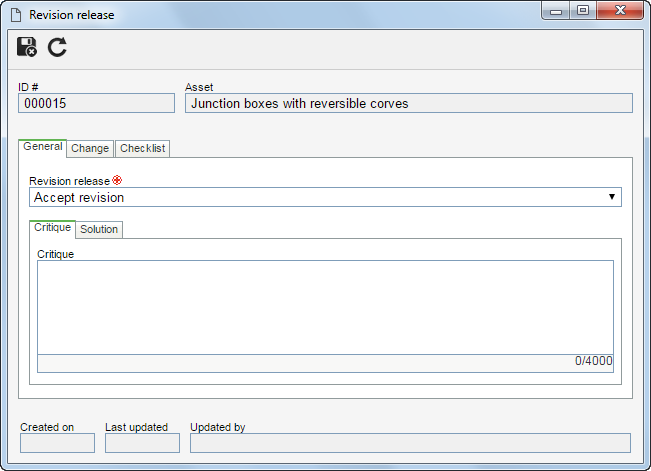
3.The General tab contains general information about the revision release:
Field
|
Revision release
|
Select, in this field, the action that will be performed:
▪Accept revision: Check this field to accept the revision and send the record to the next step. Remember that in the DRAFT task this is the only option available. ▪Send back to draft step: Select this field to return the revision to the draft step. Do not forget to enter, in the following field, the critiques that must be solved by the revision drafter. Remember that this field will not be displayed in the DRAFT task. |
Critique
|
Use this tab to enter the necessary critiques about the revision.
|
Solution
|
If a responsible user returned the revision to the draft step with critiques, the drafter must use this field to enter the solutions. Remember that this field is valid when the revision returns with critiques to the DRAFT step.
|
4.The Change tab contains information about the changes made to the item. If in the General parameters the "Require changes from draft step to be filled out" option is enabled, then the drafter must, obligatorily, enter the changes, even if the changes have already been inserted through revision data screen:
Field
|
Location
|
Location of the record in which the change was made.
|
Change
|
Description of the change made to the record.
|
5.The Checklist tab will only be displayed if the revision route defined in the revision data has a checklist associated with it. This checklist aims to assist the responsible party in the approval or rejection of the record in question. To answer the checklist questions, select, in the "Answer" column in the list of records itself, the desired option (Yes, No, or N/A). The answers may have already been filled in by the system with a default option, defined when creating the checklist. Moreover, filling in the fields in the "Comments" column will be mandatory or not according to the configurations set also when creating the checklist.
6.Click on the  button after filling in the fields on the screen above. From then on, the item goes to the next step of the revision with configured participants. button after filling in the fields on the screen above. From then on, the item goes to the next step of the revision with configured participants.
|