|
To edit a resource, select it from the list of records on the main screen and click on the  button. button.
At this point, the resource data screen will be opened. The upper part will display the user, the asset or the ID # and name of the resource, according to its classification. The following tabs are also available:
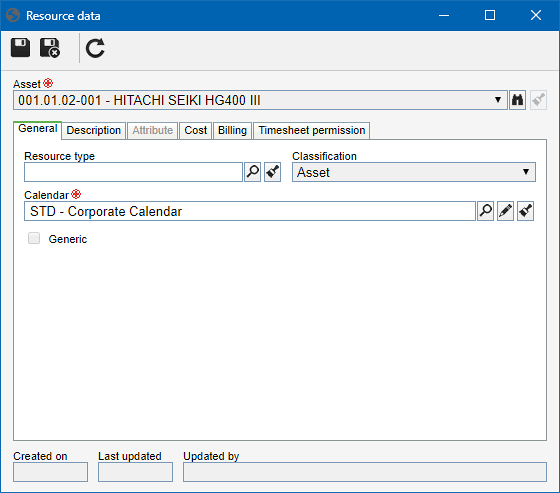
 This image refers to an asset created as a resource. The data screen of a generic resource with the "Asset" classification is similar. |
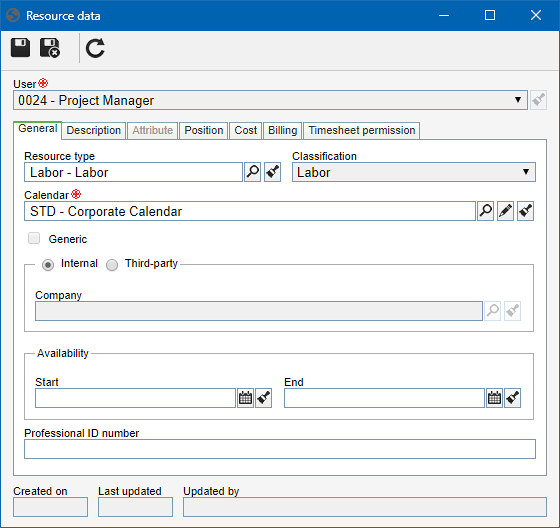
 This image refers to a user created as a resource. The data screen of a generic resource with the "Labor" classification is similar. |
Note: The fields displayed in the General tab will vary according to the classification of the resource. See a detailed description of the fields in this tab in the Creating a resource section. If the resource classification is "Labor", the Position tab will be displayed. This tab will not be available for resources with the "Asset" classification.
Fill out the field in this tab to record important information about the resource.
|
This tab will only be displayed if at least one attribute was associated in the Attribute tab of the resource type. In that case, enter the value of the displayed attributes. Those that are required must, necessarily, have their values filled in. The way to fill out an attribute varies according to the configurations established during its creation.
If the resource type is edited in the "General" tab for any reason, the attributes of the resource will also be edited; if their values were already entered, they will be lost.
|
|
This tab displays the positions held by the resource. On the side toolbar, the following buttons are available:

|
Click on this button to associate a position with the resource. On the screen that opens, locate and select the desired position and save the selection. Use the CTRL and SHIFT keys on the keyboard or check next to each record to select more than one position at a time. Use the buttons on the toolbar to check all listed positions and clear all checked options.
|

|
Click on this button to set the position selected in the list of records as default.
|

|
Click on this button to view the data of the position selected in the list of records.
|

|
Click on this button to disassociate the position selected in the list of records from the resource.
|
|
Use this tab to enter the costs associated with the resource being created. On the side toolbar, the following buttons are available:

|
Click on this button to add a cost to the resource. On the screen that will be opened, select the date from which the cost will become valid. Enter also the values of the standard, overtime, and weekend working rates of the resource. After that, save the record.
|

|
Click on this button to edit the cost selected in the list of records.
|

|
Click on this button to delete the cost selected in the list of records.
|
|
In this tab, enter the gains obtained with the resource being created. On the side toolbar, the following buttons are available:

|
Click on this button to add a billing to the resource. On the screen that will be opened, select the date from which the billing will become valid. Enter also the values of the standard, overtime, and weekend working rates of the resource. After that, save the record.
|

|
Click on this button to edit the billing selected in the list of records.
|

|
Click on this button to delete the billing selected in the list of records.
|
|
This tab displays the parties responsible for entering the time in the activities to which the resource is allocated. On the side toolbar, the following buttons are available:

|
Click on this button to associate the timesheet responsibility with the resource. See further details on the "Associating timesheet responsibility" topic below.
|

|
Click on this button to disassociate the responsible party selected in the list of records from the resource.
|
Associating timesheet responsibility
|
To associate a responsible party, click on the  button on the side toolbar. On the selection screen that will be opened, perform the following steps: button on the side toolbar. On the selection screen that will be opened, perform the following steps:
1.
|
Select one of the following options to define the timesheet responsibility:
Control
|
Team
|
The responsible parties will be the members of a previously created team.
|
Department
|
The responsible parties will be the user of a certain department of the organization.
|
Position
|
The responsible parties will be the users who hold a certain position in the organization.
|
Department/Position
|
The responsible parties will be the users of a certain department of the company who hold a specific position.
|
User
|
The responsible party will be a specific user.
|
All
|
The responsible parties will be all users with access to SE Time Control.
|
|
2.
|
According to the selected control, the Filters will be enabled to be filled out. Use them to easily search for the desired responsible parties.
|
3.
|
 After that, click on the After that, click on the  button on the toolbar in the selection window. Based on the control selected and the values entered in the search fields, the result will be displayed in the list of records, on the lower part of the screen. Select the desired responsible parties. Hold the SHIFT or CTRL keys down or check next to each item to select more than one record at a time. button on the toolbar in the selection window. Based on the control selected and the values entered in the search fields, the result will be displayed in the list of records, on the lower part of the screen. Select the desired responsible parties. Hold the SHIFT or CTRL keys down or check next to each item to select more than one record at a time.
|
4.
|
Once done, save your selection. Repeat the procedure to add all desired responsible parties.
|
|
|
After setting all the necessary configurations, save the record.
|


