Navigation:  Configuration > Classification > Process type >

Configuring a process type

Previous  Top  Next

See how to configure a new process type:


1.1_auxnmb

On the main screen toolbar, click on the new button.


2.

Fill out the following fields on the data screen that will open up:


dados_tipo_processo


ID #: Enter a number/code that identifies process type.

Name: Enter a name for the process type.


3.

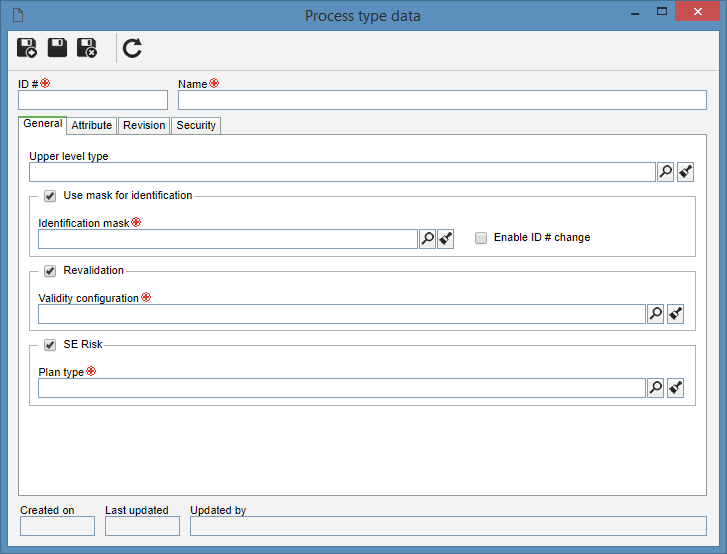
On the General tab, general information about the process type is available:

Upper level type: Select the process type that is one level above the record in main screen hierarchical structure.

Use mask for identification: Select this field to enable mask identification for activities of this type. In that case, fill out the following fields:

Identification mask: Select the desired identification mask among those created through the Configuration arrowrgray Identification mask menu.

Enable ID # change: If this option is selected, it will be possible to manually change the ID # generated by the mask when this type of activity is created. Otherwise, it will not be allowed.

Revalidation: Check this option for processes of this type to have a validity date and go through a revalidation, once its validity expires. For that, in the Validity configuration field, select, among those already created in the system, the validity configuration, that will be applied to the process.

SE Risk: Check this field, so that the processes of the type in question may be used in risk plans of SE Risk. In the Plan type field, enter the risk plan type in which the processes will be associated with.


4.

Save the record after providing all necessary information, but do not close the data screen. At this point, the other tabs will be enabled.


5.1_auxnmb

1_auxnmbUse the Attribute tab to associate the attributes that will complement the processes of this type. Click on the new button on this tab and select the desired attributes.


selecao_atributo


i.1_auxnmb

1_auxnmbOn the upper part of the screen, fill out the search fields that will help retrieve the attributes that will be associated with this kind of process. Click on the search button on the toolbar to search; the respective attributes will be displayed in the list of records on the screen;

ii.

The following information will be available in the columns of the list of records to be filled out. Enter them only if necessary and for the attributes you wish to associate with the process:

Default value: Enter a default value for the attribute, which will be automatically filled out by the system when creating the process in question;

R (Required): If this field is selected when creating a process of this type, it will be mandatory to enter the attribute value.

iii.

To associate attributes, select the desired ones from the list of records and save them. Don't forget to use the CTRL or SHIFT key on the keyboard to select more than one record at a time.


6.

Use the Revision tab to configure the revision control, for the processes classified with this type in question. In the Revision process field select one of the following options:

Simplified: If this option is selected, the processes of this type will have a simplified control of the changes. This control will display the Enable editing button on the process data screen and in the process flowchart. When it is enabled, the Release version and Discard changes buttons which will allow the changes to be published through a new version or discarded will be displayed.

ISO9000 based: If this option is selected, the processes of this type will have their revisions checked through the ISO9000 model. Refer to the Revision section for further details on how to configure the revision control.

Workflow: If this option is selected, the processes of this type will have their revisions checked through a process instantiated in SE Workflow. Refer to the Revision process configuration section for more details about the revision process configuration.


7.

On the Security tab, the security configuration is executed for the task type in question. Refer to the Security section to obtain further details on how to perform this configuration.


8.

Save the record.