Configuring task details |
|
|
See below how to configure the details of a task:
1.In the structure, select the task whose details you wish to configure.
2.Click on the Task details option on the Task tab.
3.At this point, the task data screen will open. The display of some sections/fields may vary if the logged-in user has any restriction configured in the Access
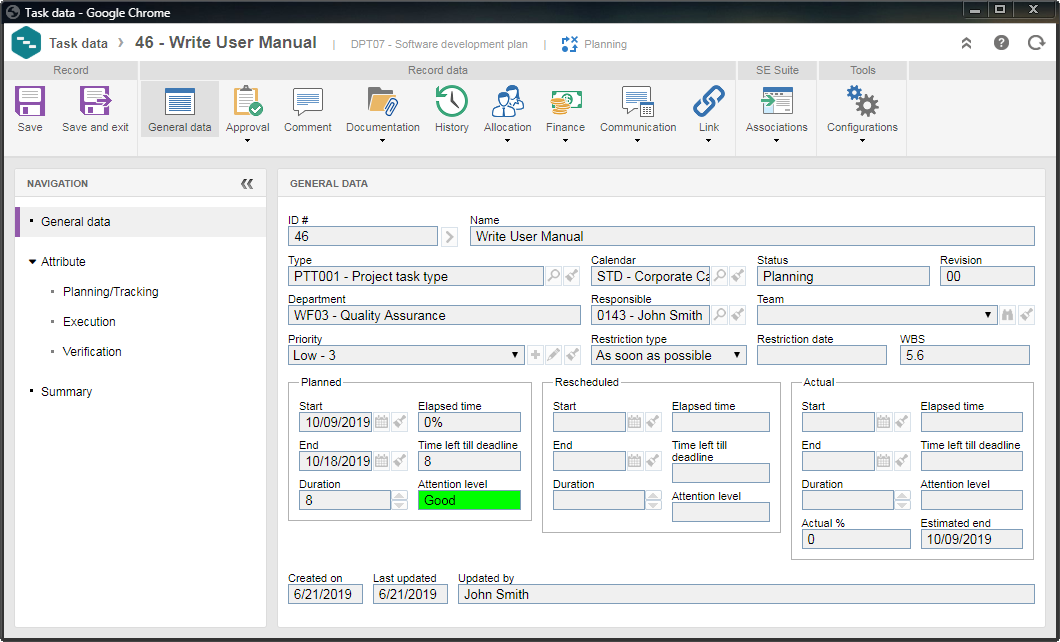
4.In the General data section is displayed the task data entered during its creation, for view only.
5.The General data
6.In the General data
7.The Approval Responsibility route: Select the responsibility route for the approval of the task execution. If the route type defined in the configuration is "Fixed", it is only possible to define another route through this field, but it will not be possible to edit its members. Please note that only the approval responsibility routes are available for selection. Approval type: This field is filled in by the system with the approval type (Incremental or Circular) defined at the time of the responsibility route creation selected previously, however, it is possible to edit it. Cycle: This field is filled in by the system with a sequential number indicating the approval cycle that the task is going through. Each time the task execution is rejected and goes through approval again, the system assigns a number to it. Select the previous cycles to view the members of the responsibility route that performed the approval. Wait for all members approval: This option will be checked/cleared by the system, according to the configuration made at the time of the responsibility route creation selected previously. If this option is checked, the approval will only be released after all route members execute their tasks.
If the route type defined in the project type is "Variable", the following buttons will be available on the side toolbar of the list of records:
8.In the Comment section, it is possible to add comments related to the task being edited. To do that, on the screen that will be opened, enter the desired comment and click on Send. The added comments will be displayed in the timeline of the History section of the task.
9.Use the Documentation section to add the documentation that will complement the task information. For that, the following options are available: ▪Attachment: Add the attachments related to the task. Refer to the Adding attachments section for further details on how to add attachments. ▪Document: Add or associate the documents related to the task. Refer to the Adding documents section for further details on how to add and/or associate documents from SE Document. ▪Requirement: This section displays the requirements added to the task. The requirements must be completed in order to finish the planning of the task successfully. Filling out the Attachment/Document columns of the list of records will vary according to the requirement type: oAttachment: Use the buttons next to the field to: select an attachment already associated with the task to the requirement, add an attachment and associate it directly with the requirement, view the data screen of the selected attachment and clear the value from the field. oDocument: Use the buttons next to this field to: select a document already associated with the task to the requirement, add a document from a file and associate it directly with the requirement, view the data screen of the selected document and clear the field. ▪File form: Track the forms that were associated with the task, through the File form option on the toolbar of SE GanttChart. For that reason, this section is displayed in two lists of records. In the upper list the forms are listed and through the side toolbar, it is possible to view the electronic file, perform verification and view the data of the selected form. In the lower list are displayed the tasks that the selected form in the upper list is associated with. ▪Form: In this section are displayed the forms that were associated with the type that classifies the task, as well, it is possible to associate new forms. In order for this feature to work correctly, it is necessary for the SE Request component to be part of the solutions acquired by your organization. Use the "Read-only" column in the list of records to define whether the form may be edited or will be available in read-only mode. On the side toolbar, the following buttons are available:
10.In the History section, the system displays a timeline with the main events that occurred in the task, up to present. Use the Comment option, located under each event, to add comments related to it. On the field that will be enabled, record the desired comment and press Enter on the keyboard. If desired, it is possible to notify a user on a determined event by mentioning them through "@user". The comment will be displayed on the timeline. The user who wrote the comment may edit it or delete it through the options that will be displayed.
11.The Allocation section displays the following options: ▪Resource: Through this option, it is possible to allocate the resources required to perform the task. At the bottom of the section is displayed the planned, rescheduled and actual Total time. In the Planned field of the Function point analysis (FPA) section, enter the number that equals the FPA that will be used to evaluate/measure the task in question. Through the buttons on the toolbar at the top of this section, it is possible to allocate the desired resources, allocate resources through a calendar, replace resources allocated by other resources, and to delete the allocation of a resource to the task. ▪Actual time: The fields of this option will be filled in during the task execution, when the timesheet is performed in it.
12. In the Finance section, it is possible to add the costs and revenues related to the task and analyze them. To do that, the following subsections are available: ▪Cost: Through this section, it is possible to add the planned costs related to this task and manage other information regarding its costs. For a detailed description of this section, refer to the Finance ▪Revenue: Through this section, it is possible to add the revenues expected to be received from this task and manage other information regarding its revenues. For a detailed description of this section, refer to the Finance ▪Total: In this section, the system presents the costs and revenues estimated for the task, in addition to its gross margin. For a detailed description of the options displayed in this section, refer to the Finance
13.In the Communication section, the following sections are available: ▪History: In this section, it is possible to view the task emails sent to those involved in the project which the task belongs. Click on the ▪Meeting: In this section, it is possible to view all scheduled or recorded meetings related to the project to which the task belongs. Click on the
14.In the Link section, it is possible to view, through the respective sections, the predecessor and successor tasks of the task in question.
15.If the project to which the task belongs has the automation with SE Audit configured, the following sections will be displayed: Audit scope: Use this section to associate the objects/requirements that will compose the audit created from the project. It will only be displayed if the "Audit risk and control plan" option is enabled in the "Scope" tab of the previously selected audit category. Auditor: In this section, those responsible for the audit execution are defined. Interviewee: In this section, the people in the business unit or the supplier to be interviewed in the audit must be associated. Working paper: In this section, it is possible to view the audit structure. Project data: Click on this option to view the data screen of the project to which the task belongs. Audit result: Click on this option to view the result of the audit created from the project to which the task belongs.
16.In the Associations section, it is possible to associate objects from other SE Suite components with the task. See further details in the Associations section.
17.In the Configurations section, it is possible to parameterize several configurations which will be applied to the task in question. See further details in the Configuration section.
18. After performing all necessary configurations and associations, save the record. |