|
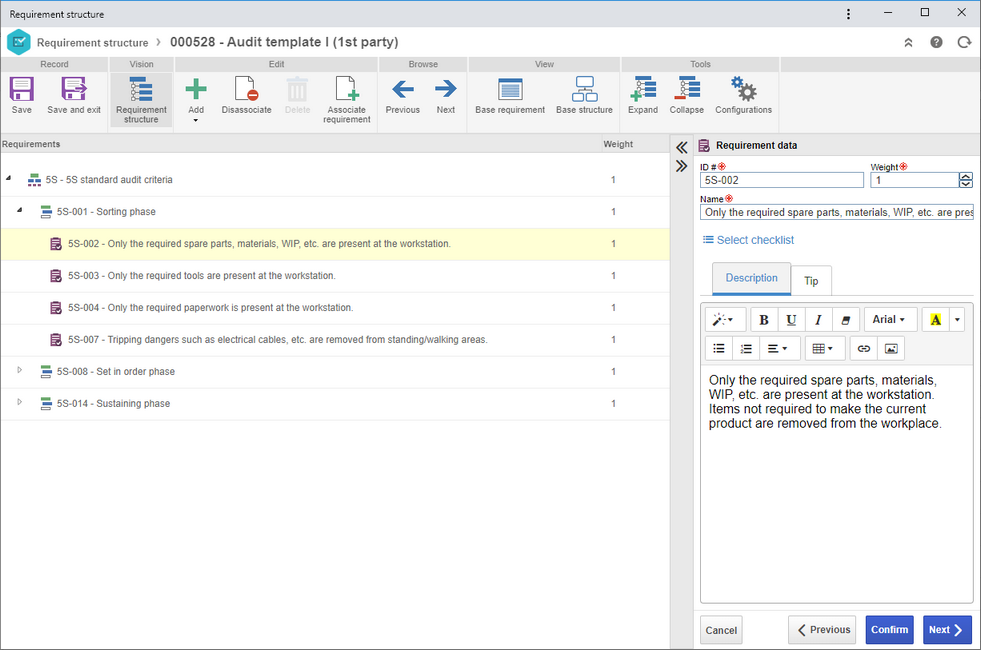
To access the structure screen, on the audit data screen, click on Audit scope  Requirement and on the Requirement and on the  button. The screen may have the following configurations according to the audit type: button. The screen may have the following configurations according to the audit type:
Use the requirement structure screen to perform adjustments such as editing the requirement score and data, adding new requirements, audit tests and verification items, associating existing objects or disassociating unnecessary objects. It is also possible to edit the general configurations for the audit scope.

To edit the data of an object, select it in the requirement structure and, on the panel on the right side, edit the desired information.
The following panels and their respective buttons are available in the upper part of the screen:
Edit
Button
|
Add
|
It is possible to add new objects to the requirement structure:
▪Control tests: It will add a control test to the selected requirement. Tests can only be added to lowest level requirements, that is, those that do not have a requirement in a lower level. It will be necessary to enter the test data in the panel on the right side and enter a configuration for it. ▪Verification items: They are items that may compose a lowest level requirement and help with its evaluation. Their configuration is similar to that of a requirement. ▪Requirements: It will add new requirements to the structure. It will only be possible to associate requirements to other requirements. |
Disassociate
|
It disassociates the reference requirement and the structure that belongs to it.
|
Delete
|
Allows deleting the objects selected in the scope structure. If the object has sub-objects, they will also be deleted.
|
Associate requirement
|
Click on this option to open the requirement association wizard. This wizard allows associating previously recorded requirements to the structure. In the association wizard, locate the base requirement whose structure will be detailed on the left side of the screen. The right side will display all requirements that are already a part of the current structure. Select the desired items and import them to the current requirement structure.
|
Tools
Button
|
Expand/Collapse
|
Allow expanding/collapsing the requirement structure.
|
Configurations
|
In this section, it is possible to edit the rules of each object type that composes the structure of a reference requirement. See further details about this operation in the Reference requirement configurations section.
|
After making the necessary changes, save the record.
|
In the audit scope screen, it is possible to perform adjustments in the scope structure such as adjusting object score, adding control tests and verification items, associating other objects or disassociating those that are not necessary. It is also possible to edit the general configurations for the audit scope.
To edit the weight of the objects, simply click on the record in the scope structure and, on the right side of the screen, in the Score field, enter the desired value of the score for that record. If necessary, it is possible to add, below this field, descriptions regarding the object in question.
The following buttons are available in the upper part of the screen:
Button
|
Add
|
Click on this button to add Control tests and Verification items to the selected risk plan structure, as long as these objects are allowed in the category configuration.
|
Associate
|
Click on this button to associate plans or objects with the scope structure through the association wizard.
|
Disassociate
|
Click on this button to disassociate an object selected in the list of records.
|
Delete
|
Click on this button to delete the object selected in the scope structure. If the object has sub-objects, they will also be deleted.
|
Configurations
|
Click on this option to perform adjustments in the audit scope configuration. The information on this screen in described in Step 3 of the Audit scope definition section.
|
On this screen, it is also possible to view the data of the selected record, view the flowchart of the process (if there is a risk plan with scope in process in the structure) and view the risk plan of the selected object.
After making the necessary changes, save the record.
|
|


