|
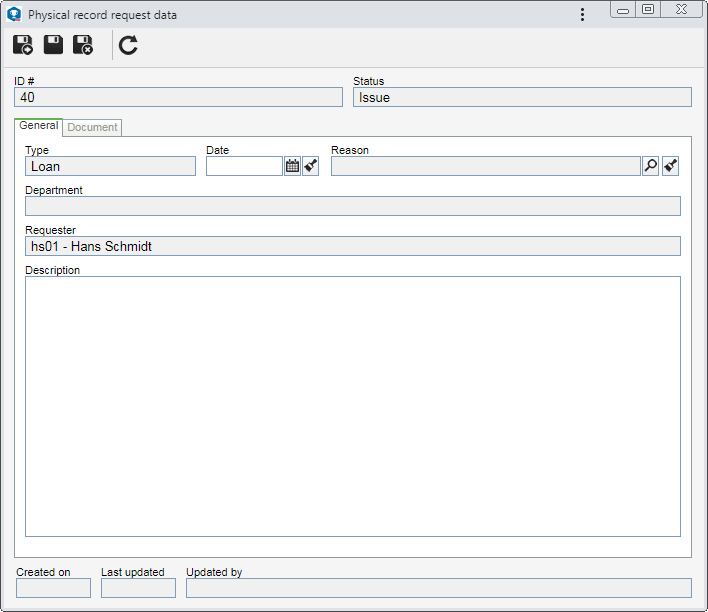
To issue a physical record loan request, click on the  button on the main toolbar. To edit the data of a request, select it in the list of records and click on the button on the main toolbar. To edit the data of a request, select it in the list of records and click on the  button. button.
The ID # of the request and the status in which it is found are displayed on the respective fields of the data screen. The following tabs are also available:

Note: To issue a request, it is necessary to fill out the required fields in the General tab. After saving the data for the first time, the Document tab will be available to be filled out.
Field
|
|
Type
|
Displays the type of the request being issued.
|
Date
|
Displays the date in which the request is being issued, and it is possible to edit it. In this case, select the date of the copy request.
|
Reason
|
Fill out this field to enter a reason for the request. In this case, select the desired reason.
|
Department
|
This field displays the name of the department to which the request issuer belongs, after saving the record for the first time.
|
Requester
|
Displays the data of the user who is issuing the request.
|
Description
|
Fill out this field to record important information about the loan being requested.
|
|
Barcode
|
Use this field to add the documents that must be loaned to the list of records located at the bottom of the screen and associate them with the request. To do this, enter the ID # or barcode of the desired document and click on the "Add" button next to the field. The barcode can also be entered through a barcode reader. Only add documents that have already been archived. Repeat the procedure to add as many documents as necessary. The barcode of a document is generated in the SE Document component through the "Documents label" report.
Another way of adding documents is through the "Associate" button on the side toolbar, described below.
|
The list of records displays the data of the documents associated with the request. If the "Return original document in" field is filled out in the Control tab  Physical file section of the category of the document to be loaned, the field in the Return deadline column will be filled out by the system with the date that meets the number of days of the loan from the current date, and it is possible to edit it through the "Edit" button described below. Physical file section of the category of the document to be loaned, the field in the Return deadline column will be filled out by the system with the date that meets the number of days of the loan from the current date, and it is possible to edit it through the "Edit" button described below.
On the side toolbar, the following buttons are available:

|
Click on this button to edit the return date of the document selected in the list of records. On the screen that will be opened, select the desired date and save the record.
|

|
Click on this button to associate the documents that must be loaned with the request. On the screen that will be displayed, select the desired documents. Save the selection after that. The system will only display the documents that have already been archived. To select more than one record at a time, use SHIFT or CTRL on the keyboard, or the checkbox next to each record.
|

|
Click on this button to disassociate the document selected in the list of records from the request.
|

|
Click on this button to view the electronic file of the document selected in the list of records.
|

|
Click on this button to view the data screen of the document selected in the list of records. View specific documentation of the SE Document component for further details on the data screen of a document.
|
|
This tab will only be available when approving and recording the physical record copy request.
|
Use the Save and new, Save and Save and exit buttons to save the request data without sending it for approval. If you wish to send the request for approval without leaving the data screen, click on the  button on the toolbar. button on the toolbar.
|


