|
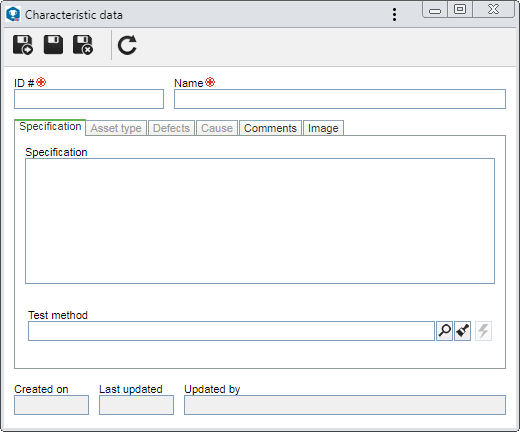
To add a new characteristic of the "Attribute" type, on the main screen toolbar, click on the arrow located next to the  button and select the Attribute option. To edit the data of a characteristic, select it in the list of records and click on the button and select the Attribute option. To edit the data of a characteristic, select it in the list of records and click on the  button. button.
On the screen that will be opened, enter an ID # and a name for the characteristic.

Save the record. At this point, the following tabs will be available to be configured:
Fields
|
Specification
|
Fill out this field to enter the particularities of the characteristic.
|
Test method
|
The completion of this field will vary according to the "Integration with SE Document" option in the Integration tab of the general parameters of SE SPC. If it is:
▪Checked: It will be possible to select documents from SE Document. For this resource to work correctly, the SE Document component must be part of the solutions acquired by your organization. On the screen that will be opened, locate and select the desired document and save the selection. Use the other buttons next to the field to clear it and view the electronic file of the selected document. ▪Unchecked: It will be possible to select documents from SE PDM. In order for this feature to function correctly, it is necessary for the SE PDM component to be part of the solutions acquired by your organization. In this case, select the desired document. The documents that will be available for selection will be those created through the File  Document menu. Use the other buttons next to the field to add a new document and associate it as a test method, edit the data of the selected document, clear the field and view the electronic file/url of the selected document. Document menu. Use the other buttons next to the field to add a new document and associate it as a test method, edit the data of the selected document, clear the field and view the electronic file/url of the selected document. |
|
In this tab, it is possible to list the types of the assets that may be used to validate the characteristic. In order for this feature to function correctly, it is necessary that the SE Asset component is part of the solutions acquired by your organization. On the sidebar, the following buttons are available:

|
Click on this button to associate an asset type with the characteristic. On the screen that opens, locate and select the desired type in the hierarchy and save the selection.
|

|
Click on this button to disassociate the asset type selected in the list of records from the characteristic.
|
In practical terms:
Considering the characteristic being added is "Weight", a scale will be necessary to validate it. Use this tab to select a previously configured "Scale" asset type, so that when performing a collection in SE SPC, for example, all scales added to the type are displayed.
|
|
In this tab, it is possible to list the defects that may be displayed in the characteristic. On the side toolbar, the following buttons are available:

|
Click on this button to associate a defect with the characteristic. On the screen that will be opened, locate and select the desired defect and save the selection. Use the CTRL and SHIFT keys on the keyboard or check next to each record to select more than one defect at a time.
|

|
Click on this button to disassociate the defect selected in the list of records from the characteristic.
|

|
Click on this button to view the data of the defect selected in the list of records.
|
|
In this tab, it is possible to list the causes of the defects that may be displayed in the characteristic. On the side toolbar, the following buttons are available:

|
Click on this button to associate a cause with the characteristic. On the screen that will be opened, locate and select the desired cause and save the selection. Use the CTRL and SHIFT keys on the keyboard or check next to each record to select more than one cause at a time.
|

|
Click on this button to disassociate the cause selected in the list of records from the characteristic.
|

|
Click on this button to view the data of the cause selected in the list of records.
|
|
In this tab, it is possible to record important information about the characteristic.
|
Use this tab to associate an image related to the characteristic. To do that, click on the  button next to the Image field. On the screen that will be opened, browse the files saved in the computer and select the desired image file. Use the other buttons next to the field to delete or view the selected electronic file. At the bottom of this tab, it is possible to preview the selected file. button next to the Image field. On the screen that will be opened, browse the files saved in the computer and select the desired image file. Use the other buttons next to the field to delete or view the selected electronic file. At the bottom of this tab, it is possible to preview the selected file.
|
After performing all necessary configurations, save the record again.
|


