|
See how to execute a project task:
1.
|
 To start the execution of a task, first locate and select the desired task in the list of records. The tasks with the "To be started" status can be identified with the To start the execution of a task, first locate and select the desired task in the list of records. The tasks with the "To be started" status can be identified with the  icon in the S column. icon in the S column.
|
2.
|
After that, click on the arrow located next to the  button and select the Task data option. button and select the Task data option.
The execution of a task through SE GanttChart will not be approached in this section. For further details about the execution of a task through SE GanttChart, refer to the Task section.
|
|
3.
|
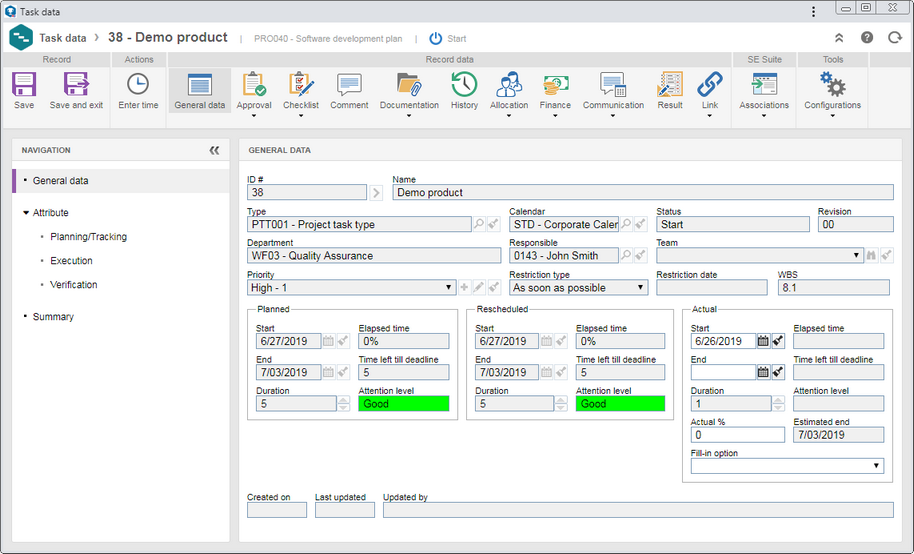
At this point, the task data screen will be displayed. In the General data section, fill out the following fields in the Actual section:

Field
|
Start
|
Enter the start date of the task. It is vital that this date is true so that the project may receive studies of variations and deviations from the plan. If the "Allow entering retroactive dates in the execution of tasks" option is checked in the general parameters, it will be possible to enter a date prior to the current date. Otherwise, the system will not enter a date before the current date. Note that the system does not allow entering a date after the current date.
|
Actual %
|
Enter the actual percentage of the task so far. The system only considers the task as started when an execution percentage between 1% and 99% is entered, because when a task is saved with 0% its status is not changed to "In progress", and when 100% is entered, the "End" field is filled in with the current date, considering the task as finished. If the "Allow entering retroactive percentage in the execution of tasks" option is checked in the general parameters, during the progress of the task, the executors will be able to edit the percentage entered in this field for a smaller percentage. If this option is not checked, the tasks executors will not be able to rewind the percentage entered in this field.
|
Duration
|
This field is filled out by the system with the number of days needed to finish the task.
|
Elapsed time
|
This field will display, in percentage, the result of the division of the difference between the time left till deadline by the difference between the start and end dates, multiplied by 100.
|
Time left till deadline
|
This field is filled out by the system with the difference between the current date and the actual start date.
|
Attention level
|
This field displays an indicator based on the elapsed time and takes into account the settings of the indicator (stabilize or minimize) performed in the general parameters.
|
Estimated end
|
This field displays the estimated end date, obtained from the counting of the duration days from the entered actual start date.
|
The "Elapsed time", "Time left till deadline", and "Attention level" options will only be displayed if the project status is the same as set in the general parameters.
|
▪If the task whose execution is being initiated has execution attributes configured as required or associated file forms, it will be required to complete the value of the attributes and the verification of the file forms to successfully start the execution of the task. ▪If the task has an asset allocated as a resource, and it is being used, or for some other reason it is unavailable, the system will issue a message informing you of the event and question whether you wish to continue executing anyway. |
|
4.
|
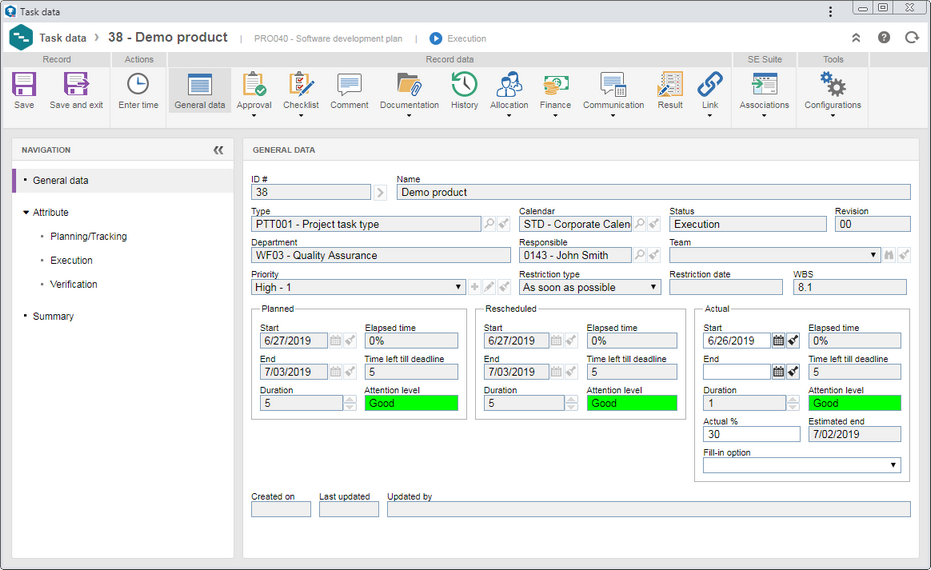
Save the record after that. At this point, the task status will change to "Execution".
▪This operation may also be performed through the Task execution task. ▪Refer to the Editing task in progress section for a detailed description of the fields and sections that may be available to be filled in during the execution of the task. |
|
1.
|
 To end the execution of a task, first locate and select it in the list of records. The tasks with the "Execution" status can be identified with the To end the execution of a task, first locate and select it in the list of records. The tasks with the "Execution" status can be identified with the  icon in the S column. icon in the S column.
|
2.
|
After that, click on the arrow located next to the  button and select the Task data option. button and select the Task data option.
The closure of a task through SE GanttChart will not be approached in this section. For further details about the execution of a task through SE GanttChart, refer to the Task section.
|
|
3.
|
At this point, the task data screen will be displayed. In the General data section, fill out the following fields in the Actual section:

Field
|
End
|
Enter the actual date of the end of the task execution. If the "Allow entering retroactive dates in the execution of tasks" option is checked in the general parameters, it will be possible to enter a date prior to the current date. Otherwise, the system will not enter a date before the current date. Note that the system does not allow entering a date after the current date or before the start date.
|
Set actual duration as zero
|
This field will only be displayed when the task being finished is a milestone. Check this option to set its duration as zero, i.e., the task will not be considered in the project duration.
|
Actual %
|
Fill out this field with 100% to indicate that the task was finished. When filling out this field with 100%, the End field will be automatically filled in by the system with the current date.
|
Fill-in option
|
Select the corresponding option to use the planned or the rescheduled dates as the execution date (actual) of the task. In that case, the Start and End fields will be filled out with the planned/rescheduled start and end dates, and they will not be available for editing. Note that the Actual % field will be filled out with the value of 100%.
|
It is important to note that to execute the task successfully, all the required fields of the task (execution checklist, requirements, etc.) must be duly completed. When a required field is not filled in, the system will issue an alert informing of the error. Refer to the Editing task in progress section for a detailed description of the fields and sections that may be available for completion during the task execution.
|
|
4.
|
Save the record after that. The system will issue an alert informing the task will be finished, meaning it is no longer possible to edit or add values to it and ask whether you wish to send it to the next step. Choose the desired option:
Field
|
OK
|
The task will be sent to one of the following steps:
▪Task verification: If, when including the task, the Task verification option is selected, the task will be sent to Verification by its responsible party. ▪Execution approval: If the Execution approval option is checked in the task type, the system will generate the Task execution approval task for the due responsible parties to perform this operation. ▪Closure: If the task does not have the verification step nor the execution approval configured, it will be closed. |
Cancel
|
The task will remain pending with the "Execution" status. It is also possible to close it by selecting the task in the list of records and then clicking on the  toolbar button on the main screen. toolbar button on the main screen.
|
|
1.
|
To start or finish the execution of several tasks at once, first locate and select the desired tasks in the list of records. Use the CTRL and SHIFT keys to select the desired tasks in the list of records.
|
2.
|
 After that, click on the arrow located next to the After that, click on the arrow located next to the  button and select the Task data option. button and select the Task data option.
Note that the SE GanttChart option will not be available when more than one task is selected.
|
|
3.
|
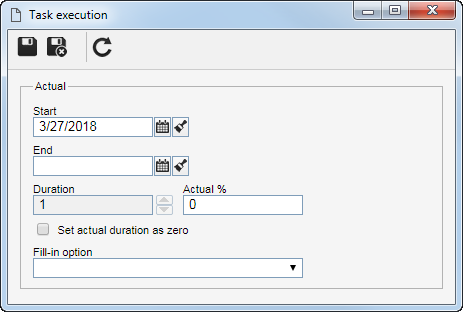
At this point, the system will display the task execution screen of multiple tasks.

|
4.
|
To start the execution of the tasks, fill in the following fields:
Start: Enter the start date of the task. It is vital that this date is true so that the project to which the tasks belong can receive studies of variations and deviations from the planning. If the "Allow entering retroactive dates in the execution of tasks" option is checked in the general parameters, it will be possible to enter a date prior to the current date. Otherwise, the system will not enter a date before the current date. Note that the system does not allow entering a date after the current date.
Actual %: Enter the percentage of the task performed so far. The system only considers the task as started when an execution percentage between 1% and 99% is entered, because when a task is saved with 0% its status is not changed to "In progress", and when 100% is entered, the "End" field is filled in with the current date, considering the task as finished. If the "Allow entering retroactive percentage in the execution of tasks" option is checked in the general parameters, during the progress of the task, the executors will be able to edit the percentage entered in this field to a smaller percentage. If this option is not checked, the tasks executors will not be able to rewind the percentage entered in this field.
|
5.
|
Save the record after that. The task status will become "Execution".
Refer to the Editing task in progress section for a detailed description of the fields and sections that may be available to be filled in during the execution of the task.
|
|
6.
|
To finish the execution of the tasks, fill out the following fields:
Field
|
End
|
Enter the actual date of the end of the task execution. Note that the system does not allow entering a date after the current date. When filling this field out, the Actual % field will be automatically filled out by the system with 100%.
|
Set actual duration as zero
|
This field is only available when the tasks that are being closed are milestones. Check this option to set its duration as zero, i.e., the task will not be considered in the project duration.
|
Actual %
|
Fill out this field in with 100% to indicate that the tasks were finished. When filling out this field with 100%, the End field will be automatically filled in by the system with the current date.
|
Fill-in option
|
Select the corresponding option to use the planned or the rescheduled dates as the execution date (actual) of the tasks. In that case, the Start and End fields will be filled out with the planned/rescheduled start and end dates, and they will not be available for editing. Note that the Actual % field will be filled out with the value of 100%.
|
|
7.
|
Save the record. The system will issue an alert stating that the task will be finished, meaning it is no longer possible to edit or add values to them, and ask whether to send them to the next step. Choose the desired option:
OK: The tasks will be sent to one of the following steps:
▪Task verification: If, when including the task, the Task verification option is selected, the tasks will be sent to Verification by their responsible party. ▪Execution approval: If the Execution approval option is checked in the task type, the system will generate the Task execution approval task for the due responsible parties to perform this operation. ▪Closure: If the tasks do not have the verification step nor the execution approval configured, they will be closed. Cancel: The tasks will remain pending with the "Execution" status.
|
|


