|
To add a new REST data source, click on the  button on the main screen toolbar. To edit a data source, select it in the list of records and click on the button on the main screen toolbar. To edit a data source, select it in the list of records and click on the  button. button.
Adding and editing a REST data source can be performed through a wizard. In it, the following steps are available:
If the REST data source can also be configured to use the REST web service API in SE Suite. For each REST interface made available by SE Suite, it is necessary to configure a REST data source. For example: to use the RIS_RISK_INTERFACE, it is necessary to create a REST data source that will be used to make the connection and will have the necessary parameters for this interface. If, in addition to this interface, you wish to use the RIS_CONTROL_INTERFACE interface, it will be necessary to create another data source.
|
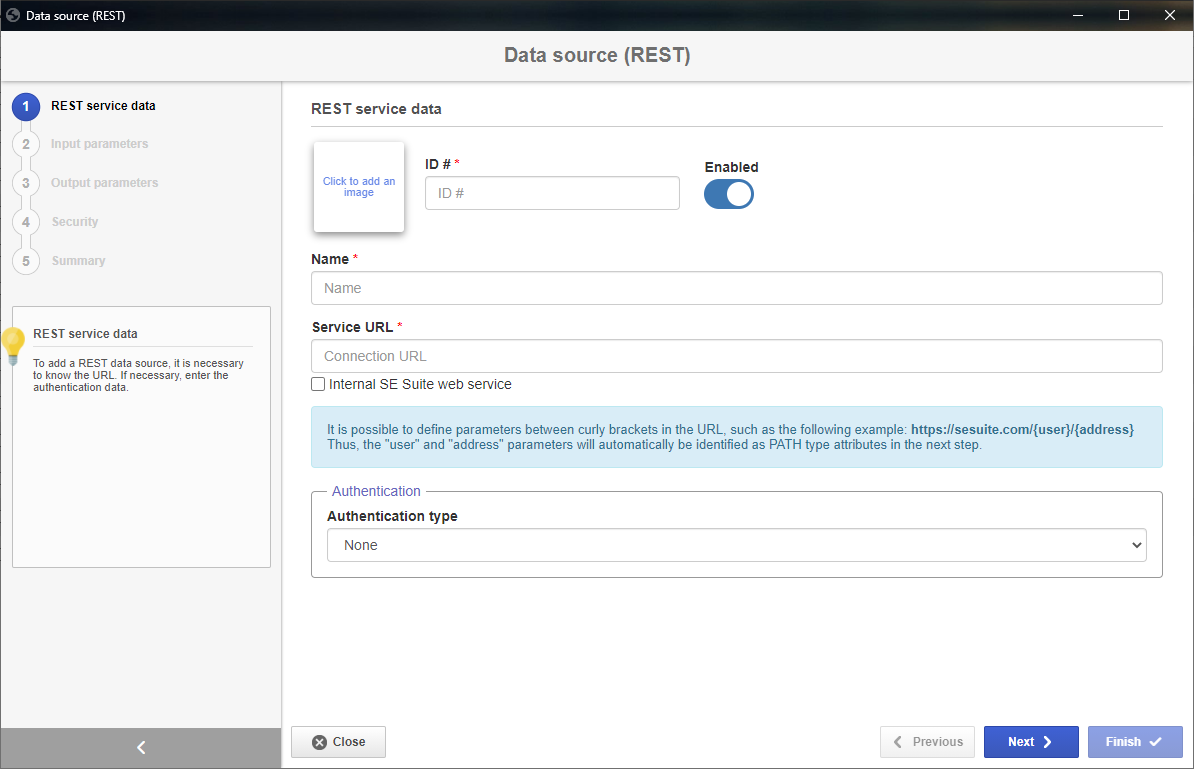
REST service data
|
REST service data
|
Click to add an image
|
Click on this frame to add an image to represent the REST data source.
|
ID #
|
Enter a number or code to identify the REST data source. The ID # must have letters and may have a number, but it cannot start with a number.
|
Enabled
|
Use this option to enable/disable the data source.
|
Name
|
Enter a name for the REST data source.
|
Service URL
|
Enter the REST Web Service URL that will be used to perform the integration. If the service is to use PATH type parameters, they must be entered in the URL itself (simply add an endpoint, such as: https://exampleservice.com/user/{path}). Note that the PATH parameter that is entered in the URL will be added by the system in the Input parameter step, and it must have a value during the consumption for the operation to be successfully performed.
|
Option
|
Checked
|
Unchecked
|
Internal SE Suite web service
|
Allows selecting an internal Web Service made available by SE Suite. Thus, it will not be necessary to create a new source if the domain configurations of the environment are edited.
|
It will not be possible to select an SE Suite internal Web Service.
|
Authentication
|
None
|
Select this option if the service does not require authentication.
|
Basic authentication
|
Select this option if the service requires only the user login and password. In this case, the fields to enter the user and password to be used for this operation will be displayed.
|
Internal authentication
|
Select this option if it is an internal service. In this case, the authentication takes into consideration the SE Suite user that is logged on during the consumption.
|
OAuth Authentication (client credentials)
|
Select this option if the service uses OAuth Authentication with the client credentials flow. In this case, the fields to enter the Client ID, Client Secret and Scope will be displayed. This information comes from the service that will be consumed.
The resource to obtain the service token must be in accordance with the standards specified by OKTA. Click here for more information. Refer to the Service example section for an example of creating a data source with OAuth authentication.
|
API key
|
Select this option if it is an internal service. In this case, the API key field will be displayed, in which it will be necessary to enter the user token that will be used for the operation.
The token that will be used can be generated through the API Gateway section in the user data screen, when accessed through the user panel.
For more information on this authentication type, refer to the Integration guide.
|
When configuring a REST interface made available by SE Suite:
▪the service URL can be obtained in the Integration guide. ▪to use the logged user, it is possible to select the "Internal authentication" option. to define a specific user, it is possible to select the "API key" option. |
Use the Next button at the bottom of the wizard to access the next step in which it is located.
|
Input parameters
|
In this step, perform the necessary parameterizations for the consumption of the REST service:
1.
|
In the Method field, select the HTTP method that will be used to perform the service request:
|
GET
|
Performs the data recovery operation of the added service.
|
POST
|
Performs the upload operation of the added service.
|
PUT
|
Performs the service update operation of the added service.
|
DELETE
|
Performs the data removal operation of the added service.
|
|
2.
|
Then, fill out the following fields that will be displayed:
|
ID #
|
Enter the ID # of the parameter to be added.
|
Constant value
|
This field must be filled in if the parameter has a fixed value. Therefore, when the service is executed, the parameter will always have the constant value set.
|
Parameter
|
Select one of the following options to set the parameter type:
▪QUERY: Indicates that the parameter will be a Query string. ▪HEADER: Indicates that the parameter will be a Header required for the request. ▪PATH: This option is not available for selection. It will be displayed, already selected, when the parameter listed is an endpoint in the Service URL reported in the previous step. |
Type
|
Select one of the following options to define the data type that will be used when entering the value of the parameter:
▪STRING: The parameter value will be of the text type. ▪NUMERIC: The parameter value will be of the numeric type. ▪DECIMAL: The parameter value will be of the numeric type with decimal places. ▪BOOLEAN: The parameter value will be of the logic type: true or false. ▪DATE: The parameter value will be of the date type. By selecting this option, the Date mask field will be displayed. In it, select the date format in which the parameter value must be entered. See next an example of its use. |
|
3.
|
If the previously selected method is POST or PUT, a field will be displayed where an example should be added to the request body in JSON format. The example body will be used by SE Suite to map the attributes that will be sent by the request. Here is an example of a request body that may be entered in the displayed field:
It is also possible to send examples with date type:
The date parameter must be using the formatting value correctly. Here are some examples of date formats:
Format
|
Description
|
Example
|
MM/dd/yyyy
|
American date pattern
|
06/22/2024
|
dd/MM/yyyy
|
European date pattern
|
15/03/2024
|
HH:mm:ss
|
Hours, minutes and seconds
|
18:37:05
|
KK:mm:ss a
|
Hours, minutes and seconds (AM/PM)
|
07:44:23 PM
|
dd/MM/yyyy HH:mm:ss
|
Date, hours, minutes and seconds
|
26/12/2024 12:30:55
|
dd/MM/yyyy KK:mm:ss a
|
Date, hours, minutes and seconds (AM/PM)
|
12/07/2024 11:50:02 AM
|
EE MMM dd hh:mm:ss Z yyyy
|
Descriptive date, day, time (AM/PM), time zone and year
|
Tue Aug 16 12:00:00 BRT 2024
|
|
4.
|
To add another parameter, simply click on the Add button again and repeat the procedure described above. To delete a parameter, click on the Remove button next to the desired parameter.
|
When configuring a REST interface made available by SE Suite:
▪the POST method must be selected. ▪the request body can be obtained in the Integration guide. |
Use the Next button at the bottom of the wizard to access the next step in which it is located.
|
Output parameters
|
In this step, it is possible to enter an example of the response body that will be returned through the JSON format. This example will be used by SE Suite to map the attributes that will be obtained in service response. Refer to step 3 of the description of the Input parameters step for examples of the response body that may be entered in this step.
▪When entering the request/response body in the "Input parameters" and "Output parameters" sections, there may be issues that keep you from moving on to the next step. View the Troubleshooting section to view the possible problems and their solutions. ▪When configuring a REST interface made available by SE Suite, the response body can be obtained in the Integration guide. |
Use the Next button at the bottom of the wizard to access the next step in which it is located.
|
Security
|
On this step, it is possible to define the security list for the REST data source. Enable the desired option:
Private
|
Public
|
If this option is enabled, only the users defined in this tab will be able to edit or view the REST data source. To do that, use the following columns:
▪Edit: Define which users, teams, departments and/or positions will have permission to edit the data source. ▪View: Define which users, teams, departments and/or positions will have permission to view the data source. |
If this option is enabled, all system users will be able to view the REST data source, but only the users defined in the respective column will be able to edit it.
Therefore, the View column will be disabled (since the data source can be viewed by any user).
In the Edit column, define which users, teams, departments and/or positions will have permission to edit the data source data.
|
To add a user/team/department/position to the security list, simply type the desired name in the available field and select the corresponding option in the list that will be displayed or press "Enter" on the keyboard.
To delete a user/team/department/position from the security list, click on the  button next to the desired record. button next to the desired record.
|
Use the Next button at the bottom of the wizard to access the next step in which it is located.
|
Summary
|
In this step, an overview of the REST data source configurations is displayed. Use the Consumption test button to test the service being recorded. See further details about this operation in the "Testing a service" section below.
Sections
|
Input parameters
|
Displays the information regarding the parameters identified in the "Input parameters" step.
|
Request
|
Displays the request attributes defines in the "Input parameters" step if the defined method is POST or PUT. See how to identify the attributes in the "Supported data type" topic below.
|
Return
|
Displays the response body attributes defined in the "Output parameters" step. See how to identify the attributes in the "Supported data type" topic below.
|
To test the configured service, click on the Consumption test button. On the screen that will be opened, the information must be filled out according to the specifications of the service being consumed. Among the parameters available in the consumption test, the following information can be filled out:
Parameters
|
Path
|
Parameters of the PATH type defined in the service URL.
|
Query
|
Parameters of the QUERY type defined in the "Input parameters" step.
|
Header
|
Parameters of the HEADER type defined in the "Input parameters" step.
|
Request body
|
Parameters of the request body used to consume the services.
|
To consume the service, click on the Execute button on the bottom part of the screen. Two response types may be displayed:
Response - Consumption test
|
Success
|
The consumption has been successfully performed. In this case, it will be possible to view a JSON with the service return via SE Suite.
|
Something went wrong
|
There was a problem during the consumption of the service. View the Troubleshooting section to view the possible responses and their meanings.
|
|
Icon
|
Data type
|

|
BOOLEAN
|

|
NUMERIC
|

|
DECIMAL
|

|
TEXT
|

|
DATE
|

|
ARRAY
|

|
OBJECT
|
|
Click on the Finish button to close the configuration of the Web Service data source. Thus, the wizard screen will be closed. Refer to the Service example section for an example of data source record with GET and POST methods and of example services that may be successfully consumed.
|
▪Use the Previous button at the bottom of the screen to return to a previous step of the REST data source configuration to make the necessary edits. ▪Use the Close button at the bottom of the screen to exit the REST data source configuration wizard. Note that all the data entered up to then will be lost. To perform this operation effectively, it is necessary to confirm the question asked by the system. |
|