|
To add a new Web Service data source, click on the  button on the main screen toolbar. To edit a data source, select it in the list of records and click on the button on the main screen toolbar. To edit a data source, select it in the list of records and click on the  button. button.
Adding and editing a Web Service data source can be performed through a wizard. In it, the following steps are available:

If the data source was added from a WSDL file, after performing the file import, the wizard will be displayed for configuring the details.
|
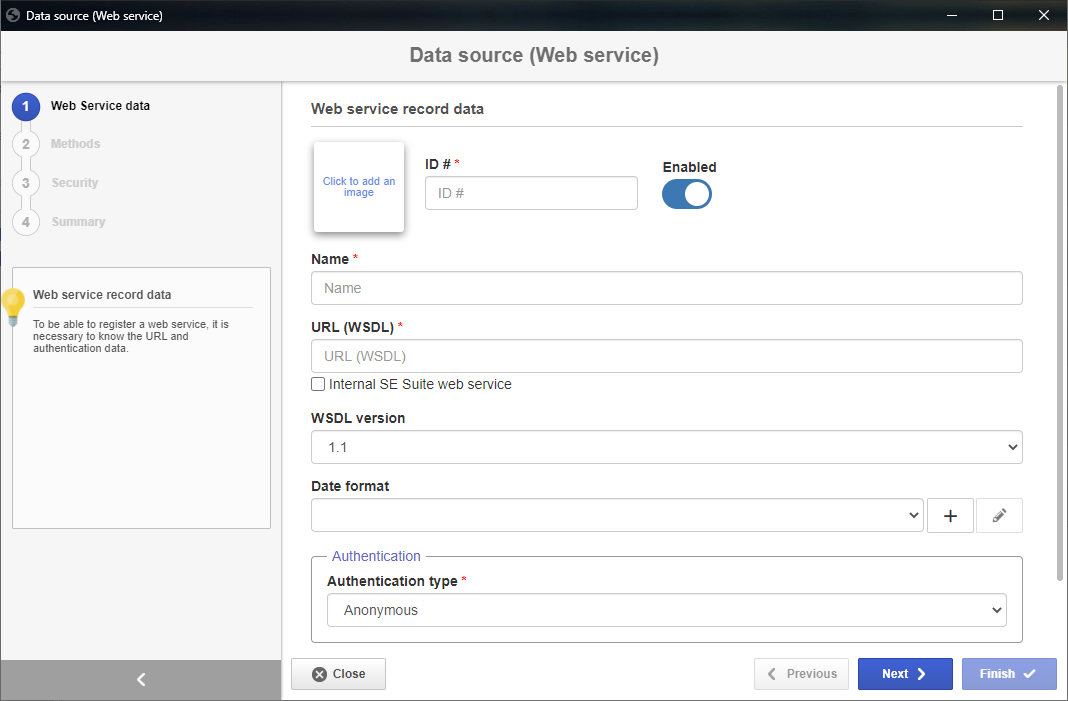
Web Service data
|
Web Service record data
|
Click to add an image
|
Click on this frame to add an image to represent the data source.
|
ID #
|
Enter a number or code to identify the Web Service.
|
Enabled
|
Use this option to enable/disable the Web Service without deleting it.
|
Name
|
Enter a name for the Web Service.
|
URL (WSDL)
|
Enter the WSDL address (Web Services Description Language) address of the service that will be used, that is, the URL that has the methods that will be implemented in the position executed by service/Web Service.
|
Internal SE Suite web service
|
Check this option to select an internal Web Service made available by SE Suite. Thus, it will not be necessary to create a new source if the domain configurations of the environment are edited. The "WSDL version" and "Connection URL" fields will not be available since this information will be defined internally.
|
WSDL version
|
Select the version of WSDL that will be used in the Web Service. This field will not be available if the "Internal SE Suite web service" option has been previously checked.
|
Date format
|
Select the format that will be used by the Web Service to perform the date format. To add a new date format, click on the  button next to the field and on the screen that opens, enter an ID # and the desired format. Use the Enabled/Disabled option to enable/disable the format. Use the other buttons next to the field to edit the selected format and clear the field. button next to the field and on the screen that opens, enter an ID # and the desired format. Use the Enabled/Disabled option to enable/disable the format. Use the other buttons next to the field to edit the selected format and clear the field.
|
Authentication
|
In the Authentication type field, select one of the following options:
▪Anonymous: There will be no need for authentication. ▪Basic authentication: The authentication will take place through user and password in the header of the HTTP request. In the respective fields that will be enabled, enter the User and Password that will be used for the service authentication. If you wish, enter also the domain that will be used. ▪WS-Security (Password Text): The user and password are sent along with the SOAP message in order to validate the communication between the service and its consumer. In the respective fields that will be enabled, enter the User and Password that will be used for the service authentication. ▪API key: The authentication will take place through a token in the header of the HTTP request. This authentication type must be used only when the registered data source is an SE Suite WSDL. In the API key field that will be displayed, enter the user token that will be used for the operation. The token that will be used can be generated through the API Gateway section in the user data screen, when accessed through the user panel. For more information on this authentication type, refer to the Integration guide. |
Advanced
|
Connection URL
|
Enter the URL that SE Suite will use when performing the webservice operation. If this field is not filled in, SE Suite will recognize the URL from the WSDL itself indicated in the URL, but if more than one is defined, the system may use a different address than the one you wish. In these cases, for the correct operation of the service, it is necessary to fill this field with the URL that should be used.
This field will not be available if the "Internal SE Suite web service" option has been previously checked.
|
Proxy
|
Select the proxy you wish to use for server authentication, during Web Service execution.
|
Format
|
Description
|
Example
|
MM/dd/yyyy
|
American date pattern
|
06/22/2024
|
dd/MM/yyyy
|
European date pattern
|
15/03/2024
|
HH:mm:ss
|
Hours, minutes and seconds
|
18:37:05
|
KK:mm:ss a
|
Hours, minutes and seconds (AM/PM)
|
07:44:23 PM
|
dd/MM/yyyy HH:mm:ss
|
Date, hours, minutes and seconds
|
26/12/2024 12:30:55
|
dd/MM/yyyy KK:mm:ss a
|
Date, hours, minutes and seconds (AM/PM)
|
12/07/2024 11:50:02 AM
|
EE MMM dd hh:mm:ss Z yyyy
|
Descriptive date, day, time (AM/PM), time zone and year
|
Tue Aug 16 12:00:00 BRT 2024
|
|
Use the Next button at the bottom of the wizard to access the next step in which it is located.
|
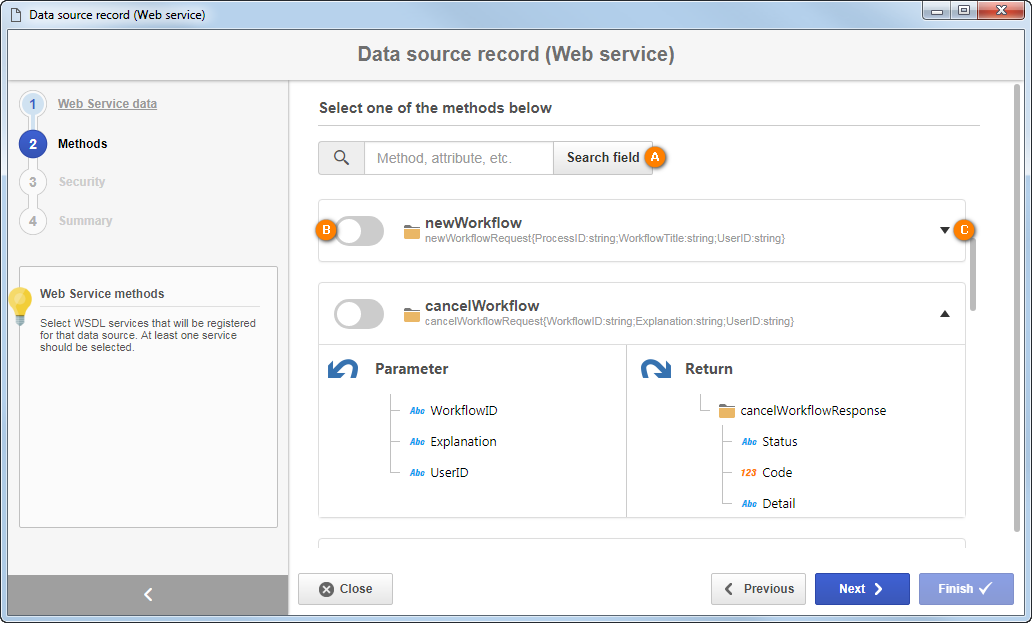
Methods
|
In this step, the system will display the functions that can be executed by the Web Service. The methods presented will vary according to the URL (WSDL) entered in the previous step.
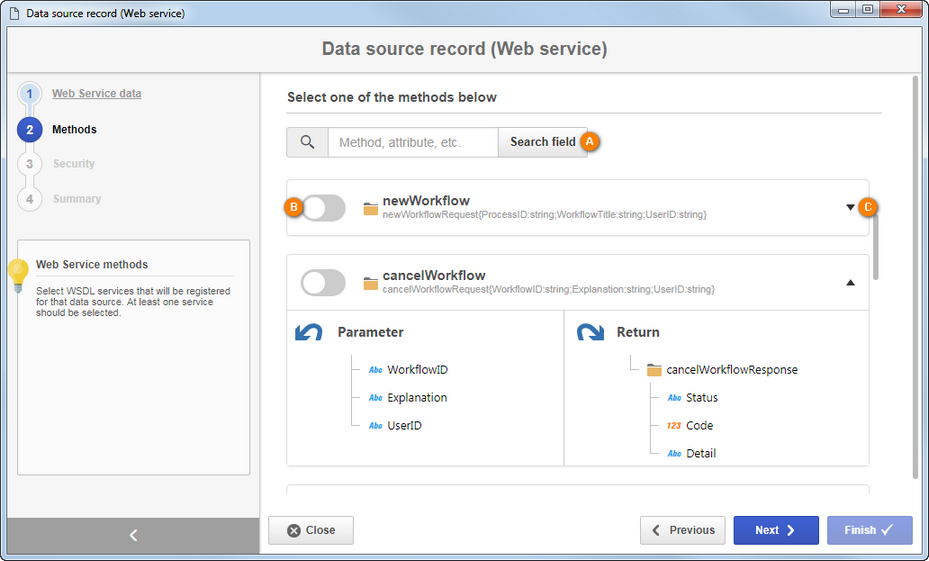
A
|
To find a particular method more efficiently, enter the name of the method or attribute that composes it in the field at the top of the screen and click on the Filter button. The corresponding methods will display on the lower part of the screen.
|
B
|
Use the toggle located next to each method to enable or disable its execution.
|
C
|
By clicking on the arrow next to each method, the input and output parameters of the method will be displayed, divided into columns. In the parameter hierarchy, the user will be able to identify the data type of each parameter. See the attribute types that are supported by the methods of the Web Service data source in the "Supported data type" topic below.
|
Icon
|
Data type
|

|
TEXT
|

|
NUMERIC
|

|
DECIMAL
|

|
TIME
|

|
DATE
|

|
BOOLEAN
|

|
ISNUM
|

|
BINARY
|
|
The Web Service data source does not support:
|
Array data type
|
Elements that use the Array type (such as: soap-enc:Array) or array through square brackets (such as: "element[]"). We recommend using the maxOccurs="unbounded" attribute to represent arrays.
|
Returns with dynamic structures
|
Methods that have returns with dynamic structures, since it would not be possible to map the types defined in the return.
|
Complex types nested with tags of any
|
The <any> tag within nested ComplexType tags. For this situation, we recommend each ComplexType to be declared independently and all elements to have the type attribute defined without using the any tag.
|
Inheriting elements with tags of Extension
|
The use of the <extension> tag to perform inheritance among ComplexTypes. In this situation, the elements of the upper ComplexType must be replicated in the lower levels to obtain the same behavior.
|
|
Use the Next button at the bottom of the wizard to access the next step in which it is located.
|
Security
|
On this step, it is possible to define the security list for the Web Service data source. Enable the desired option:
Private
|
Public
|
If this option is enabled, only the users defined in this tab will be able to edit or view the Web Service data source. To do that, use the following columns:
▪Edit: Define which users, teams, departments and/or positions will have permission to edit the data source. ▪View: Define which users, teams, departments and/or positions will have permission to view the data source. |
If this option is enabled, all system users will be able to view the Web Service data source, but only the users defined in the respective column will be able to edit it.
Therefore, the View column will be disabled (since the data source can be viewed by any user).
In the Edit column, define which users, teams, departments and/or positions will have permission to edit the data source data.
|
To add a user/team/department/position to the security list, simply type the desired name in the available field and select the corresponding option in the list that will be displayed or press "Enter" on the keyboard.
To delete a user/team/department/position from the security list, click on the  button next to the desired record. button next to the desired record.
|
Use the Next button at the bottom of the wizard to access the next step in which it is located.
|
Summary
|
In this step, an overview of the Web Service data source configurations is displayed. It is also possible to perform the consumption of the methods that were enabled. To do so, click on the Consumption test button next to the desired method. On the screen that will be opened, enter the values of the parameters that are necessary for the consumption of the method, and then, click on the Execute button at the bottom part of the screen. Two response types may be displayed:
Response - Consumption test
|
Success
|
The consumption has been successfully performed. In this case, it will be possible to view a JSON with the service return via SE Suite.
|
Something went wrong
|
There was a problem during the consumption of the service. Check if it is available and if the data has been correctly completed in the previously described steps.
|
Click on the Finish button to close the configuration of the Web Service data source. Thus, the wizard screen will be closed.
|
▪Use the Previous button at the bottom of the screen to return to a previous step of the Web service data source to make the necessary edits. ▪Use the Close button at the bottom of the screen to exit the Web service data source configuration wizard. Note that all the data entered up to then will be lost. To perform this operation effectively, it is necessary to confirm the question asked by the system. |
|