|
Each storage place must be associated with an organization department, recorded in the SE Administration component.
To do that, first, in the Storage place filter, located in the search filters panel, click on the  button and, on the screen that will be opened, locate and select, in the hierarchy, the desired Department. Use the button and, on the screen that will be opened, locate and select, in the hierarchy, the desired Department. Use the  button to fill out the field with the department of the logged user. Once done, click on Search. button to fill out the field with the department of the logged user. Once done, click on Search.
Thus, the storage place hierarchy of the department will be displayed in the list of records.
To add a new storage place, click on the  button on the main toolbar. To edit the data of a storage place, select it in the hierarchy and click on the button on the main toolbar. To edit the data of a storage place, select it in the hierarchy and click on the  button. button.
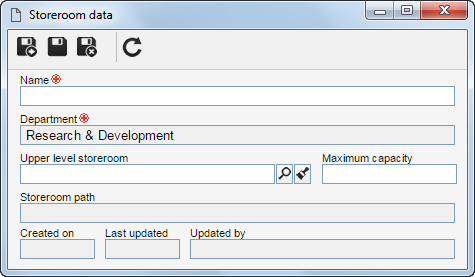
On the screen that will be opened, the following fields are available:
Field
|
|
Name
|
Enter a name for the storage place.
|
Department
|
Displays the name of the department selected in the "Storage place" filter, and it is not possible to edit it.
|
Upper level storage place
|
Fill out this field for the storage place to be hierarchically created below the selected storage place. In this case, select the desired storage place.
If a storage place is selected in the main screen hierarchy, this field will be filled out by the system, but it will be possible to edit it. In this case, the fields on the storage place data will be filled out by the system with the information registered in the upper level storage place (except by the "Name" and "Maximum capacity" fields), but the user can edit the "Upper level storage place" field.
|
Maximum capacity
|
Enter the maximum number of repositories that the storage place can have.
|
Storeroom path
|
Displays the storage places that are in the levels above, until this storage place. For example: Archive room I.Bookcase I
|
After filling in the necessary fields, save the record.
|