Adding a revision route |
|
|
By defining that the revision template is ISO9000 based, it is possible to add a revision route.
The routes can be added through the following locations: ▪Configuration ▪Template revision tab, on the type data screen, next to the Route field.
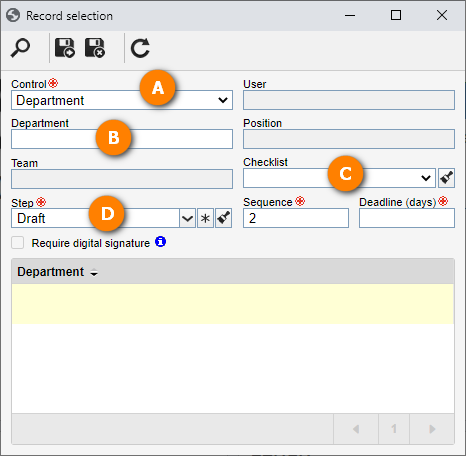
1.Click on the 2.On the screen that will be opened, enter an ID # and a name for the revision route. 3.Save the record to enable the tabs, but do not close the data screen. 4.On the Step tab, it is possible to define the steps through which the revision will go and those responsible for executing them, among other information. To do that, click on the
a.On the screen that will be opened, in the Control field, select the group that represents the origin of the route participants. b.According to the selected control, the Filters will be enabled to be filled out. Use them to make it easier to search for desired participants. c.On the Checklist field, select the checklist that the participant must answer when executing the step under their responsibility. d.Expand the list on the Step field and check the options that correspond to the revision steps that the participants will be responsible for: ▪Draft: This is the first step of the revision process. The drafter must view the asset data and, if needed, make the necessary changes. ▪Review, Approval, and Release: The editions performed in a document by the drafter will be viewed in these steps. If a participant does not agree with some change made or still has comments to make about the revision, critiques may be entered and sent to the drafter. These steps are generated when the previous revision step is finished, in following the order: Review 6.On the Sequence field, enter the order of the participant for the execution of the revision step assigned to them. More than one participant, from different controls, may have the same sequence. In this case, the participants will receive the tasks generated by the system simultaneously and will have to execute them (according to the revision clause set in the record type/category) so that the participants of the next sequence receive the tasks assigned to them. 7.On the Deadline field, enter the number of days the participants will have to execute the revision step assigned to them. 8.Check the Require digital signature1 option so that it is mandatory for the documents to be digitally signed to allow releasing the revision step task assigned to the responsible party. If this option is not checked, it will be possible to release the revision task without digitally signing the documents. 9.After entering the fields above, click on the 10.Once done, save your selection. Repeat the procedure to add all desired steps and participants.
After setting the necessary configurations, save the record.
|