|
To add a new monitored event, click on the  button on the main toolbar, select the task type that will classify the monitored event, and save the selection. To edit a record, select it in the list of records and click on the button on the main toolbar, select the task type that will classify the monitored event, and save the selection. To edit a record, select it in the list of records and click on the  button. button.
On the screen that will be opened, enter an ID # and a name for the monitored event. The following tabs are also available:
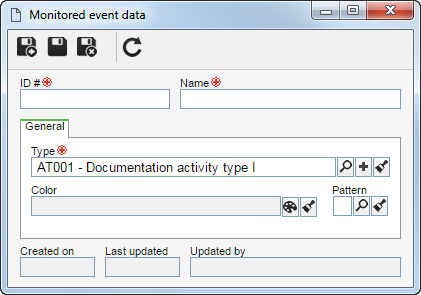
Note: To successfully add an event, it is necessary to fill out the required fields in the General tab.
General
Field
|
|
Type
|
Displays the task type that will classify the monitored event chosen during the addition. Edit the selected type or use the other buttons next to the field to add a new task type to classify the event.
|
Color
|
Select the color that will identify the monitored event being created in the resource calendar.
|
Pattern
|
Select the pattern that will identify the monitored event being created in the resource calendar.
|
|
After filling in all the necessary fields, save the record.
Through the Execution  Scheduling wizard menu, it is possible to allocate hours to the monitored event, while the entering of the actual hours is done through the Execution Timesheet menu. Scheduling wizard menu, it is possible to allocate hours to the monitored event, while the entering of the actual hours is done through the Execution Timesheet menu.
|
|