Task:
|
Form revision
|
Who receives it:
|
The participants who have been associated as the responsible parties through the Participant  Step tab on the form revision data screen. Remember that a form may only be revised if the respective control has been configured in its table. Step tab on the form revision data screen. Remember that a form may only be revised if the respective control has been configured in its table.
|
When:
|
▪Draft: This is the first revision step. The drafter must view the form data and, if needed, make the necessary changes. This task is generated when a new form is saved in the system or a new revision is created through the Management Revision menu. ▪Review, Approval, and Release: In the steps after the draft step, the changes made in the form by the revision drafter must be viewed. If some of the participants do not agree with some of the changes or still have comments to make about the revision, critiques may be entered and sent to the drafter. This task is generated when the previous step of the revision is finished, following the order: Review Approval Release, if the configured respective participants exist. ▪Closure: User who created the revision; provided that the table to which the form belongs has been configured to close the revision manually. |
Purpose:
|
To allow the forms saved in the system to be revised, keeping the history of all the changes made.
|
How to execute this task:
1.Select the desired form from the list of pending records.
Use the toolbar buttons to make the necessary changes in the revision.
|
2.After that, click on the  button on the toolbar. button on the toolbar.
3.At this point, the screen for releasing the revision stage will be opened. The ID # and Title fields are filled out by the system with the respective information of the form. Fill out the required and desired fields in the following tabs:
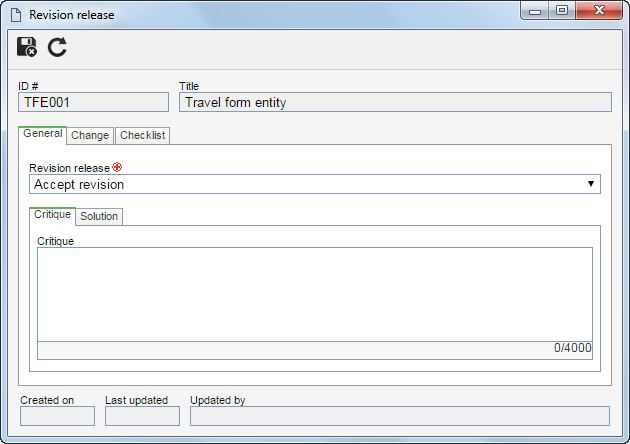
General
Revision release
|
Accept revision
|
Select this option to accept the revision and send the record to the next step. Remember that in the DRAFT step this is the only available option.
|
Send back to draft step
|
Select this field to return the revision to the draft step. Enter, in the following field, the critiques that must be solved by the revision drafter.
If during the revision configuration the approval has been configured as Circular, the reviewers will not be able to send the revision to the draft step. If the approval has been configured as Incremental, any revision participant will be able to return it to the draft step.
|
Critique
|
Use this tab to enter the necessary critiques of the revision. Thus, the critiques may be added or dealt with according to the step on which the revision is:
|
Review / Approval / Release / Closure
|
The executor of the revision may add critiques concerning the revision through the  button. On the Critique tab of the screen that will be opened, the desired critique must be entered. button. On the Critique tab of the screen that will be opened, the desired critique must be entered.
|
Draft (Second cycle or after)
|
The drafter should enter the solutions for each critique recorded through the button. On the Solution tab of the screen that will be opened, the solution for the critique must be entered.
|
Change
In this tab, it is possible to enter the modifications that were made to the record that is being revised. In the other steps configured for the revision, the changes entered will be available for viewing.
To add a revision, click on the side toolbar button and fill out the following fields from the screen that will be opened:
Fields
|
Location
|
Enter the document location in which the change was performed.
|
Change
|
Describe the change performed in the previously entered location.
|
Checklist
This tab will only be displayed if the participant of the revision has an associated checklist. This checklist is intended to help the person responsible for the approval or disapproval of the record. In order to answer the checklist questions, select the desired option: Yes, No or N/A. The answers may have already been selected by the system according to the standard defined when recording the checklist. Moreover, filling in the Comments fields may be mandatory or not, also according to the configurations established when creating the checklist.
This tab will not be displayed in the revision Closure step.
|
4.Click on the  button after filling in the fields on the screen above. At this point, the action specified in the "Revision release" field will be performed. If there is more than one participant with the same sequence, when executing a revision step, the parameterization defined during the revision configuration will be applied. button after filling in the fields on the screen above. At this point, the action specified in the "Revision release" field will be performed. If there is more than one participant with the same sequence, when executing a revision step, the parameterization defined during the revision configuration will be applied.
|