|
After generating the status report while it is issuing, some of its data will be available for completion. Note that the presentation of some information may vary according to the parameterization set out on the Configuration tab of the template data screen from which the status report was generated. On the toolbar of the screen of the status report screen, the user can find several buttons and menus divided in the following sections:
Record
|
Save
|
Click on this button to save the configurations performed in the status report and keep the screen open. Note that, when using this option, the status report will remain with the "Issue" status, not being closed.
|
Save and exit
|
Click on this button to save the configurations performed in the status report and close the screen. Note that, when using this option, the status report will remain with the "Issue" status, not being closed.
|
Actions
|
Finish
|
Click on this button to finish the status report after performing all necessary changes. Confirm the request made by the system to effectively perform this operation.
|
Record data
|
Overview
|
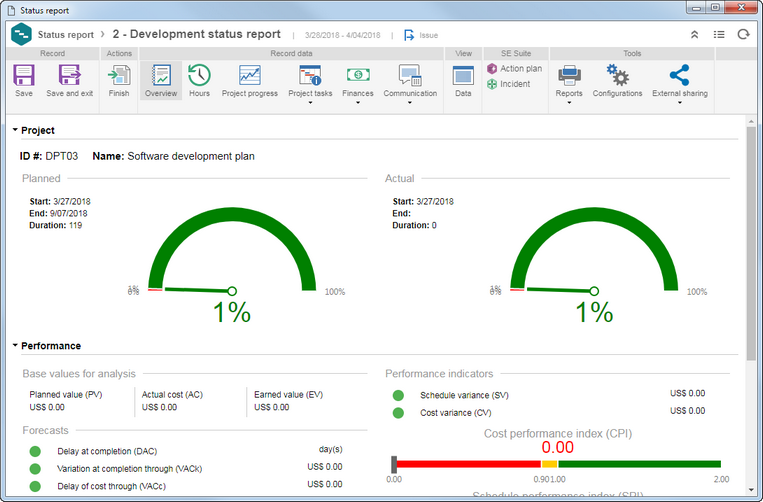
Click on this button to view project information (ID #, name, estimated percentage, as configured for the base date and percentage performed) and project performance information (EVM charts and values). Note that the presentation of the "Performance" section may vary according to the configurations performed in the view profile associated with the project.
|
Hours
|
Click on this button to view the planned and rescheduled allocations (according to the base date), as well as the timesheets performed in the project. It will also be possible to view a comparison chart for Allocation X Timesheet. The figures presented will be for the total period of the project and not just for the period of the status report.
|
Project progress
|
Click on this button to graphically track the project progress. The chart will be displayed with the period and chart configurations set in the Configuration tab of the template data screen which the status report was generated from. To edit these configurations, use the buttons on the upper part of the section to configure the interval of days, weeks or months that will be displayed in the project progress chart and to access the Chart configuration resource to parameterize how the project progress chart will be displayed. Refer to the Chart configuration section of the User guide document for more information on how to use this feature.
|
Project tasks
|
Click on the arrow located below this option and select the information you wish to view:
▪Project summary: This section displays, as a schedule, the project summary, milestone, and delivery of the project, taking into account the frequency established in the template used by the status report, within the duration of the project period. For example: If the frequency of the status report template is weekly, the system will display the tasks (summary, milestone, and delivery) of 7 days from the current date. ▪Previous past due tasks: This section displays, as a schedule, the tasks that were executed past due in the period of the project summary, as well as the tasks executed past due before the period of the summary period and that were not finished. ▪Finished previous tasks: This section displays, as a schedule, the tasks whose executions were finished in the period before the period of the project summary. ▪Project tasks: This section displays, as a schedule, the project tasks in the summary period. ▪Next task: This section displays, as a schedule, the project tasks of the period following the project summary period, taking into account the frequency established in the template used by the status report. |
Attachment
|
Click on this button and, on the screen that will be opened, use the displayed buttons to add attachments to the status report.
Note: The status report attachments will not be linked to the project attachments, that is, attachments associated with the project will not be displayed next to the status report attachments.
The status report attachments will not be displayed when access the status report externally.
|
Finances
|
Click on the arrow located below this option and select the information you wish to view:
▪Cost: This section displays the planned and rescheduled costs (according to the date base), in addition to the actual costs of the project. A comparison chart will also be displayed. The figures presented will be for the total period of the project and not just for the period of the status report. ▪Revenue: This section displays the planned and rescheduled revenues (according to the date base), in addition to the actual revenues of the project. A comparison chart will also be displayed. The figures presented will be for the total period of the project and not just for the period of the status report. |
Communication
|
Click on the arrow located below this option and select the information related to the project you wish to record: opinion, achievements, attention points, identified risks and change requests and recommendations.
|
View
|
Data
|
Click on this button to view the data screen of the status report record in read-only mode.
|
SE Suite
|
Incident
|
Click on this button to start recording new incidents and associate incidents previously recorded in the SE Incident component that are related to the project status report.
To do that, click on the  side toolbar button and select the corresponding option to start or associate incidents. In order for this feature to function properly, it is necessary for the SE Incident component to be part of the solutions acquired by your organization. Refer to the specific SE Incident component documentation for more details on recording incidents. side toolbar button and select the corresponding option to start or associate incidents. In order for this feature to function properly, it is necessary for the SE Incident component to be part of the solutions acquired by your organization. Refer to the specific SE Incident component documentation for more details on recording incidents.
|
Action plan
|
Click on this button to associate an action plan with the project status report. Use the Add option in the upper part of this section to add a new action plan (be it blank or from a template) or the Associate option to associate a previously recorded action plan. In order for this feature to function correctly, it is necessary for SE Action plan to be part of the solutions acquired by your organization. Once this is done, the structure of the action plan will be presented in this section, allowing you to view its information. Position the mouse over the action plan card or its actions, view its data or perform its deletion.
|
Tools
|
Reports
|
Click on the arrow located below this button and select the desired option to print the generated status report and configure the other report options.
|
Configurations
|
Click on this button to access the status report template data screen and edit the definitions set in the Configuration tab. The changes made through this option will also be replicated to template record; however, they may be edited.
|
External sharing
|
Click on the arrow below this option and select the desired option:
▪Generate external view: Click on this button to configure the external sharing to a status report. Select the desired record before clicking on the button. On the screen that will open, in the Who do you wish to share it with? field, enter departments, positions, teams and users of the system that has an email configured, as well as, emails from parties who do not have access to SE Suite, for which you wish to send the sharing link. In the Share message field, enter the message that will be displayed in the body of the email that will be sent with the share link. After that, save the record. ▪History: In this section, it is possible to view the emails sent with the link to external access of the status report. Click on the  button to view the details of the email selected in the list of records. button to view the details of the email selected in the list of records. |
|
