|
To configure a risk type, in the main screen toolbar, click on the  button. button.
Enter the ID # and the name of the type on the screen that will be displayed and save the record.
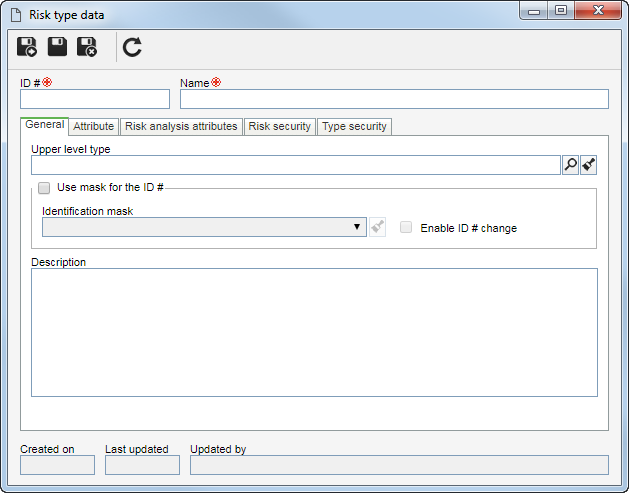
Configure the following tabs in the risk type:
General
|
Upper level type
|
Select the risk type that, in the hierarchy, is one level above the type in question. This field is filled out by the system if, in the type hierarchy on the main screen, a risk type is selected.
|
Use mask for the ID #
|
Check this option so that when creating risks of this type, the automatic identification resource is used. Fill in the following fields:
▪Identification mask: Select the desired identification mask. Note that only identification masks whose object is "Risk" will be available for selection. ▪Enable generated ID # change: Check this option to allow the generated ID # to be edited manually when creating a risk in this type. If this option is not checked, the generated ID # may not be edited. |
Description
|
Use this field to enter relevant descriptions referring to the risks of this type.
|
Attribute
|
Use this tab to define attributes to complement the information of the risks of this type. On the side toolbar, the following buttons are also available:

|
Click on this button to associate an attribute that was previously created in the system with the type. Refer to the Adding attributes section for further details on how to perform this operation.
|

|
Click on this button to save the association of attributes with the control.
|

|
Click on this button to disassociate the attribute selected in the list of records from the type.
|
Note: If the attribute configurations are edited (e.g.: an attribute checked as required becomes non-required or vice versa), they will be replicated to the records of this type when their data is edited.
|
Risk analysis attributes
|
Use this tab to associate the attributes that will complement the analyses of the risks classified by this type. Click on the button of this tab and on the screen that will be displayed, locate and select the desired attributes. In the previous step, a detailed description on how to perform this procedure was performed.
|
Risk security
|
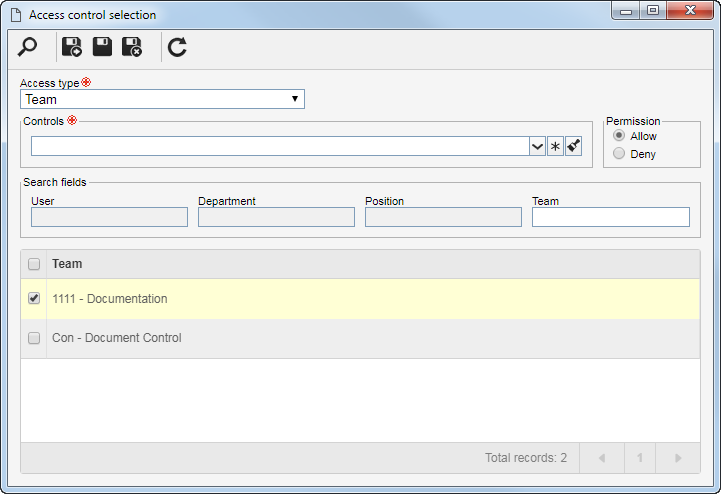
Use this tab to configure the security of the risks of this type. To do that, at the top of this tab, select one of the following options:
▪Public: Select this option for any user to have access to the risks of this type. ▪Restricted: Select this option to restrict the access to the risks of this type. At this point, the sidebar buttons will be enabled. Click on the button and fill out the fields on the screen that will be opened:
i.
|
In the Access type field, select one of the following options to set the access type that will compose the security list:
▪Team: It will be composed of the members of a team previously created in SE Risk. ▪Department: It will be composed of users from a selected department. ▪Department/Position: It will be composed of users from a specific department of the company, who have a specific position. ▪Position: It will be composed of users who hold specific position in the company. ▪User: It will be composed of a specific user. ▪All: It will be composed of all users who have access to the SE Risk component.
|
ii.
|
In the Controls field, it is possible to select the actions that may or may not be performed in the risks of this type. To do so, select the controls that will be granted to access the type selected previously:
▪Add: Creates risks in the type. ▪Edit: Change the risk data included in the type. ▪Delete: Deletes the risks of this type. ▪List: Allows viewing the risk on the system screens. Users who have this control denied, or not enabled, will not see the risk type in the type hierarchy. ▪View: Allows viewing the data screen of the risks of this type.
Use the buttons located next to the field to expand and view the list of controls, mark all available controls, and clear the markups you have made.
|
|
iii.
|
Select in the Permission field, if the controls checked previously will be granted or denied for access type.
|
iv.
|
According to selected access type, Filters will be enabled to be filled out. Use them to facilitate the search of users who will form the security list.
|
v.
|
After that, click on the  button on the toolbar of the selection screen. Depending on the access type selected and the values entered in the filters, the result will be displayed in the list of records, located at the bottom of the screen. Select the ones that will compose the security list and save the record. Hold the SHIFT or CTRL keys down or check next to each item to select more than one record at a time. button on the toolbar of the selection screen. Depending on the access type selected and the values entered in the filters, the result will be displayed in the list of records, located at the bottom of the screen. Select the ones that will compose the security list and save the record. Hold the SHIFT or CTRL keys down or check next to each item to select more than one record at a time.
|
|
Type security
|
On this tab, it is possible to configure the security of the risk type To do that, at the top of this tab, select one of the following options:
▪Public: Select this option for any user of the SE Risk to have access to the type. ▪Restricted: Select this option for only specific users of the SE Risk to have access to the type in question. At this point, the sidebar buttons will be enabled. Click on the button and fill out the fields on the screen that will be opened:
i.
|
In the Access type field, set whether the access type that will compose the security list is: a team, a department, a department + position, a position, a user, or all users of SE Risk.
|
ii.
|
In the Controls field, it is possible to select the actions that may, or may not, be performed in the risk type. To do so, select the controls that will be granted to access the type selected previously:
▪Add: Adds new types to levels below the risk type. ▪Edit: Changes the data of the type. ▪Delete: Deletes the type. ▪Security data: Edits the security data of the type. Users who have this control denied, or not enabled, may edit the other data of the risk type; however, this tab will be blocked. ▪List: Allows viewing the type on the system screens that display the hierarchy of risk types. Users who have this control denied, or not enabled, will not see the risk type in the type hierarchy. ▪View: Views the data screen of the type. |
iii.
|
Select in the Permission field, if the controls checked previously will be granted or denied for access type.
|
iv.
|
According to selected access type, Filters will be enabled to be filled out. Use them to facilitate the search of users who will form the security list.
|
v.
|
Then, click on the button on the toolbar of the selection screen. The result will be displayed in the list of records, located in the lower part of the screen. Select those that will make up the security list and save the record. Use the SHIFT or CTRL keys on the keyboard or check next to each item to select more than one record at a time.
|
|
Save the record.
|