Scheduling configuration |
|
|
In SE SPC, it is possible to configure the scheduling of CMM file imports. To do that, access the Configuration
Select the
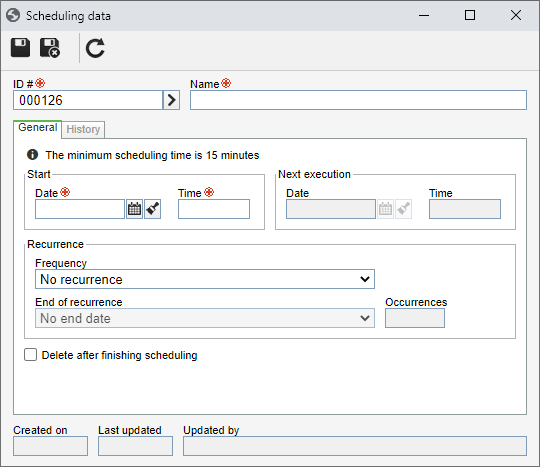
On the screen that will be opened, enter an ID # and a name for the scheduling. The button next to the field can be used to generate an ID # with a new sequential number.
Note: To successfully create an import scheduling, fill out the required fields in the General and Import type tabs and save the record. At this point, the other tabs will be enabled to be filled out.
Fill out also the required fields in the following tabs:
GeneralStart: Enter the start date and time of the scheduling execution. Next execution: The date and time for the next scheduling execution are filled out according to the recurrence information filled out next. Recurrence: Configure the execution frequency of the scheduling: Frequency: Select how often the scheduling execution will be performed: ▪No recurrence: The scheduling execution will be done only once, that is, it will not be repeated. ▪Hour(s)/Minute(s): The scheduling will be executed in intervals of hours or minutes. Enter the desired interval in the "each __ hh:mm" field. For example: every 01:15, every 00:30, every 03:00, etc. Note: It will not be possible to select a time smaller than 15 minutes for the scheduling. ▪Daily: The scheduling will be executed in intervals of days. Enter the desired interval in the "every __ day(s)" field. For example: every 2 days, every 5 days, etc. ▪Weekly: The scheduling will be executed on specific days of the week. In the "Week days" field, check the days on which the scheduling execution should be performed. For example: every Monday, Wednesday and Friday. ▪Monthly: The scheduling execution will be done during certain months of the year. In the "Months" field, select the desired months in which the scheduling execution should be performed. For example: March, June, September and November. End of recurrence: Select in this field how will be the end of the recurrence of the scheduling execution: ▪No end date: The recurrence of the scheduling execution will have no definite end. ▪Ends after: The scheduling execution ends after a certain number of occurrences. Enter, in the "Occurrences" field, the number of limit occurrences of scheduling executions. ▪Ends on: The scheduling execution ends on a certain date. Select, in the "Date" field, the day, the month and year in which the scheduling execution will end. Delete after finishing scheduling: If this option is: ▪Checked: The scheduling record will be deleted after its execution is finished, and it will no longer be displayed in the list of records. ▪Unchecked: The scheduling record will not be deleted after its execution is finished, and it will be displayed in the list of records.
Import directoryThe configuration of this tab varies according to the storage configuration defined for the files:
Data integration file storage1: Enter the Amazon server directory that contains the files that will be used in the import. Directory that will be monitored during executions: Enter the SE Suite server directory that contains the files that will be used in the import. Directory to store imported files: Enter the SE Suite server directory that will store files that have already been imported.
SE Suite serverWhen the storage of the CMM files is not configured, the following files will be available:
|