|
To access the resource screen, first, edit the data of a standard activity and click on the Resources section.
In the standard activity, it is possible to carry out resource planning (technical, tools and supplies) that will be used during the execution of verification, calibration and maintenance activities. The plans that have been created with the "Copy data from activity" option may have the feature configuration changed to best suit their needs.
Later, in the verification, calibration and maintenance activities, the resource settings will be inherited from the standard activity (when the plan has inherited the data from the standard activity) or the plan (when the plan has copied the standard activity data). Here's how to set up activity resources, in each of these situations:
Technician
In this section, the technicians responsible for the activity in question must be entered. During the planning or execution of activities, it is possible to view the estimate of resources that was previously configured in the standard activity or in the plan, when it was created with the "Copy data from activity" option.
Resources estimate
This section aims to assist the allocation of technicians during the programming of activities. The resource estimate configuration is done in the Standard activity or Plans (verification, calibration and maintenance), as long as they have been created with the "Copy data from activity" option.
Standard activity and Verification/calibration/maintenance plan
Click on the  button in this section to add an estimate. On the screen that opens, complete the following fields: button in this section to add an estimate. On the screen that opens, complete the following fields:
▪Position: Select the role the technician must perform to execute the activity. ▪Quantity: Enter the number of technicians, who have the previously selected position, that are required to perform the activity. ▪Man/Hour needed: Set the number of hours that must be allocated by a technician to perform the activity. ▪Total Man/Hour: This field will be automatically filled by the system with the total hours that will be required to perform the activity.
Activity programming and Activity execution
In this section, it will be possible to see the resource estimates for the activity. In these steps, the estimate of resources is more intended to be informative/guidance.
Activity technicians
Use the buttons in this section to add, edit, delete, allocate/enter time to the activity technicians:

|
Click on this button to add a new technician to the activity. The details on how to add a technician can vary from standard activity to plan, as well as the step where the activity is located. See the following subsections for details on how to add a technician.
|

|
Click on this button to edit an activity technician. When the user clicks this button, the same inclusion screen will appear; however, with the required fields filled out. See the following subsections for details on how to add a technician.
|

|
Click on this button to delete a technician from the activity. Select the desired technician before clicking on this button.
|

|
This button will only be displayed when the integration with SE Time Control has been configured and when the activity is in the execution step. Click on this button to create the timesheet of the technician. For more details on the timesheet, refer to the "Timesheet (integration with SE Time Control)" subsection of the Executing a verification topic.
|

|
Click on this button to view the resource allocation data of the technician in the activity. Select the desired technician before clicking on this button.
|
1.
|
 To associate a technician with a standard activity or plan that was created with the "Copy data from activity" option, go to the Resources To associate a technician with a standard activity or plan that was created with the "Copy data from activity" option, go to the Resources  Tool section and click on the Tool section and click on the  button. At this point, the following screen will be displayed: button. At this point, the following screen will be displayed:

|
2.
|
Fill in the following fields:
▪Technician: Select the technician responsible for the activity. If there is a Service center selected in the respective field, then only the associated technicians will be presented as a resource of the selected service center. Otherwise, the associated technicians will be presented as resources in at least one service center. ▪Service center: Select the service center responsible for the activity. If there is a Technician selected in the respective field, then only the service centers where the technician was associated as a resource will be displayed. To associate a service center that does not exist, click on the  button to create one. The service centers displayed in this field are recorded in the "File button to create one. The service centers displayed in this field are recorded in the "File  Service center" menu. Service center" menu. ▪Position: This field will be automatically filled by the system with the technician position selected in the previous field. ▪Sched. time: Enter the planned duration for the technician to perform the activity.
|
3.
|
After filling in the fields, click on the Save button, at this moment, the technician will be associated with the activity.
|
1.
|
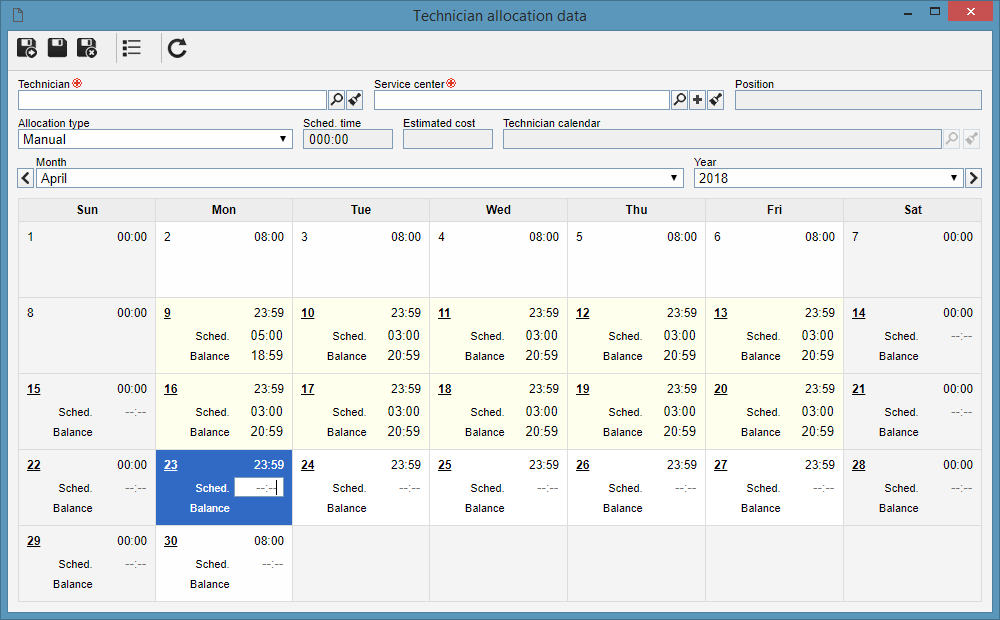
 To associate a technician, in the activity planning step, go to the Resources To associate a technician, in the activity planning step, go to the Resources  Tool section and click on the Tool section and click on the  button. At this point, the following screen will be displayed: button. At this point, the following screen will be displayed:

|
2.
|
Fill in the following fields:
▪Technician: Select the technician responsible for the activity. If there is a Service center selected in the respective field, then only the associated technicians will be presented as a resource of the selected service center. Otherwise, the associated technicians will be presented as resources in at least one service center. ▪Service center: Select the service center responsible for the activity. If there is a Technician selected in the respective field, then only the service centers where the technician was associated as a resource will be displayed. To associate a service center that does not exist, click on the  button to create one. The service centers displayed in this field are recorded in the "File button to create one. The service centers displayed in this field are recorded in the "File  Service center" menu. Service center" menu. ▪Position: This field will be automatically filled by the system with the technician position selected in the previous field. ▪Allocation type: Select one of the following options to define how the technician hours allocation will be performed: —Manual: If this option is selected, then it will be necessary to set the number of hours the technician will work on the activity per day. Once this option is selected, the calendar displayed just below these fields will be enabled to fill in the hours to be performed by the technician. It will only be possible to enter the time in the "Sched." field, for the days that belong to the planned activity period, which is defined in the general data of the activity. —Divide the hours by the activity period: If this option is selected, then it will be necessary to enter in the "Sched. time." field the total number of hours the technician must use to perform the activity. At this point, in the calendar presented below these fields, the times will be divided between the days that cover the planned activity period, which is defined in the general data of the activity. ▪Sched. time: If the allocation is of the "Manual" type, then this field will be automatically filled with the total hours obtained by the sum of the hours entered in the calendar. If the allocation is of the "Divide the hours by the activity period" type, then this field must be filled with the total hours for the activity execution. ▪Estimated cost: This field will be automatically filled by the system with the cost of the technician. This value is obtained by multiplying the hourly cost of the technician with the number of hours allocated to the technician. ▪Technician calendar: This field is automatically filled by the system with the calendar configured for the technician.
|
3.
|
 After completing the fields, click on the After completing the fields, click on the  button. At this point, the technician will be associated with the activity. button. At this point, the technician will be associated with the activity.
|
1.
|
  To associate a technician, in the activity execution step, go to the Resources To associate a technician, in the activity execution step, go to the Resources  Tool section and click on the Tool section and click on the  button. If the integration with SE Time Control is configured, the following screen will be displayed: button. If the integration with SE Time Control is configured, the following screen will be displayed:

|
2.
|
Fill in the following fields:
▪Technician: Select the technician responsible for the activity. If there is a Service center selected in the respective field, then only the associated technicians will be presented as a resource of the selected service center. Otherwise, the associated technicians will be presented as resources in at least one service center. ▪Service center: Select the service center responsible for the activity. If there is a Technician selected in the respective field, then only the service centers where the technician was associated as a resource will be displayed. To associate a service center that does not exist, click on the  button to create one. The service centers displayed in this field are recorded in the "File button to create one. The service centers displayed in this field are recorded in the "File  Service center" menu. Service center" menu. ▪Position: This field will be automatically filled by the system with the technician position selected in the previous field. ▪Open timesheet after saving and exiting: Check this field so that after the technician is added, the timesheet screen is displayed. It is worth remembering that only the users configured in the "Timesheet permission" tab, in the resource data, can perform the timesheet for the technician. For more details on the timesheet, refer to the "Timesheet (integration with SE Time Control)" subsection of the Executing a verification topic.
|
3.
|
After filling in the fields, click on the Save button, at this moment, the technician will be associated with the activity.
|
1.
|
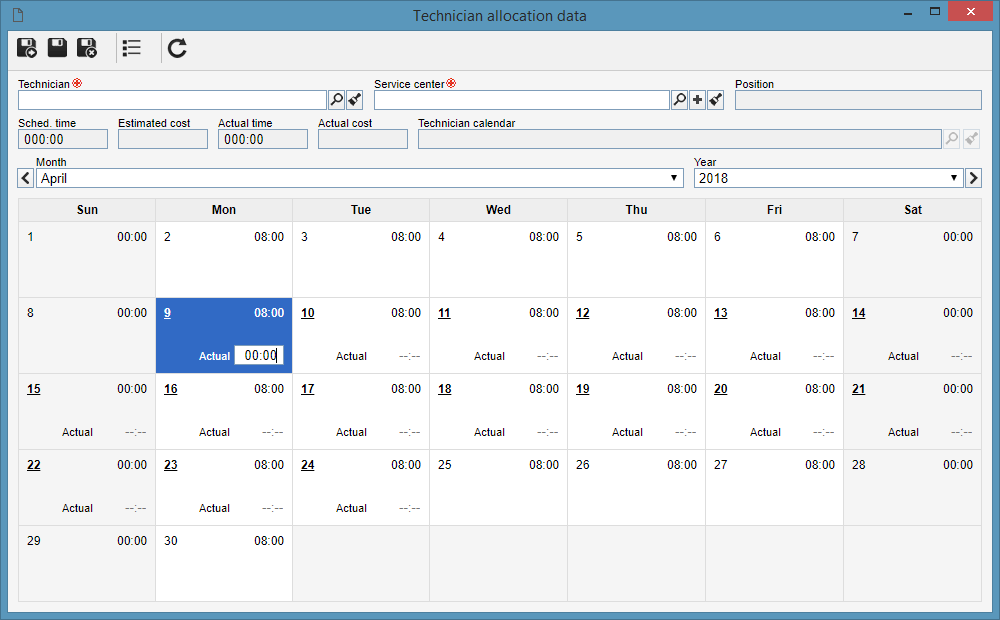
 To associate a technician, in the activity execution step, go to the Resources To associate a technician, in the activity execution step, go to the Resources  Tool section and click on the Tool section and click on the  button. If the integration with SE Time Control is not configured, the following screen will be displayed: button. If the integration with SE Time Control is not configured, the following screen will be displayed:

|
2.
|
Fill in the following fields:
▪Technician: Select the technician responsible for the activity. If there is a Service center selected in the respective field, then only the associated technicians will be presented as a resource of the selected service center. Otherwise, the associated technicians will be presented as resources in at least one service center. ▪Service center: Select the service center responsible for the activity. If there is a Technician selected in the respective field, then only the service centers where the technician was associated as a resource will be displayed. To associate a service center that does not exist, click on the  button to create one. The service centers displayed in this field are recorded in the "File button to create one. The service centers displayed in this field are recorded in the "File  Service center" menu. Service center" menu.
Use the calendar area to enter the time that the technician used to perform the activity. For more details on the timesheet, refer to the "Timesheet (integration with SE Time Control)" subsection of the Executing a verification topic.
|
|
3.
|
 After completing the fields, click on the After completing the fields, click on the  button. At this point, the technician will be associated with the activity. button. At this point, the technician will be associated with the activity.
|
Tool
Use the Resources  Tool section of the standard activity, plan (created with the "Copy data from activity" option) or activity in planning, to associate the tools (assets) that are being programmed to be used in the activity (verification, calibration or maintenance). In the execution of the activity, the tools that were actually used in the activity should be associated in this section. Tool section of the standard activity, plan (created with the "Copy data from activity" option) or activity in planning, to associate the tools (assets) that are being programmed to be used in the activity (verification, calibration or maintenance). In the execution of the activity, the tools that were actually used in the activity should be associated in this section.
1. Click on the Click on the  button to associate the tool in the activity. At this point, the following data screen will display: button to associate the tool in the activity. At this point, the following data screen will display: 
2.Fill in the following fields: ▪Tools: Select the tool (asset) that will be associated with the activity. ▪Sched. quantity: This field will be enabled for standard activity, plan, and activity in planning (programming). Enter the scheduled quantity of the tool that will be used in the activity. ▪Actual quantity: This field will be enabled when the tool association is being made while the activity is under execution. Use this field to enter the actual quantity of tool that was used in the activity.
3.After filling in the fields, click on the Save button, at this point, the selected variable will be associated with the standard activity in question.
Supply
Use the Resources  Supply section of the standard activity, plan (created with the "Copy data from activity" option) or activity in planning, to associate the supplies that are being programmed to be used in the activity (verification, calibration or maintenance). In the execution of the activity, the supplies that were actually used in the activity should be associated in this section. Supply section of the standard activity, plan (created with the "Copy data from activity" option) or activity in planning, to associate the supplies that are being programmed to be used in the activity (verification, calibration or maintenance). In the execution of the activity, the supplies that were actually used in the activity should be associated in this section.
No integration with SE Storeroom
If the integration with SE Storeroom is not configured in the SE Asset general parameters, the supply association with the activity will take place as follows:
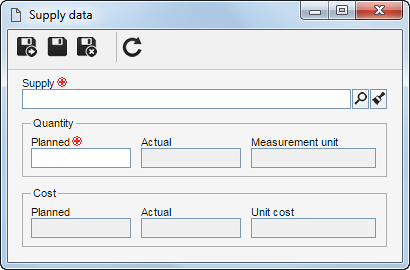
1. Click on the Click on the  button to associate a supply in the activity. At this point, the following data screen will display: button to associate a supply in the activity. At this point, the following data screen will display:

2.Fill in the following fields: ▪Supply: Select the supply that will be associated with the activity. Remember that supplies are created through the SE Supply component. ▪Quantity: In case of standard activity, plan or activity programming, enter the number of supplies that is being programmed to be used in the activity. If the activity is under execution, then enter the actual quantity of the supply that was used in the activity. ▪Measurement unit: This field is automatically filled by the system with the measurement unit configured for the selected supply.
3.After filling in the fields, click on the Save button, at this point, the selected supply will be associated with the activity/plan.
With integration with SE Storeroom
If the integration with SE Storeroom is configured in the SE Asset general parameters, the supply association with the activity will take place as follows:
1. Click on the Click on the  button to associate a supply in the activity. At this point, the output event screen will be displayed. Select the Storeroom that has the supply needed for the execution of the activity in question. As soon as a storeroom is selected, the screen will be reloaded, allowing the user to proceed with the supply output event. button to associate a supply in the activity. At this point, the output event screen will be displayed. Select the Storeroom that has the supply needed for the execution of the activity in question. As soon as a storeroom is selected, the screen will be reloaded, allowing the user to proceed with the supply output event.
2.Then, enter the ID # for the output event. Enter also those responsible for it in the Source and Destination sections. The Attributes section has the attributes that must be completed during the output event.
3.After filling in all the necessary fields, save the output event screen. At this point, the system will display a screen in which the supplies and their respective quantities for the activity execution must be selected. Save the selection after that.
4.At this point, the selected supplies will be displayed in the output event screen. Save and close the output event screen. As soon as the screen is closed, the supplies will be displayed in the activity data screen.
|


