Objective calibration table |
|
|
Objective tables are those used in the reading of measurable characteristics, that is, that contain data that may be measured. See how to create an objective attribute calibration table:
1.To add a calibration table of this type, click on the arrow next to the
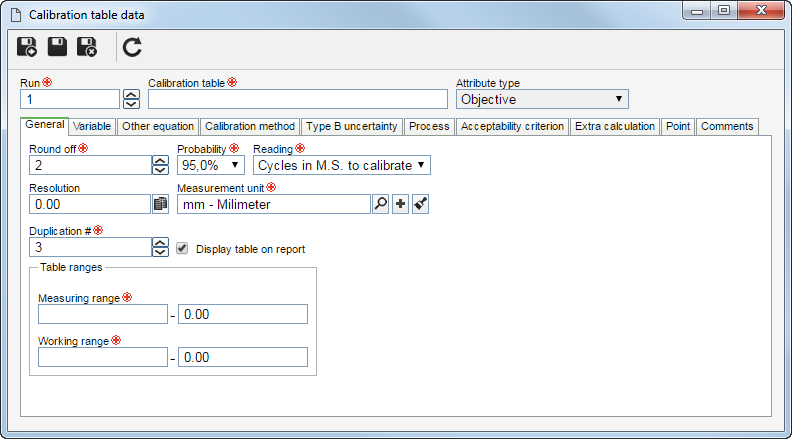
Run: Enter the run of the calibration table. This field is automatically filled in by the system according to the record order, but it may be edited. Calibration table: Enter a name for the calibration table. Attribute type: This field is automatically filled in by the system and indicates the calibration table type in question.
2.Use the General tab to enter the general data about the calibration table: Round off: Enter the number of decimal places used for all values in the calibration table. This value should be based on the asset resolution. Probability: Select the interval around the measurement result, with which it is expected to cover a large fraction of the distribution of values, which could reasonably be attributed to the magnitude subject to measurement. Example: for 95% coverage probability, 95% of measurements are expected to be within the uncertainty range of the asset. Definition of probability used in the expansion of the uncertainty (using Student). Reading: Select the measurement system the reading will be based. Remember that this option is only valid for variable magnitudes: ▪Cycles in M.S. to calibrate: The standard displays the fixed reading and the measurement cycles carried out on the asset being calibrated. ▪Cycles in standard M.S.: The asset being calibrated contains the fixed measure and the cycles are performed in the standard. ▪Both readings: The readings are performed in both assets simultaneously. Resolution: Enter the resolution, that is, the lowest reading that may be performed in the asset. Click on the button next to this field to apply the resolution value to all the table points. It is worth pointing out that the resolution may be a fraction of the asset indication. Example: a person measures a particular part with a device having a scale of 0.01 mm (assuming the measurement = 10.09 mm), and the possibility of estimating one or more unit of that measurement (for example, 10.094 mm). Measurement unit: Select the measurement unit involved in calibrating the assets of this configuration. Duplication #: Enter the number of readings cycles to be performed in the calibration of the assets in this configuration. Schumacher duplication #: Enter the number of reading cycles required to evaluate the initial bias used in the Schumacher Frequency calculation. This field will only be displayed if, in the Calibration data, the Invariable magnitude has been selected and if the Schumacher frequency option is selected. Display table on report: Check this field for the table in question to be displayed in the calibration reports. Measuring range: Enter the range that indicates the measurement capacity of the asset. This field will only be displayed if selecting the Variable magnitude in the Calibration data. Working range: Enter the range that indicates the measurement range that is actually used in the organization. This field will only be displayed if selecting the Variable magnitude in the Calibration data. Nominal value: Enter the range that indicates the measurement range that is actually used in the organization. This field will only be displayed if selecting the Invariable magnitude in the Calibration data.
3.Save the record after filling in the fields above and also fill in the data in the other tabs.
4.Use the Variable tab to associate the additional variables that will be measured when calibrating the asset. Variables exert some influence over the calibration and, therefore, it is necessary to have them properly configured. To do that, click on the
Variable: Select the desired variable. The variables available in this field are created in the SE Calibration component, through the Configuration Input: Select the input measurement unit of the variable. Output: Select the output measurement unit of the variable. This field is automatically filled in by the system according to the unit selected in the input, but it may be edited. If the output measurement unit is different from the input measurement unit, it will be necessary for the respective unit conversions to be recorded in the system. Variable type: Select the variable type being associated with the calibration table: ▪Constant: Select this option if the measurement is performed by a constant variable, that is, its value may not be edited. E.g.: Pi = 3.14. ▪Input based on point: Select this option if the measurement is performed by variables in different points of the same asset. Each point, then, will have its own variable. ▪Input based on reading: Select this option if more than one reading is made at the same point, that is, the measurement is performed several times, and can generate more than one distinct value, which will consequently generate a variable. After selecting the variable type, select the input type: ▪Manual input: Select this option if the variable value is entered manually, that is, the user will type in the value directly. ▪Automatic input: Select this option if the variable value is calculated by the system based on standard, table, and other data. Remember that this field will be disabled if the variable type is Input based on reading.
5. Sequence: Sequential number of the equation. This field is automatically filled in by the system. ID #: Enter the number or code that identifies the other equation. Input: Select the value of the input measurement unit in the equation. Output: Select the value of the output measurement unit in the equation. Equation: Click on the
6.The Calibration method will only be enabled if the Measurement data collection option is selected in the Calibration ▪Direct: Select this option for the measurement to be performed without the use of equations. ▪Indirect: Select this option for the user to build the equation that will be used in the measurement. In that case, enter an ID # in the Output field and click on the
7. Source of uncertainty: Select the name of the source of uncertainty. Block source of uncertainty in calibrations: Select this option so that the standard value defined in the Uncertainty value field cannot be edited. Uncertainty value: Select how the Type B uncertainty will be calculated: ▪Direct: It is only necessary to enter the estimated numerical value of the uncertainty. ▪Indirect: It is necessary to click on the Distribution: Select the distribution type to be performed: ▪Normal: Repeated measurement results are distributed around the average. ▪Rectangular: It is characterized by presenting the same probability for all the values within the limits and zero outside them. ▪Triangular: It is characterized by presenting the maximum probability for the average value, decreasing linearly to zero in the limits and zero out of these. Divisible factor: Enter the distribution value already defined. Only the Normal distribution type allows editing its value. # of degrees of freedom: Enter the number of existing links. Sensitivity coefficient: Enter the coefficient that determines the correlation between variables in the measurement process.
8.Use the Process tab to associate the processes by which the associated assets will pass in the standard activity in question. These processes refer to the necessary adjustments to use the asset. To associate them, click on the
9.The Acceptability criterion tab will only be displayed if the Control calibration result option is selected in the Calibration
10.Use the Extra calculation tab to enter the extra equations. The objective of these equations is to present the asset condition, that is, if it needs to be adjusted, fixed, or even disposed of. To do that, click on the Sequence: Sequential number of the extra calculation. This field is automatically filled in by the system. ID #: Enter the number or code that identifies the extra calculation. Equation: Select the
11.Use the Point tab to add the points related to the calibration table. Click on the
12.Use the Comments tab to enter general comments about the calibration table.
13.Save the record. |