|
Manual document separation can be performed both in the Capture step, as in the Document separation.
This section is not valid if the batch type set in the capture configuration is "Single document", because all files will be associated with a single document, meaning, it is not possible to separate them.
|
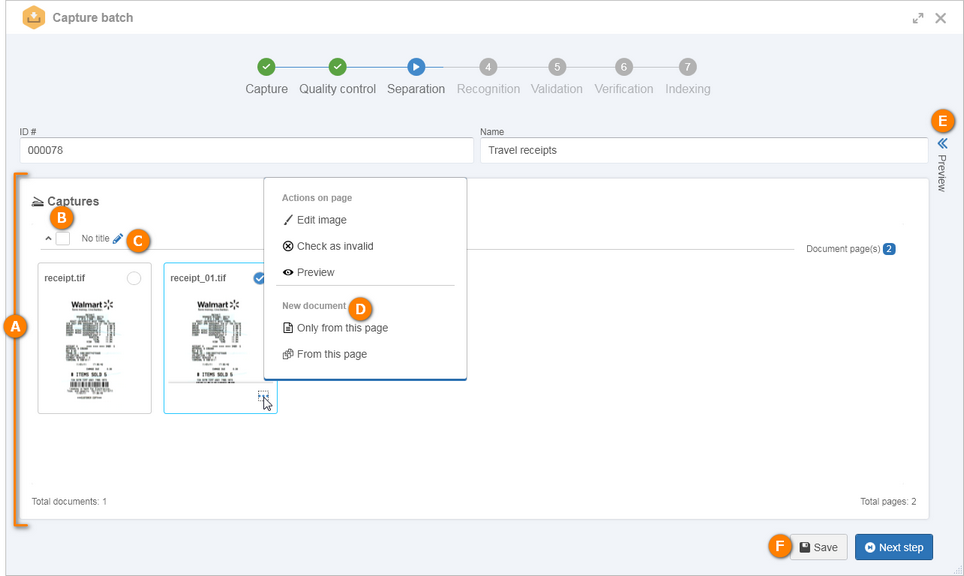
The batch screen in the separation step will be displayed according to the following example:

A
|
In the Captures panel, the files that make up the batch are displayed. If the separation is being performed during the capture step, the files will be displayed in the "Loose files - Will comply with the batch rules" grouper. If the separation is being performed in the "Separation" step, the files will be displayed in the "No title" grouper.
If in the capture configuration was parameterized that document separation is automatic, but a manual separation is performed in the Capture step, then the system will automatically separate only the files present in the "Loose files - Will comply the batch rules" grouper.
|
B
|
Click on each file to hide it and thus hide the files that compose it or expand it and view the files.
To delete a grouper (document), it is first necessary for it to be empty. To do that, disassociate the files and then check the option that corresponds to it. Once done, click on the Delete button that will be displayed at the bottom part of the "Captures" panel. Confirm the request made by the system to perform this operation.
|
C
|
 To define a title for the grouper (document), click on the To define a title for the grouper (document), click on the  icon and fill out the following fields: icon and fill out the following fields:
ID #: Enter a number or code to identify the document.
Title: Enter a title for the document.
Category: If the "Dynamic category selection" option is checked in the capture configuration, click on this field to change the categories that will classify the document. If this option is not checked, the document will be created in the category defined in the capture configuration.
If in the Processing section of the capture configuration it was set that the ID # and/or title will be filled in from an index or relationship variable, this procedure will occur when executing the "Relationship" step. In case these fields are filled put in the Capture step, the data entered will be overwritten with the values set in the "Processing" section.
|
D
|
 To create a new document that the file will be associated with, first, select the desired file. Then, click on To create a new document that the file will be associated with, first, select the desired file. Then, click on  and select the desired option: and select the desired option:
▪Only from this page: Allows separating the selected file in a new document. ▪From this page: Allows separating the selected file and all files that follow it in a new document. Another way to create a document is to select several files and click on the New document option that will be displayed at the bottom part of the "Captures" panel. The batch can be divided into as many documents as desired. For a detailed description of the other options that can be performed in the page (file), refer to the Actions on page topic.
|
E
|
On the right side of the screen, there is an option that allows expanding and hiding the Preview panel. If the file is an image (tif, tiff, gif, png, jpg, jpeg and bmp), it will be possible to view its content. It is also possible to view the indexes configured in the recognition profile associated with the capture configuration of the batch. Refer to the Preview panel topic for a detailed description on the buttons displayed on the toolbar.
|
F
|
After setting all the necessary configurations, save the batch. This operation does not send it to the next configured step.
|
If you wish to add a file (page) to a document, change the document or even change the order of the files within a document, simply click on it, drag it to the desired grouper/position and drop it.
|
|


