|
The flowchart allows you to see at which point in the flow an incident is executed and, if necessary, some changes can be made. When accessing the flowchart of an incident in progress, for example, the executors of the activities that have not yet been executed can be changed along with the deadline of the activity that is enabled for execution. To change the flow of an incident by adding or removing activities, gateways, or subprocesses, the incident must be locked for editing. See the operations that may be performed in the following situations:
The operations described in this section can only be performed by users defined as process managers or instance managers. The flowchart will be displayed for viewing ONLY when:
▪The logged user is NOT the instance/process manager or does NOT have the "Edit" control enabled in the incident security list. ▪The incident status is "Postponed", "Canceled" or "Closed". |
From the records list of the Management  Incident menu, select the incident in progress, whose execution information changes. Incident menu, select the incident in progress, whose execution information changes.
Incidents with the "In progress" status may be identified in the list of records by the  icon. icon.
|
After that, click on the  button. At this point, the screen to edit the flowchart will be displayed: button. At this point, the screen to edit the flowchart will be displayed:
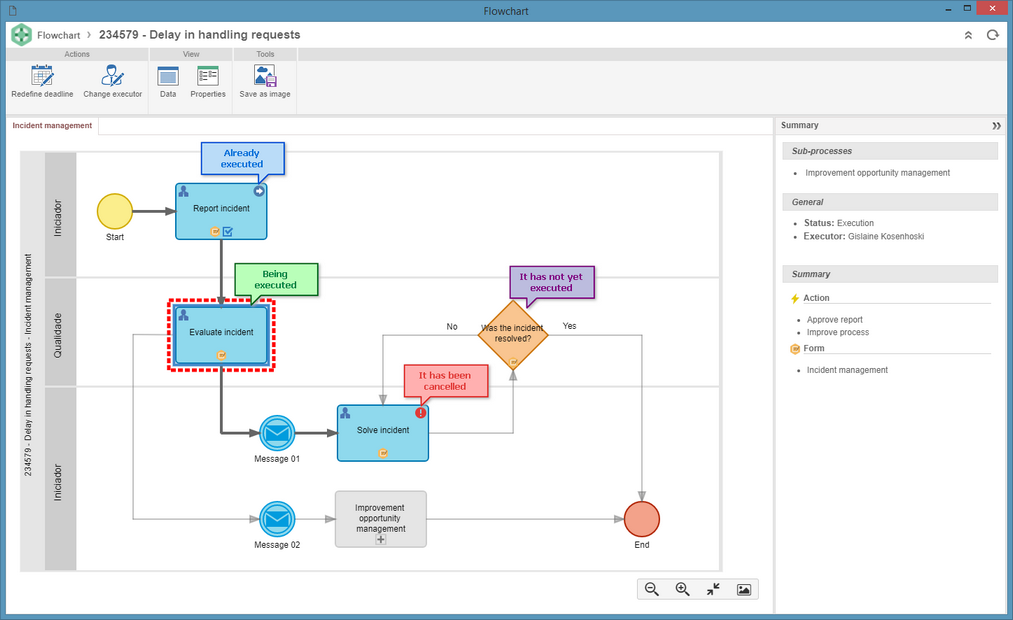
▪The icons of the actions performed on the activities executed or canceled are displayed in the flowchart, allowing to visually identify the action that was taken in each activity. ▪If the party responsible for executing an activity is a group (department, role, or functional role), by selecting it in the flowchart, the Summary panel will display the party responsible for the execution and when you click on the executor, the system will display the list of users who are members of the group, that is, the possible executors of the activity. |
When you select an activity or decision in the flowchart, some buttons will be displayed in the Actions area in the flowchart buttons panel (Ribbon). The actions available vary according to the situation of the selected activity/decision:
The Enable item button will only be enabled when you select an activity/decision that has already been performed. When you click on this button, a screen will be displayed, in which the Explanation must be entered to return to the execution of the activity/decision.
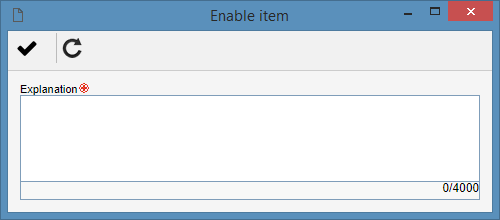
After entering the explanation, click on the  button. At this point, the activity will be re-enabled for execution. The completed information, such as attachments, attributes, checklists, will not be lost. button. At this point, the activity will be re-enabled for execution. The completed information, such as attachments, attributes, checklists, will not be lost.
|
The Redefine deadline button will be enabled when you select an activity/decision that is under execution. Clicking on this button will display a screen, in which the Date/Time and the Explanation should be entered to change the deadline of the activity/decision.
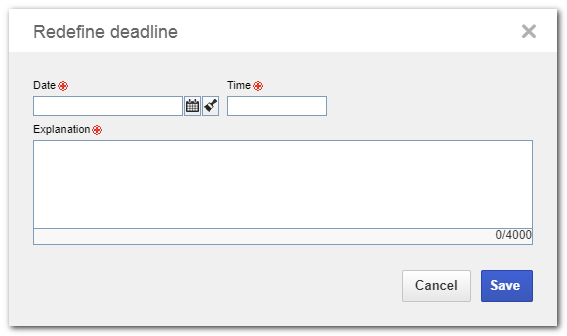
After entering the new deadline of the activity, click on the Save button to make the deadline change.
|
The Change executor button is enabled when selecting an activity/decision that under execution or has not yet been executed (it is further down the flow). Clicking on this button will display a screen in which the new executor of the activity should be selected. To do that, complete the following fields:
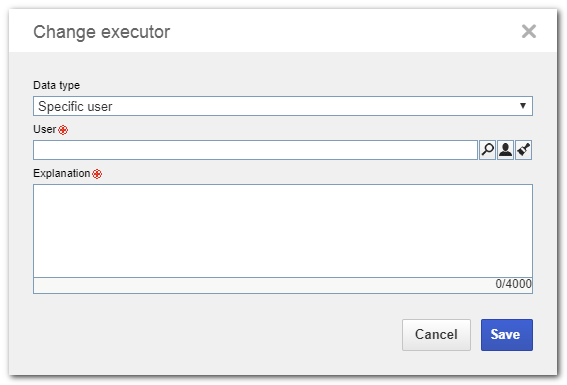
Responsibility type: In this field, select the responsibility type for the activity:
▪Specific user: If this option is selected, the activity must be performed by a particular user. To do so, in the Specific user section, select the desired user in the respective field. ▪Functional role: If this option is selected, the activity must be performed by a user of a certain functional role. To do that, in the Functional role section, select the functional role responsible for performing the activity in question. In this case, it will also be possible to define whether the execution of the activity will be restricted to specific department (defined in the respective field) or whether the department of the executor will be restricted. ▪Department: If this option is selected, the activity must be performed by a user of a certain department. To do that, in the Department section, select the department responsible for performing the activity in question. ▪Department/Position: If this option is selected, the activity must be performed by a user who performs a certain position in a department. To do that, in the Department/Position section, select the department and position of the user that will be responsible for performing the activity in question. Explanation: In this field, enter an explanation for the change of the executor of the activity.
After making the change, click on the Save button to make the changes.
|
|
Incidents that are "Blocked for editing" can be identified in the list of records by the  icon. Refer to the Editing the status of an incident section for a detailed description on how to perform this operation. icon. Refer to the Editing the status of an incident section for a detailed description on how to perform this operation.
|
Changing the flowchart can only be performed by users who are managers of process/instances or who have the "Edit" control allowed in the incident security list.
|
1.
|
From the list of records of the Management  Incident menu, select the blocked incident whose flowchart you wish to edit. Incident menu, select the blocked incident whose flowchart you wish to edit.
|
2.
|
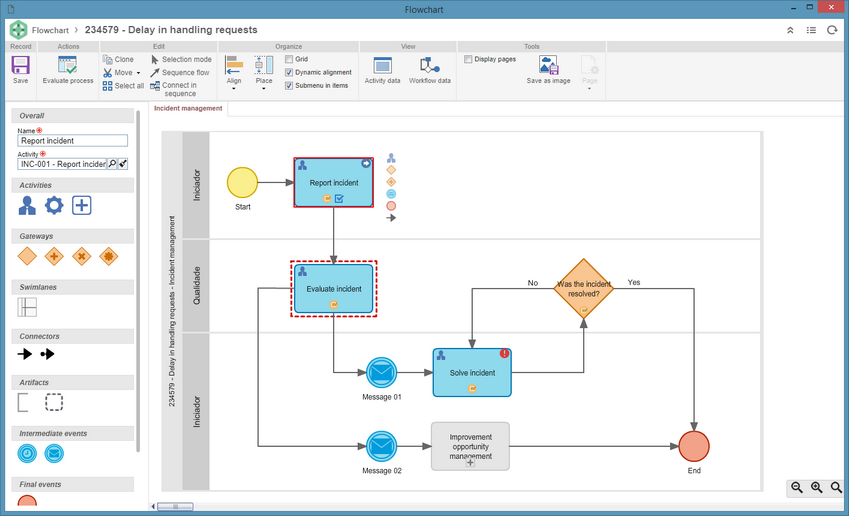
After that, click on the  button. At this point, the screen to edit the flowchart will be displayed: button. At this point, the screen to edit the flowchart will be displayed:
|
3.
|
On the flowchart screen, make the necessary changes. It will be possible to make changes such as: adding or deleting activities, gateways and sub-processes, editing the assignments of roles and view permissions, setting deadlines for activities, in short, redefining the whole structure. Remember that these changes do not affect the template saved in the SE Process component.
▪Refer to the specific documentation of the SE Process component for more information on the operations that can be performed on process flowcharts. ▪When accessing the data of an activity enabled for execution or that has yet to be executed in a flowchart that is blocked for editing, it will be possible to edit the parameterization (Configuration  Instance) for instance control and identification, as well as the dynamic duration configuration and the assignment of the status for the activity. Instance) for instance control and identification, as well as the dynamic duration configuration and the assignment of the status for the activity. |
|
4.
|
After making all the necessary changes, make sure that the flowchart has no modeling errors.
|
5.
|
On the main screen toolbar, click on the  button to unlock the incident. Thus, it will return to execute its activities. button to unlock the incident. Thus, it will return to execute its activities.
|
|
|


