|
To add a new test plan, click on the  button on the main screen toolbar. To edit a record, select it in the list of records and click on the button on the main screen toolbar. To edit a record, select it in the list of records and click on the  button. button.
On the screen that the system will open, enter an ID # and a name for the plan.

Save the record. Then, configure the following tabs:
|
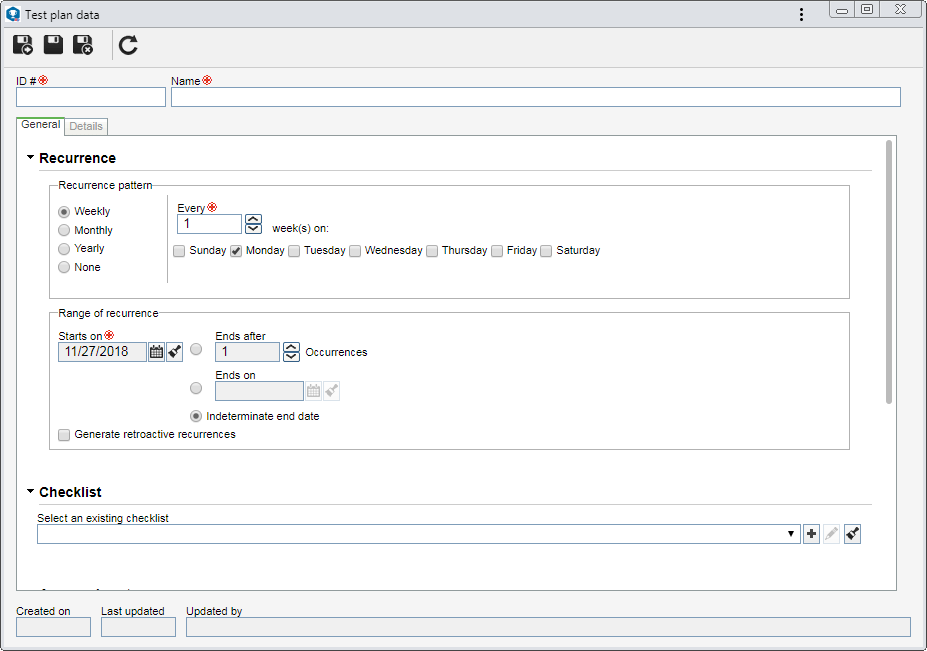
Define the frequency in which the tests of this template will be performed. To do that, configure the following fields:
Option
|
Recurrence pattern:
|
Weekly
|
The test plan will be executed every few weeks and on specific days. In the Every ___ week(s) on field, enter the number of the desired weekly frequency and, after that, check the days of the week corresponding to the days in which the test plan will occur. For example: Every single week on Monday, Wednesday, and Friday.
|
Monthly
|
The test plan will be executed on a specific day of the month. For that, select one of the following options:
▪Day __ every __ month(months): Select this option for the test plan to occur on a determined day every determined number of months. For example: Day 15 every 1 month. ▪The ____ of each __ month(months): Select this option for the test plan to occur on a determined day every determined number of months. For example: The last Wednesday of each month. |
Yearly
|
The test plan will occur on a specific day of the year. For that, select one of the following options:
▪On ____: Select this option for the test plan to occur on a specific date of the year. For example: On June 29th. |
None
|
Select this option for the test plan to have no recurrence. The user may execute it as necessary.
|
Range of recurrence:
|
Starts on
|
This field is filled in by the system with the test plan start date; however, it is possible to edit it. In this case, select the date from which the plan recurrence will be valid.
|
Ends after __ occurrences
|
Test plan recurrences will be ended after reaching a certain number of occurrences. Then, determine this amount.
|
Ends on __
|
Enter a specific date on which the test plan recurrence will end.
|
Indeterminate end date
|
The test plan recurrences will not have a specific deadline to be ended.
▪Generate retroactive recurrences: Check this option to make it possible to expedite the retroactive record of tests already performed. This feature allows you to create, for example, previously executed tests, outside the system, etc. |
Generate retroactive recurrences
|
Check this option to make it possible to expedite the retroactive record of tests already performed. This feature allows you to create, for example, previously executed tests, outside the system, etc.
|
Checklist
Select an existing checklist and associate it with the test plan. The questions in this checklist will be used as criteria for performing the control test.
Population
In this section, the field will be filled out by the system with the Population associated with the test plan when configuring it. For further details on the association of a population, access the Creating a population section.
Approval route
Select the route that is responsible for approving the result of the tests of this plan. The members of this route will receive the "Control test approval" task. Use the other buttons next to the field to add a new responsibility route, edit the data of the selected route, and clear the field.
Results
In this section, define the test result configurations. To do that, check, in the Comments? column, if it will be mandatory to add comments to the test result (Passed or Failed). In the Result >= (%) column, set the necessary value (between 1 and 100%) for the test result to be Passed. It is important to point out that, if a checklist (step 4) has been associated with the test plan, the questions in this checklist will be used as criteria to reach the desired result percentage. Example: If the checklist associated with the test plan has 10 questions to be answered and the value entered in the Result >= (%) field is 70%, during the test execution, 7 or more questions must be answered as YES for the analysis or control to pass the test.
If no checklist has been associated, the test samples must be evaluated only through "Passed" or "Failed" options.
SE Risk allows the customization of the possible plan test results, enabling a better aid in internal communication and the flexibilization of results after its execution. To perform this customization, click on the "Customize results" button at the bottom of the "Results" section and then click on the  button on the side toolbar of the section. Fill out the following fields of the screen that will be displayed: button on the side toolbar of the section. Fill out the following fields of the screen that will be displayed:
Result data
|
Name
|
Enter a name for the result.
|
Icon
|
Select a risk for the result.
|
Color
|
Select a color for the result.
|
Result >= (%)
|
Enter the minimum value (between 0 and 100%) to obtain the result being recorded.
|
After configuring the previously described fields, define if the result in question will be Failed or Passed. Configure also if you wish to enable comments for this result. It is also possible to enable the creation of events; to do that, select this option and fill out the following fields:
|
Generate event for component
|
Select the component in which the event will be generated if the result in question is obtained in the test:
▪Workflow: The system starts a workflow for the event. In the Process field, select the process that should be instantiated. ▪Incident: The system will record an incident related to the event. In the Incident type field select the type that will classify the incident that will be recorded. ▪Problem: The system will record a problem related to the event. In the Problem type field select the type that will sort the problem that will be recorded. Note: The resources of the mentioned components will function correctly if they are part of the solutions acquired by your organization. For more details on the operations, refer to the specific manual of the corresponding component.
|
|
|
Security
In this tab, it is possible to configure the security of the test plan. To do that, at the top of this tab, select one of the following options:
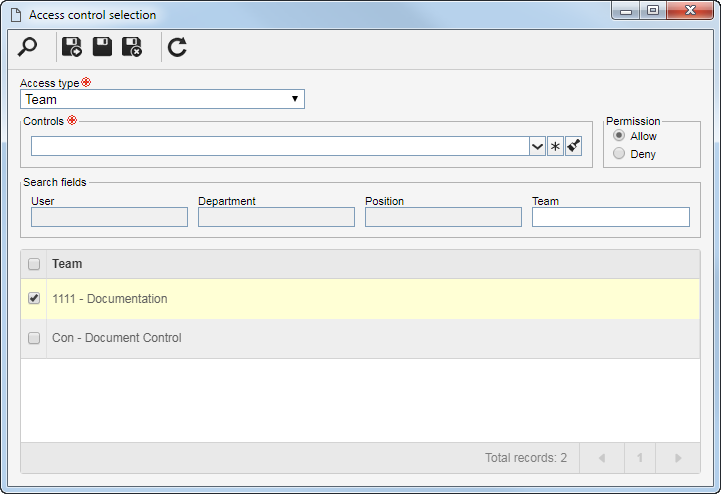
▪Public: Select this option for any user to have access to the plan in question. ▪Restricted: Select this option to restrict the access to this plan. At this point, the sidebar buttons will be enabled. Click on the  button and fill out the fields on the screen that will be opened: button and fill out the fields on the screen that will be opened:

i.
|
In the Access type field, select one of the following options to set the access type that will compose the security list:
▪Team: It will be composed of the members of a team previously created in SE Risk. ▪Organizational unit: It will be composed of users from a selected organizational unit. ▪Department/Position: It will be composed of users from a specific department of the company, who have a specific position. ▪Position: It will be composed of users who hold a specific position in the company. ▪User: It will be composed of a specific user. ▪All: It will be composed of all users who have access to the SE Risk component.
|
ii.
|
In the Controls field, it is possible to select the actions that may or may not be performed in the plans of this type. To do so, select the controls that will be granted to access the type selected previously:
▪Edit: Changes the plan data of this type. ▪Delete: Deletes the plans of this type. ▪List: Allows viewing the plans of this type in the system view. ▪View: Allows viewing the data screen of the plans of this type.
Use the buttons located next to the field to expand and view the list of controls, mark all available controls, and clear the markups you have made.
|
|
iii.
|
Select in the Permission field, if the controls checked previously will be granted or denied for access type.
|
iv.
|
According to selected access type, Filters will be enabled to be filled out. Use them to facilitate the search of users who will form the security list.
|
v.
|
 After that, click on the After that, click on the  button on the toolbar of the selection screen. Depending on the access type selected and the values entered in the filters, the result will be displayed in the list of records, located at the bottom of the screen. Select the ones that will compose the security list and save the record. Hold the SHIFT or CTRL keys down or check next to each item to select more than one record at a time. button on the toolbar of the selection screen. Depending on the access type selected and the values entered in the filters, the result will be displayed in the list of records, located at the bottom of the screen. Select the ones that will compose the security list and save the record. Hold the SHIFT or CTRL keys down or check next to each item to select more than one record at a time.
|
Test execution attributes
In this section, associate the attributes that will complement the test execution.

|
Click on this button to associate an attribute that was previously created in the system with the test. Refer to the Adding attributes section for further details on how to perform this operation.
|

|
Click on this button to save the association of attributes with the revenue type.
|

|
Click on this button to disassociate the attribute selected in the list of records from the type.
|
If the attribute configurations are edited (e.g.: an attribute checked as required becomes non-required or vice versa), they will be replicated to the revenues of this type when their data is edited.
|
Description
In this section, associate the documents related to the test plan being created. For this resource to work correctly it is necessary for the SE Document component to be part of the solutions acquired by your organization. Refer to the Adding documents section for further details on how to associate documents from SE Document.
Document
In this section, associate documents from SE Document with instructions or information on the test plan. For this resource to be available, it is necessary for the SE Document component to be part of the solutions acquired by your organization.
Attachment
In this section, it is possible to add attachments related to the test plan that is being created. Refer to the Adding attachments section for further details on how to add attachments.
|
After filling out all the necessary fields, save the record.
|


