|
Rules are mechanisms that make the form display fields, hide them or make them mandatory in different situations. Use the rules to define the actions that must be executed according to the information filled out in the form. The actions allow comparing the entered information, editing the properties of fields, displaying a message on the screen, executing another rule and executing a dataset to fill out form variables with the result of this action.
To have access to the form rules, open the responsive form designer and access the "Rules" tab. At this point, the rules panel will be displayed, listing all rules of the form. This panel will be empty if there are no rules configured. See below the operations that can be performed:
Create rule
1.To create a rule, access the "Rules" tab from the responsive form designer screen and click on "New rule".
2.On the screen that will be opened, define a name for the rule and click on "Save and close".
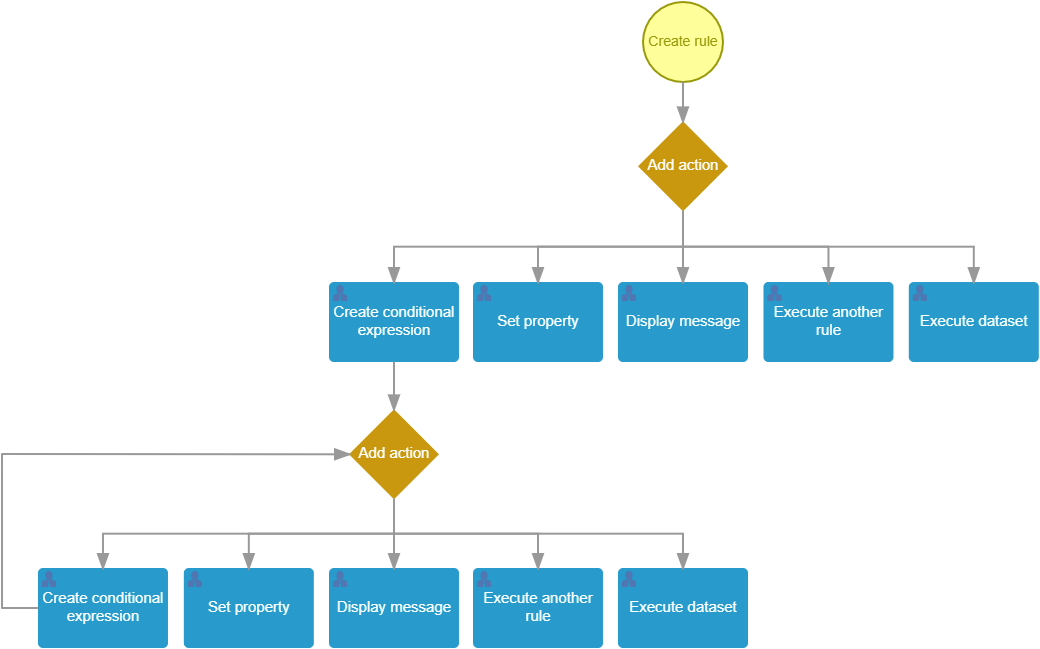
3.With the rule selected in the rules panel, click on "Add action" and select one of the options: a.Create conditional expression: Use this option to compare user information. See more details below. b.Set property: Use this option to edit the property of an element of the form (make visible, enable or make required). See more details below. c.Define variable: Use this option to edit the source of the value of a variable. d.Clear field: Use this option to clear the value of a certain field of the form. e.Display message: Use this option to display a message on the screen. See more details below. f.Execute another rule: Use this option to execute another rule of the form. See more details below. g.Execute dataset: Use this option to fill out fields of the form through the execution of a dataset. See more details below.
4.It is possible to add other actions to the same rule. Repeat this procedure for the other actions that will be created.
5.If you need to adjust an action configured in the rule, click on the  button that is displayed when selecting the action. button that is displayed when selecting the action.
Create conditional expression
You can use conditional expressions to compare or verify form information, such as to verify if a form field is null (empty, not filled out). Note: The conditional expression is equal to the IF and ELSE functions of the Formula editor.
A conditional expression returns the True or False value for each case (comparison). If the result of a conditional expression is True, a certain action will be executed; otherwise, the action will not be executed. To execute another action when the conditional expression returns the False value, add the "Else" option.
The conditional expression can have two structures (IF-THEN-END or IF-THEN-ELSE-END):
IF <condition> THEN
<action that will be executed if the condition is true>
End IF
|
IF <condition> THEN
<action that will be executed if the condition is true>
ELSE
<action that will be executed if the condition is false>
End IF
|
Configure expression
1.During the creation of the rule, after clicking on the "Add action" button and selecting the "Create conditional expression" option, the system will display a screen in which the conditions must be created.
2.Click on "Add condition". At this point, the screen in which the condition must be assembled will be displayed.
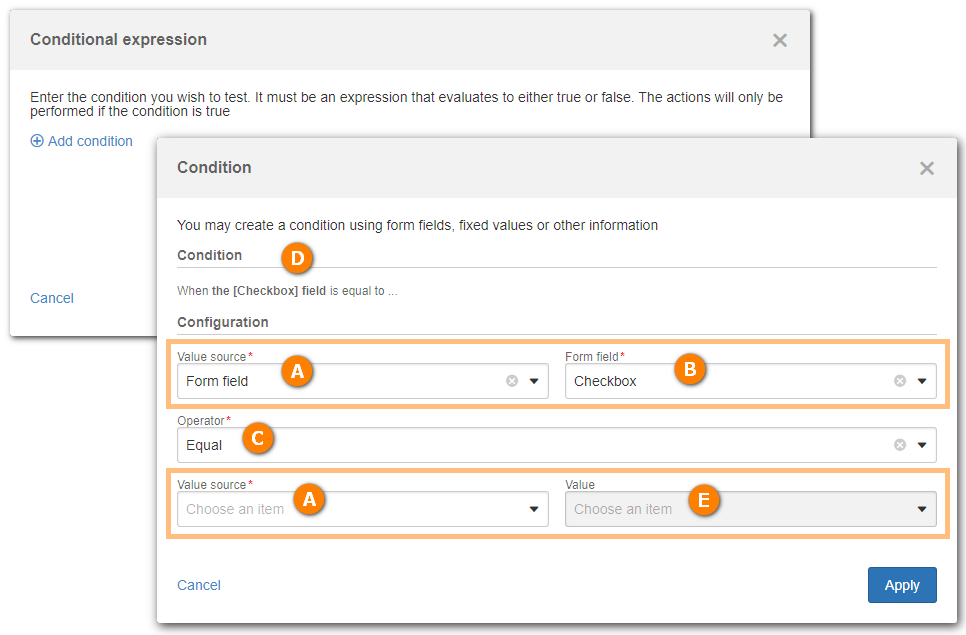
3.Define the condition and verify it in the Condition section. See further details on the options of each field in the tables below.
4.After filling out all fields in the condition, click on "Apply". At this point, the condition screen will be closed and the created condition will be listed in the conditional expression screen.
5.If it is necessary to merge several conditions in the same expression, click on "Add condition" and define the condition.
6.After filling out all fields in the condition, click on "Apply". At this point, the condition screen will be closed and the created condition will be listed below the first condition.
7.Add as many conditions as necessary for this expression.
8.Select the AND or OR option next to each condition to define if all (AND) or one of (OR) the expressions must be true to execute the IF actions.
A
|
In the "Value source" field, select one of the options to define the source of the value that will be used in the conditional. The values of the condition may come from form fields, variables, expressions and functions already recorded in the form, or fixed values. See more details about this field in the table below.
|
B
|
After selecting the value source, it will be necessary to specify the value according to the previously selected option. The "Type" and "Value" fields are displayed in this location when the "Fixed value" option is selected, and they must be filled out. Enter the fixed value type and the respective value that will be used in the conditional expression. See more details about this field in the table below.
|
C
|
The "Operator" field allows defining the criterion to verify the expression. It is possible to verify if certain field of the form is filled out or not, as well as to compare two expressions through operators such as: equal to, different from, null, not null, greater than, less than, greater than or equal to, less than or equal to, contains, and does not contain. By selecting a comparison operator, the fields in the second expression will immediately be enabled. See more details about this field in the Operator table.
|
D
|
This area displays the condition in written form. Thus, it is possible to verify if the condition has been configured correctly. The condition may return two results: True or False. When the condition is true, the action assigned to this condition will be executed; otherwise, no actions will be executed or the action assigned to "Else" will be executed.
|
E1
|
Expression 1 - Use this area to define the first expression of the condition. If the condition only verifies if a value is null/false or not, it will not be necessary to configure a second expression; however, if the conditional expression is comparing two values, it will be necessary to define the second expression for the condition.
|
E2
|
Expression 2 - Use this area to define the second expression of the condition. This area will be enabled when a comparison operator is selected (equal to, different from, greater than, less than, greater than or equal to, less than or equal to, contains and does not contain).
|
Value source
|
|
Form field
|
Select this option to use the value of certain form field in the condition. It is possible to verify if the field has been filled out or compare the value of the field with another value, which may be a fixed value or the value of another form field.
|
Variable
|
Select this option to use a variable from the table in the condition.
|
Function
|
Select this option to use a function previously recorded in the form in the condition.
|
Expression
|
Select this option to use an expression previously recorded in the form in the condition.
|
Fixed value
|
Select this option to use a fixed value for the condition. The system accepts fixed values of these types: text, paragraph, integer, decimal, time, date or boolean.
|
OPERATOR
|
OPERATOR DESCRIPTION
|
FIELDS
|
Equal
|
This operator allows verifying if the value of the first expression (E1) is equal to the value of the second expression (E2). If the values of the two expressions are the same, the condition will return the value "True"; otherwise, it will return the value "False".
Note: In the cases of checkboxes (booleans), the condition will return "True" if both fields are checked (true) or if both are unchecked (false), indicating that the values are the same. The condition will return "False" if the values are different, that is, if a field is checked (true) and the other is unchecked (false).
|
Text, Paragraph, Option group, Simple list, Fixed value, Date, Time, Decimal, Integer, Checkbox, Boolean
|
Different
|
This operator allows verifying if the value of the first expression (E1) is different from the value of the second expression (E2). If the values of the two expressions are different, the condition will return the value "True"; otherwise, it will return the value "False".
Note: In the cases of checkboxes (booleans), the condition will return "True" if a field is checked (true) and the other is unchecked (false), indicating that the values are different. The condition will return "False" if both fields have the same value, that is, if both are checked or unchecked.
|
Text, Paragraph, Option group, Simple list, Fixed value, Date, Time, Decimal, Integer, Checkbox, Boolean
|
Null
|
This operator allows verifying if the value of the expression (E1) is null. If the value of the expression is null, that is, if the field is not filled out, the condition will return the value "True"; otherwise, it will return the value "False".
|
Text, Paragraph, Option group, Simple list, Fixed value, Date, Time, Decimal, Integer, Checkbox, Boolean, Advanced list, Data source list, File, Signature
|
Not null
|
This operator allows verifying if the value of the expression (E1) is not null. If the value of the expression is not null, that is, if the field is filled out, the condition will return the value "True"; otherwise, it will return the value "False".
|
Text, Paragraph, Option group, Simple list, Fixed value, Date, Time, Decimal, Integer, Checkbox, Boolean, Advanced list, Data source list, File, Signature
|
Contains
|
This operator allows verifying if the text of the first expression (E1) contains the text of the second expression (E2). If the text of the second expression is contained in the text of the first expression, the condition will return the value "True"; otherwise, it will return the value "False".
|
Text, Paragraph, Option group, Simple list and Fixed value
|
Does not contain
|
This operator allows verifying if the text of the first expression (E1) does not contain the text of the second expression (E2). If the text of the second expression is not contained in the text of the first expression, the condition will return the value "True"; otherwise, it will return the value "False".
|
Text, Paragraph, Option group, Simple list and Fixed value
|
Greater than
|
This operator allows verifying if the value of the first expression (E1) is greater than the value of the second expression (E2). If the value of the expression is greater than the value of the second expression, the condition will return the value "True"; otherwise, it will return the value "False". In date or time verification, the date/time is considered to be later than the other date/time.
|
Date, Time, Decimal, Integer
|
Less than
|
This operator allows verifying if the value of the first expression (E1) is less than the value of the second expression (E2). If the value of the expression is less than the value of the second expression, the condition will return the value "True"; otherwise, it will return the value "False". In date or time verification, the date/time is considered to be earlier than the other date/time.
|
Date, Time, Decimal, Integer
|
Greater than or equal to
|
This operator allows verifying if the value of the first expression (E1) is greater than or equal to the value of the second expression (E2). If the value of the expression is greater than or equal to the value of the second expression, the condition will return the value "True"; otherwise, it will return the value "False". In date or time verification, the date/time is considered to be later than or equal to the other date/time.
|
Date, Time, Decimal, Integer
|
Less than or equal to
|
This operator allows verifying if the value of the first expression (E1) is less than or equal to the value of the second expression (E2). If the value of the expression is less than or equal to the value of the second expression, the condition will return the value "True"; otherwise, it will return the value "False". In date or time verification, the date/time is considered to be earlier than or equal to the other date/time.
|
Date, Time, Decimal, Integer
|
True
|
This operator allows verifying if the value of the expression (E1) is true. In the case of a checkbox (or fixed boolean value), this operator checks if the field is checked or not. If the value is checked (true), the condition will return "True", but if the field is unchecked (false), the condition will return "False".
|
Checkbox, Boolean
|
False
|
This operator allows verifying if the value of the expression (E1) is false. In the case of a checkbox (boolean), this operator checks if the field is checked or not. If the value is unchecked (false), the condition will return "True", but if the field is checked (true), the condition will return "False".
|
Checkbox, Boolean
|
Set property
Use this action to edit the property of a form field. In the "Element" field, select the field whose properties will be edited. In the "Property" field, select the property, define the value to be applied to it in the "Value" field, and select an operation (if necessary). See more details on the configurations available for each property:
Property
|
Description
|
Fields
|
Visible
|
This property allows making the field visible or hidden. In the "Value" field, select the Yes option to make the field visible or the No option to hide it.
|
Date, Decimal, Time, Integer, Paragraph, Text, Option group, Simple list, File, Signature, Advanced list, Data source list, Checkbox, Cause analysis, Attachment, Button, Action plan, Table, Card, Image, Panel, Section and Title.
|
Enabled
|
This property allows enabling or disabling the completion of the field. In the "Value" field, select the Yes option to enable the field or the No option to disable it.
|
Date, Decimal, Time, Integer, Paragraph, Text, Option group, Simple list, File, Signature, Advanced list, Data source list, Checkbox, Cause analysis, Attachment, Button, Action plan and Table.
|
Required
|
This property allows making the completion of the field mandatory or optional. In the "Value" field, select the Yes option to make the field mandatory or the No option to make it optional.
|
Date, Decimal, Time, Integer, Paragraph, Text, Option group, Simple list, File, Signature, Advanced list and Data source list.
|
Value
|
This property allows changing the values of fields to pre-set values. The configuration of the "Value" field depends on the field type, as described below:
▪Checkbox: Select the "True" option to check the checkbox or the "False" option to uncheck it. ▪Date: Select the new date for the form field. ▪Time: Enter the new time for the form field. ▪Decimal: Define the new decimal value that will be added to the field. ▪Integer: Define the integer number that will be added to the field. ▪Option group: Select the option that will be checked in the field. The options of the selected field will be listed. ▪Simple list: Select the option that will be selected in the field. The options of the selected field will be listed. ▪Text: Enter the new text that will be displayed in the field. ▪Paragraph: Enter the new text that will be displayed in the field. |
Date, Decimal, Time, Integer, Paragraph, Text, Option group, Simple list and Checkbox.
|
Dynamic value
|
This property allows changing the values of fields to values originated from a variable. The variable value can come from an expression, a data source or a fixed value. In the "Value" field, select the variable that has the value that will be applied to the field. All form variables will be listed; therefore, make sure to select a variable whose value is valid for the type of field being edited.
|
Date, Decimal, Time, Integer, Paragraph and Text.
|
Click on "Apply" to save the configuration.
Define variable
Use this action to edit the source of the value of a variable created in the form.
In the "Variable" field, select the variable whose value will be edited.
In the "Value source" field, select the desired type and the option with the value to be applied to the variable.
Clear field
Use this action to clear the value of a certain field of the form. To do that, select the desired form field.
Display message
Use this action to display a message in the form screen.
In the "Message" field, write the message to be displayed.
In the "Type" field, select one of the message types: information, success, warning or critical.
Click on "Apply" to save the configuration.
Execute another rule
Use this action to execute another form rule.
In the "Rule" field, select the rule that will be executed.
Click on "Apply" to save the configuration.
Open external page
Use this action to execute the URL on a new window or in the background.
Perform operation in the table
Use this action to execute, in the specified table, an operation of the "Sum", "Maximum", "Minimum", or "Counter" types.
Execute dataset
Use this action to assign the result of a dataset to a form table variable.
For example, in a dataset that returns the user ID and name, the ID can be assigned to a variable while the name is assigned to another variable.
Configuration:
See the configuration details in the steps below:
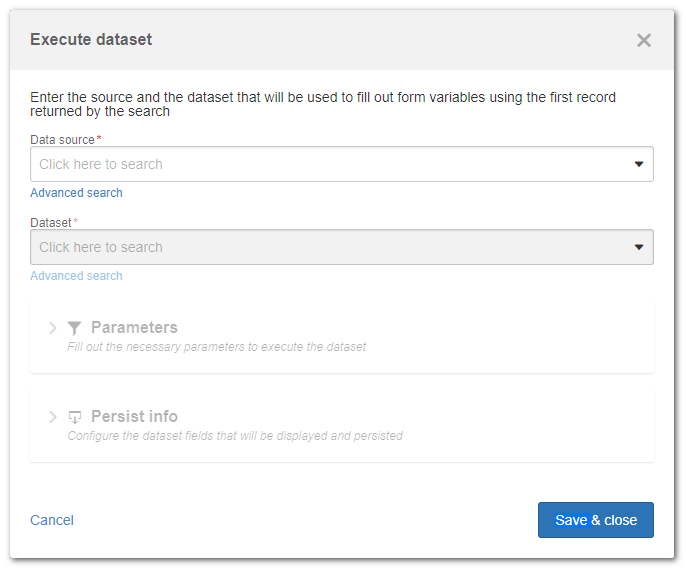
1.Select the data source that will be used for the connection with the database. Note: The data sources displayed in this field have been recorded in the SoftExpert Administration component through the "Configuration  Data source Data source (AD047)" section. Data source Data source (AD047)" section.
2.On the "Dataset" field, select the dataset that has the query (Query/SQL). The dataset must be created in the "File Dataset" menu.
3.The "Parameters" section will only be enabled if there is a parameter set for a condition (WHERE) of the query (Query/SQL) of the selected dataset. For example: if a dataset lists the users by department is selected, in which the department will go through a parameter, it will be necessary to define the source of the department parameter, which can be a form field, a variable or a fixed value.
4.Use the "Persist info" section to select the fields that will receive the value (from the data source) that will be selected in the form.
5.Click on "Apply" to save the configuration of the dataset execution action.
Execute REST web service
Use this action to execute a REST web service on a form button or any object that has events for rule execution. Thus, it is possible, for example, to search for data in third party systems through REST web service and fill out the form fields with the returned data. The system also allows sending data when using the service, but with a restriction in the sending of electronic files and multiple values for the same parameter.
Add comments
Use this action to add a comment to the instance history using value filled out in the form.
In the "Value source" field, select an item and a value for it.
Click on "Save and exit" to save the configuration.
Change status
Use this action to edit the process instance status. To do that, select the desired status and click on "Save & close".
Change priority
Use this action to edit the instance priority. To do that, select a new evaluation method and a result for the method.
Execute activity
Use this action to execute activities through a form button when they are linked to the activity that loaded the form. These actions require the rule to be executed in the interface.
Configure rule in the form field
After creating the rule, it is necessary to assign it to the field that will trigger the execution of the rule:
1.First, access the "Form" tab on the responsive form designer screen.
2.Select the field that will trigger the rule. The rule can be triggered by selecting the field (focus), unselecting the field (remove focus) or editing the value of the field (change). For the button component, the rule will be triggered by clicking on it (click).
3.After selecting the field, click on the "Configure elements" button or double click on it.
4.In the configuration panel, locate the "Rules" section and define, in the respective field, the rule that must be executed. According to the field selected in the form, the following fields may be available for rule configuration: ▪Change: This option is displayed for the fields that have pre-set values, that is, list, date, option group and checkbox fields. The rule is executed as soon as there are any changes in the value, which can be selecting the value or switching the selected value for another one. ▪Focus: This option is displayed for the fields in which the values must be added manually, that is, text, paragraph, time, integer and decimal. The rule is executed as soon as the field is selected during the completion of the form. ▪Remove focus: This option is displayed for the fields in which the values must be added manually, that is, text, paragraph, time, integer and decimal. The rule is executed as soon as the field is unselected during the completion of the form. ▪Click: This option is displayed for the button component. The rule is executed as soon as the button is clicked during the completion of the form.
5.After associating the rule with the field, save the form.
Refer to the Examples section to view some examples for configurations of rules and variables in the responsive form.
|
|