Navigation:  Configuration > Asset > Asset type >

Configuring an asset type

Previous  Top  Next

To add a new asset type, click on the button on the main toolbar. To edit the data of a type, select it in the list of records and click on the button.


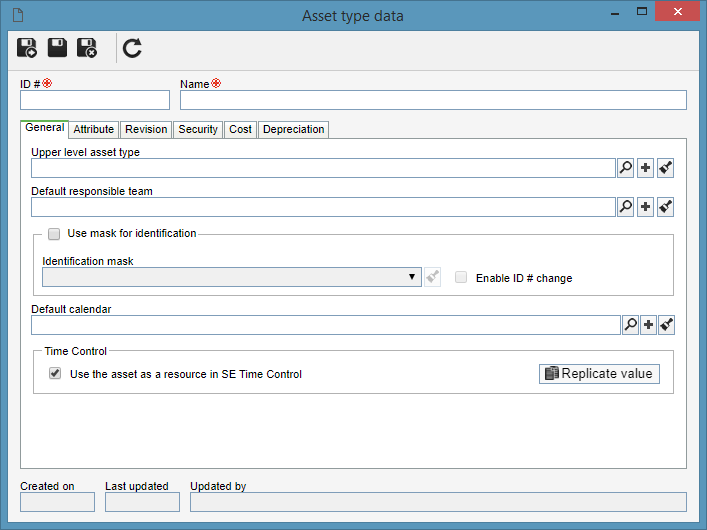
On the screen that will be opened, enter an ID # and a name for the asset type. The following tabs are available:


Note: To successfully add an asset type, it is necessary to fill out the desired fields in the General tab. After saving the data for the first time, the other tabs will be available to be filled out.


General

Upper level type: Fill out this field for the type to be hierarchically added below another asset type. In that case, select the desired asset type. If a type is selected in the main screen hierarchy, this field will be filled out by the system, but it will be possible to edit it.

Default responsible team: Fill out this field to predefine a team responsible for all assets classified by this type. Thus, when adding an asset to the type, the team will be filled out with the team selected in this field, but it will be possible to edit it.

Default calendar: Fill out this field to predefine the calendar that will be used for all assets classified by this type. Use the other buttons next to this field to add a new calendar and clear it.

Refer to the SE Administration component specific documentation for more information about adding and configuring calendars.

If the type already has assets recorded in it and this field is filled out/edited, use the Replicate value button for the new default calendar to be immediately applied to the assets.

Option

Checked

Unchecked

Use mask for the ID #

When adding assets to this type, the automatic identification resource will be used. The following fields will be enabled:

Identification mask: Select the desired identification mask. Use the other buttons next to the field to add a new mask, use it to generate the ID # and clear the field.

Enable ID # change: Check this option to allow the generated ID # to be manually edited when adding assets to this type. If it is not checked, the generated ID # may not be edited.

The ID #s must be manually entered by the user who is adding the assets to this type.

Use the asset as a resource1

Indicates that the assets of this type will also be considered resources in the SE Time Control component.

The assets of this type will not be considered resources. In this case, it will be necessary to add a resource of the "Asset" type and associate the desired asset with it.

1 - It will be displayed checked/unchecked by the system according to the configuration performed in the general parameters, and it will be possible to edit it. If the type already has assets created in it and the "Use the asset as a resource" option is edited, use the Replicate value button for the new configuration to be immediately applied to the assets.


Attribute

Use this tab to define attributes to complement the information of the assets of this type. On the side toolbar, the following buttons are available:

Click on this button to associate an attribute that was previously created in the system with the type. Refer to the Adding attributes section for further details on how to perform this operation.

Click on this button to disassociate the attribute selected in the list of records from the type.


Revision

In this tab, it is possible to configure means that will allow controlling the changes made to the scorecards of this type, thus keeping several versions of the same asset. See how to configure the revision of the assets that will be added to this type in the Revision section.


Security

Public: Select this option so that any user of SE Asset has access to this type.

Restricted: Select this option for only specific users of SE Asset to have access to the type. At this point, the sidebar buttons will be enabled. Use them to add, edit and delete accesses from the security list.

1.To add a new access to the security of the type, click on the button and perform the following steps on the screen that will be opened:

Team: It will be composed of the members of a team already registered in SE Asset.

Organizational unit: It will be composed of users of a particular organizational unit or department of the organization.

Department/Position: It will be composed of users from a specific department of the organization who have a specific position.

Position: It will be composed of users who hold specific position in the organization.

User: It will be composed of a specific user.

All: It will be composed of all users who have access to SE Asset.


2.According to selected access type, Filters will be enabled to be filled out. Use them to make it easier to search for desired records.

3.If the selected access type is Organizational unit, the hierarchy of business units and the departments belonging to them (if any) will be displayed.

4.Check the business units and/or desired departments. By checking the "Consider sublevels" option at the bottom of the screen, the system will also consider the organizational units that are down in the hierarchy of the selected organizational unit. Note that by checking this option, if new organizational subunits (whether they are business units or departments) are subsequently added, they will be automatically added to the security list.

5.Next to the hierarchy, the system also makes available buttons that allow you to check all the sub-levels of a particular organizational unit or uncheck all sub-levels. Note that by using the "Check all sub-levels" button if new organizational sub-levels are subsequently added, they will not be included in the security list.

6.After entering the fields above, click on the toolbar button on the selection screen. Depending on the selected access type and the values entered in the filters, the result will be displayed in the list of records, located at the bottom of the screen. Select the ones that will compose the security list. Hold the SHIFT or CTRL keys down or check next to each item to select more than one record at a time.

7.In the Controls field, expand the list and check the desired actions. Then, define if they will be allowed or denied for the access type:

Control

Allowed

Denied

Add

The user will be able to add new types to the levels below the asset type in question.

The user will not be able to add subtypes to the asset type in question.

Edit

The user will be able to edit the asset type data.

The user will not be able to edit the asset type data.

Delete

The user will be able to delete the asset type.

The user will not be able to delete the asset type.

Security data

The user will be able to edit the configurations performed in the "Security" tab of the asset type.

The user may edit the other data of the asset type, but the "Security" tab will remain blocked.

List

The type will be displayed for the user in the system screens that have standard activity type hierarchy.

The type will not be displayed for the user in the system screens that have standard activity type hierarchy.

View

The user will be able to view the standard activity type data screen in "read-only" mode.

The user will not be able to view the asset type data.

The controls that are not checked for a certain access type will be considered "denied".


Indicators

In this tab, it is possible to customize the configuration of the asset indicator charts. When creating a new type, the configurations displayed in the subsections of this tab will be inherited from the general parameters, and it will be possible to edit them to make them fit the reality of the assets of this type.

The following subsections are available:

MTTR

Mean time to repair (MTTR) is an indicator that presents the mean time taken to execute a repair in an asset after the occurrence of a failure. The lower this index, the greater the asset reliability will be.


Use the displayed fields to edit the end and the color of the first / second / last range. Use the "View chart" button to see how the chart will be displayed with the configurations applied to it.


MTBF

Mean time between failures (MTBF) is the average elapsed time between a failure and the next time it will occur in an asset. The higher this index, the greater the asset reliability will be.


Use the displayed fields to edit the end and the color of the first / second / last range. Use the "View chart" button to see how the chart will be displayed with the configurations applied to it.


MTTF

Mean time to failure (MTTF) is an indicator that presents the average system operating time before a failure occurs.

Use the displayed fields to edit the end and the color of the first / second / last range. Use the "View chart" button to see how the chart will be displayed with the configurations applied to it.


Availability

This indicator calculates how long the equipment operated in relation to the total time available for production. The formula to calculate availability is: Availability = MTBF / (MTBF + MTTR).


Use the displayed fields to edit the end and the color of the first / second / last range. Use the "View chart" button to see how the chart will be displayed with the configurations applied to it.


Performance

The performance indicator shows how well the equipment produced while it was in operation. It is related to the operation speed of the equipment. The performance compares the produced quantity with the theoretic quantity that might have been produced while the equipment was in operation, regardless of the quality of what has been produced.


Use the displayed fields to edit the end and the color of the first / second / last range. Use the "View chart" button to see how the chart will be displayed with the configurations applied to it.


Quality

This indicator presents the quality of what has come out of the machine, i.e., how many good items have been produced in relation to the total produced items.


Use the displayed fields to edit the end and the color of the first / second / last range. Use the "View chart" button to see how the chart will be displayed with the configurations applied to it.


Downtime

This indicator calculates the total time the asset remained out of operation. The downtime record must be finished.

Use the displayed fields to edit the end and the color of the first / second / last range. Use the "View chart" button to see how the chart will be displayed with the configurations applied to it.


Cost

Use this tab to associate the costs generated by the assets of this type. The value of each cost associated on this tab must be entered, further on, on the asset data screen.

Associates a cost type with the asset type. On the screen that will open, locate and select the desired cost type. Use the CTRL and SHIFT keys on the keyboard or check next to each record to select more than one type at a time.

Makes the completion of the value of the type selected in the list of records required.

Disassociates the cost type selected in the list of records from the asset type.


Depreciation

Option

Checked

Unchecked

Depreciate asset

Indicates that the assets of this type have been depreciated. In this case, select the desired depreciation method and fill out the other desired fields. See a full description below.

The assets of this type have been depreciated. In this case, this tab can be disregarded.


If the "Depreciate asset" option is checked, the following fields will be enabled:

Depreciation method


Straight line

The asset depreciates evenly throughout the total working life specified in the respective field.

Posterior capitalization and subsequent acquisitions require an increase in depreciation, by the value that would be necessary to totally depreciate the sum of the original working life of the asset.

This results in an increase in the length of time needed to depreciate an asset, i.e., the time period of the beginning of the depreciation until the book value zero is reached.

The following fields will be displayed:

Working life: Enter the number of years that compose the working life of the assets of this type Once done, click on the button next to the field. In the listing at the bottom of the screen, each of the months of the working life period and their respective monthly depreciation rate will be displayed.

Annual rate: Displays the result of the calculation: 100 / [Working life]

Monthly rate: Displays the result of the calculation: [Annual rate] / 12

Straight line throughout remaining working life

The book value of the asset is distributed in even amounts throughout the remaining working life. However, unlike the straight line throughout total working life restriction, this method ensures that posterior capitalization and subsequent purchases do not lead to an extension of the estimated working life.

Posterior capitalization and subsequent purchases after the expiration of the specified estimated working life cause, although, problems in this depreciation method. In these cases, the use of a conversion key in the depreciation key must offer another method after the expiration of the expected working life.

The following fields will be displayed:

Working life: Enter the number of years that compose the working life of the assets of this type Once done, click on the button next to the field. In the listing at the bottom of the screen, each of the months of the working life period and their respective monthly depreciation rate will be displayed.

Annual rate: Displays the result of the calculation: 100 / [Working life]

Monthly rate: Displays the result of the calculation: [Annual rate] / 12

Sum of the digits of the years

When specifying the depreciation rate and validity period, it is possible to determine a depreciation course that is modified in levels (usually descending) throughout time.

The validity period can be based, among other things, on the capitalization date or on the depreciation start date.

Changes between depreciation levels must not occur at the start or at the end of an exercise. The user can also change to another depreciation rate during the exercise.

In the Working life field, enter the number of years that compose the working life of the assets of this type Once done, click on the button next to the field. In the listing at the bottom of the screen, each of the months of the working life period and their respective monthly depreciation rate will be displayed.

See in the chart below an example of the calculation of the monthly rate for this depreciation method type.

Manual

In this method, the user will determine the number of years of working life and, then, for each month, the system will allow to define a depreciation quota.

In the Working life field, enter the number of years that compose the working life of the assets of this type Once done, click on the button next to the field. In the listing at the bottom of the screen, each of the months of the working life period will be displayed. Double click on the field of the Monthly rate (%) column and enter the percentage related to the depreciation rate of the period.


Example of the calculation of the depreciation rate in the "Sum of the digits of the years" method

Considering that the entered value of the working life of the asset was "4":

To obtain the annual rate, the following calculation is performed: 100 / [Working life]. Thus:

ºRemaining total working life: 10 (= 4 + 3 +2 +1)

ºFirst year of depreciation: 100% * 4 / 10 = 40%

ºSecond year of depreciation: 100% * 3 / 10 = 30%

ºThird year of depreciation: 100% * 2 / 10 = 20%

ºFourth year of depreciation: 100% * 1 / 10 = 10%

To obtain the monthly rate, the following calculation is performed: [Annual rate] / 12


After performing the desired configurations, save the record.