|
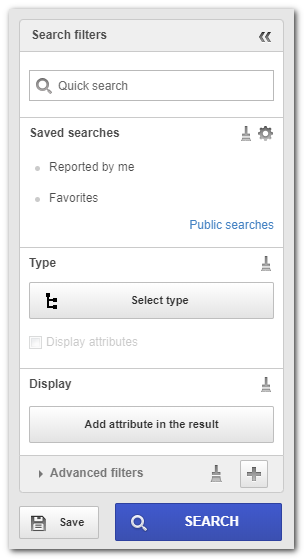
1.See on the left side of the screen, the Search filters panel, where the user can perform quick views using the record name and ID #, as well as a specific type of records. See the following panel:

|
Quick search: This field can be used to locate a record using its ID # or name. See further details in "Quick search and Full text search".
Saved searches: This field will display saved searches of the menu that is being used by the user. Click on the  button to configure the view display order. See further details in "Saved searches". button to configure the view display order. See further details in "Saved searches".
Type: Click Select type button to search only a specific type of records. Click on the button to display the type hierarchy; select the desired type and click on Apply. See further details on how to use this option in "Search filters".
Advanced filters: Use the buttons in this field to use specific component filters. The description of those filters is in the documentation of the view menus of each component. See further details on how to use this option in "Search filters".
|
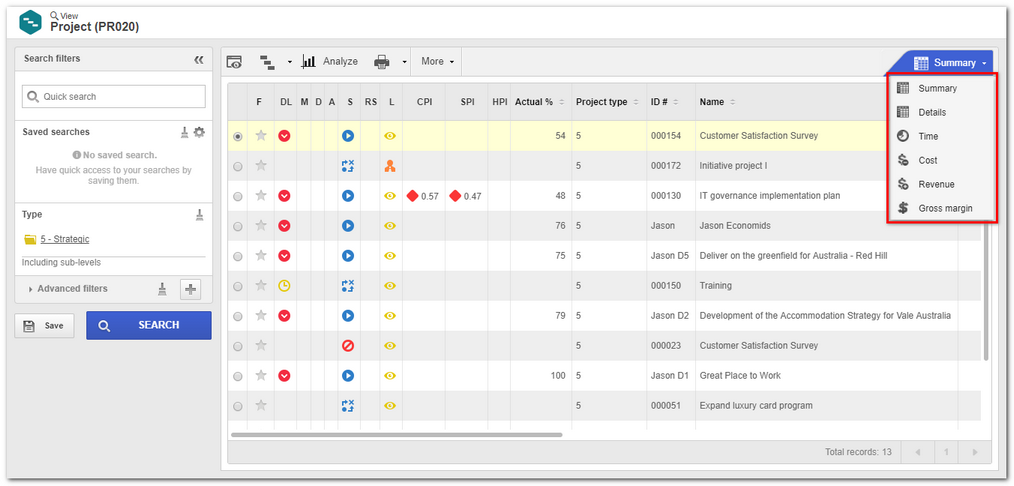
2.Click on SEARCH button and the result will display, according to the way the search fields have been filled out. Search result will display on the right part of the screen. Select an option on the tab placed on the right side, to analyze information:

3.On the upper part of the screen, find the buttons that perform searches, based on the search fields. Some of these buttons will display in all view screens. They are:

|
View data: Allows viewing the data screen of record selected in the view menu.
|

|
OLAP analysis: This button allows analyzing and viewing the data of the list of records in a fast, steady and interactive manner through the SE Analytics component. From then on, it is possible to generate analysis panels and cross information that will facilitate decision making. See how to perform this operation in the Creating a vision from other components.
|

|
By clicking on this button, a menu will be displayed allowing some operations, such as:
▪Reports: Some menus have several report options, which are generated with the records presented on the main screen. When you select a report option, a screen will be displayed containing the generated report. See the detailed description of this screen in the Generating a report section. ▪Export to Excel: This option allows you to export the main screen list to an Excel file. ▪Reports configuration: This option allows you to generate reports with the records displayed on the main screen. Click on this button to display a screen where you should select all items that will be displayed in the report. After that, click on  button to generate the report. button to generate the report. ▪Legend: This option displays the parameters that can be used in the configuration of new reports. |
|


