|
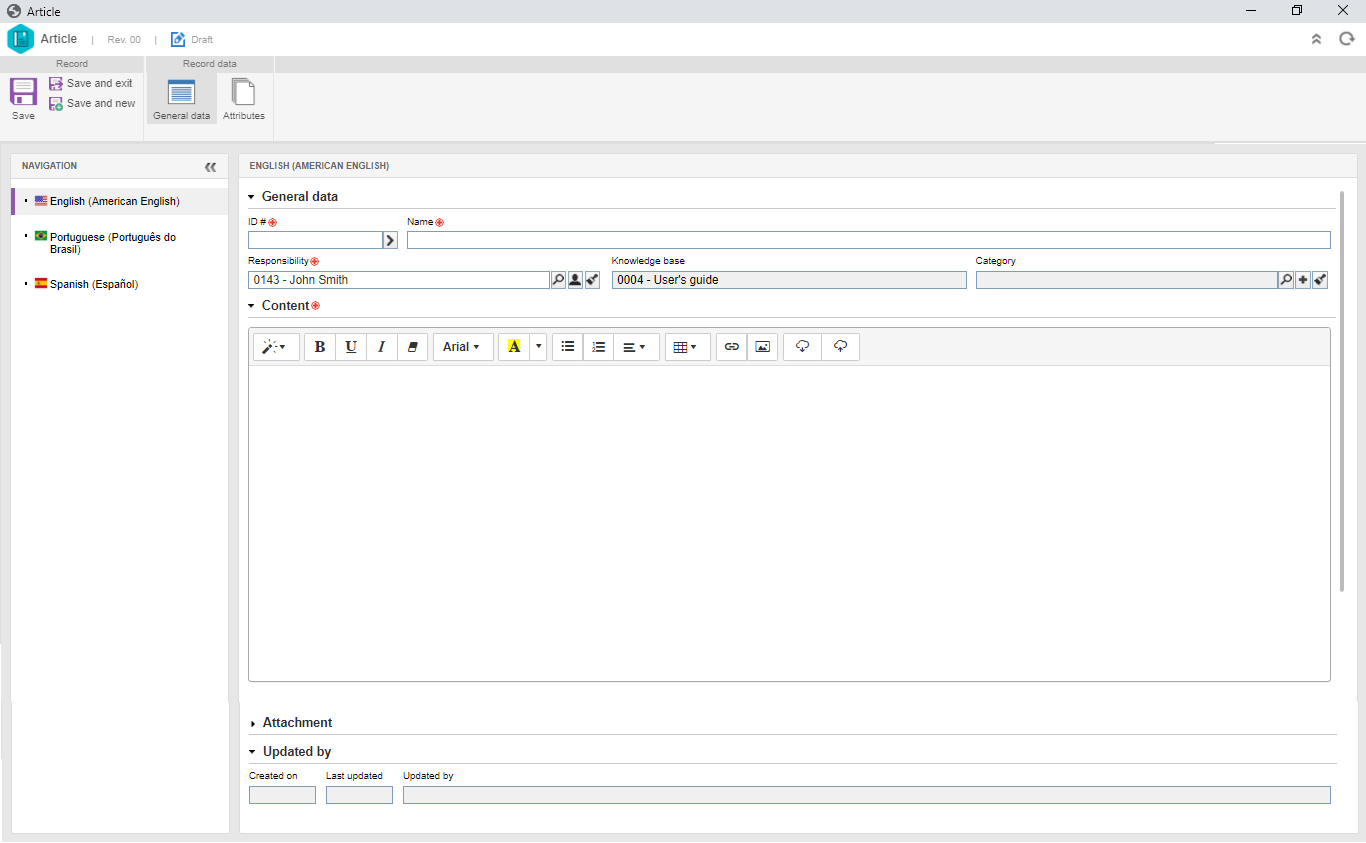
To create an article, access the "File  Article" menu, click on the Article" menu, click on the  button and select the knowledge base in which the article will be published. To edit an article that has already been released, it will be necessary to enable its editing or create a new revision. For more details on these operations, refer to the Article revision section. The screen of the article in edit mode will be displayed as follows: button and select the knowledge base in which the article will be published. To edit an article that has already been released, it will be necessary to enable its editing or create a new revision. For more details on these operations, refer to the Article revision section. The screen of the article in edit mode will be displayed as follows:

Fill out the following fields:
ID #: Enter the article ID #.
Name: Enter the name of the article according to the selected language. Note that, by switching the language, the ID # of the article does not change, but the Name and the Content do, that is, the article will be displayed according to the language in which the system is being used.
Responsible: Enter the user responsible for the article. During creation, this field is automatically filled out with the logged user (who is creating it), but it can be edited by another user.
Knowledge base: This field displays the knowledge base in which the article is or will be recorded.
Category: Enter the category that classifies the article content.
Language: This option displays the language of the article. The displayed languages are the languages enabled in the knowledge base.
If the knowledge base in which the article will be created has attributes configured, it will be possible to select them in Attributes.
Use this section to add the content of the article in the selected language. This addition can be performed in two ways:
1.Addition of created articles: It is possible to reference articles previously created in a knowledge base. To do that, type "@" and the name or ID or the article you wish to add. Select the desired article in the results list, and it will be displayed as a content in the form of a link. Only articles with current revisions will be listed. 2.Content editing: It features the Rich Text resource, which allows adding links, images and tables, as well as formatting the text. The content editor offers the user a WYSIWYG editing area (acronym for "what you see is what you get") for text formatting. Use the buttons in this tab to format the content of the article:
|

|
A
|
Through this button, it is possible to define the titles, paragraphs and block quotations in the article.
▪Heading (h): The title or heading elements have levels that go from h1 to h6. In addition to structuring information through these levels, when viewing the article through a portal, the titles that are formatted as headings will be displayed in the "Markers" section as links (anchors). ▪Blockquote: This element allows highlighting a large part of the text, whether to make a citation or to emphasize part of the content. ▪Paragraph (p): This element allows defining the paragraphs of the article. |
B
|
Allow formatting the text that will be added or that is selected with bold (B), underline (U), italic (I).
|
C
|
Allows removing any text formatting without losing the selected content.
|
D
|
Allows defining the font of the text that will be added or that is selected.
|
E
|
Allows defining the font color and the background color of the text that will be added or that is selected.
|
F
|
Bulleted lists are used for information groups or sets.
|
G
|
Numbered lists are used to display steps of an operation.
|
H
|
Allows defining the alignment of the text of the paragraph.
|
I
|
Allows adding a table to the article.
|
J
|
Allows adding a link to the article. By clicking on this button, the system displays a screen to enter the link URL and the text to be displayed for the link. It is also possible to configure whether the link will be opened in a new window when clicked.
|
K
|
Allows adding an image to the article. By clicking on this button, the system displays a screen to select the image from the files in your computer or from a URL. During viewing, if the article has two or more images, by clicking on one of them, the image carousel screen will be displayed, allowing the user to browse the images of the article.
|
L
|
Allows downloading the content of the article in HTML format for it to be translated externally, such as through translation software known as CAT Tools. Refer to the Article translation with CAT tools section for further details about this operation.
|
M
|
Allows importing an HTML file as article content. This file could be, for example, the translated file of the article in the source language.
|
|
Use this section to associate the attachments related to the article in question. These attachments can be viewed when accessing the article through the knowledge base portal. It is important to point out that the attachments that are added to the article in a certain language will only be available when the article is being accessed in that language.
|
|


