|
To add a new recognition profile, click on the  button on the main screen toolbar. To edit the data of a profile, select it in the list of records on the main screen and click on the button on the main screen toolbar. To edit the data of a profile, select it in the list of records on the main screen and click on the  button. button.
On the screen that will be displayed when adding, select the type that will classify the recognition profile being created. Save the selection.
The way the recognition profile screen will be opened will depend on the configurations performed in the general parameters and whether it is the first access. Refer to Executing external applications for further details.
The recognition profile screen will be displayed according to the following example:
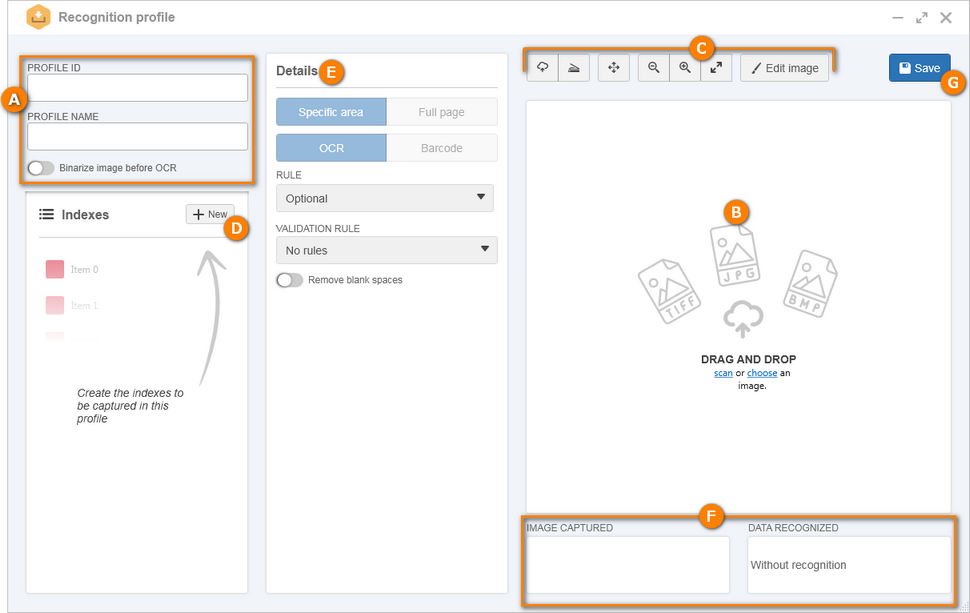
A
|
Enter, in the respective fields, an ID # and a name for the profile.
Binarize image before OCR: Check this option so that, when performing the OCR process, the image is converted to black and white. For example, if the image used by the batch is colored or grayscale, when a capture step is performed where OCR is required, the system will binarize the image, perform the OCR, and then discard the black and white image, keeping the image colorful.
|
B
|
First, it is necessary to import the image of the scanned document that will be used to configure the recognition profile. One of the ways to perform this operation is to drag and drop the desired image to the preview area, or use the links contained there to scan or choose between the files saved in the computer, the desired image.
|
C
|
Another way is to use the import and scanning options in the toolbar above the viewing panel. See the description of the buttons in the Toolbar - Viewing panel section below.
Click on the Edit image option to enhance the displayed image. See further details about this option in the Editing an image topic below.
|
D
|
Once this is done, it is necessary to define the indexes that will be extracted from the imported image. To do that, on the upper right corner of the Indexes panel, click on the New option.
On the row that will be added to the panel, enter the name of the index being created and click on the checkbox next to the field or press "Enter". Create as many indexes are desired. To do that, simply repeat the procedure.
To delete a created index, just position the mouse over it and click on the option  that will be displayed. that will be displayed.
|
E
|
On the Details panel, it is possible to configure how the index will be captured. See further details in the Details topic below.
|
F
|
Below the preview panel, it is possible to view the Image captured and the Data recognized (extracted value) of the image captured.
|
G
|
After you have made all the necessary configurations, save the recognition profile.
|
Toolbar - Viewing panel
On the screen that will be opened, by clicking on the Edit image option, the following buttons will be available:

|
Click on this button and on the screen that will open, locate and select the image that will be used to configure the recognition profile.
|

|
Click on this button to scan the file from which the recognition profile will be configured. For this feature to work correctly, it is necessary to have a scanner with TWAIN standard support installed.
If there is more than one scanner installed, the screen to select the desired scanner will be displayed. After that, the TWAIN driver screen of the scanner selected for the scan configuration will open.
|

|
Click on this button to increase the size of the imported image view.
|

|
Click on this button to decrease the size of the view of the imported image.
|

|
Click on this button to adjust the size of the view of the imported image to the preview panel.
|
Click on the Edit image option to enhance the image displayed in the viewing panel. See further details about this option in the Editing an image topic below.
|
Editing an image
On the screen that will be opened, by clicking on the Edit image option, the following buttons will be available:

|
Click on this button to activate the "hand" feature which allows you to click and drag, scrolling through the image.
|
|
Click on this button to decrease the image zoom level.
|
|
Click on this button to increase the image zoom level.
|
|
Click on this button to adjust the zoom level of the image to the preview panel.
|

|
Click on this button to invert the colors of the image. For example: in an image with a white background and text in black, the background will change to black and the text to white.
|

|
Click on this button to adjust the brightness of the image.
|

|
Click on this button to rotate the image 90 degrees clockwise.
|

|
Click on this button to rotate the image 90 degrees counterclockwise.
|

|
Click on this button to select an area of the image and crop it so that the image contains only the cropped selection.
|

|
Click on this button to binarize the image, that is, convert it to black and white. At this point, the system will display a field for the selection of the binarization you wish to apply to the image.
|

|
Click on this button to correct the alignment of the image in case it suffers a misalignment during the scanning process.
|

|
Click on this button to remove the dirt, unwanted spots or other noises that may have been inserted into the image during the scanning process.
|

|
Click on this button to remove the rows present in the image (both the originals of the file and those that were introduced during the scanning process). Remember that the presence of rows in the image, especially vertical lines, may interfere in the OCR process.
|

|
By clicking on this button, the system automatically detects and removes the edge of the image to improve image definition.
|

|
Click on this button to apply the Median filter to the image to reduce the noises (especially "salt-and-pepper" noises). The Median filter replaces the intensity of each pixel by the median of the intensities of adjacent pixels, reducing the amount of intensity variation between one pixel or the other.
|
Use the Save option to save the changes made to the image. Use the Cancel button to exit the image editing screen without applying the changes. Note that all changes made up to then will be lost.
|
Details
By clicking on an index, the following options will be available in the Details panel:
Field
|
Specific area
|
Click on this option to delimit an area to perform the recognition process.
With this, in the preview panel you can delimit the area of the image, from which the value of the index will be extracted. This area can be indicated through the Color and Name set for the index in the "Indexes" panel.
|
Full page
|
By clicking on this option, the system will consider the complete image to perform the recognition process.
|
OCR
|
Click on this option for the index value to be obtained by Optical character recognition (OCR). OCR technology consists of converting text images (scanned documents) into actual text characters (editable text).
In the Rule field that will be displayed, determine the rule that will be applied when performing OCR. See more information about the rules available in the OCR section.
|
Barcode
|
By clicking on this option, the value of the index will be obtained by reading a barcode.
In the Specification field that will be displayed, select the barcode type that will be read: Code128, EAN8, EAN13, UPCA, UPCE, Code 39, Interleaved2of5, IDENTCODE, QRCode or DataMatrix. See more information about this option in the Barcode section.
|
Validation rule
|
Select one of the following options to define the set of characters that will be recognized in the index:
▪No rules: A validation rule will not be applied to the index. ▪Date: Only values of the date type will be accepted. In the Format field, select the option that corresponds to the date format that will be recognized. ▪Only: Only one specific set of characters will be recognized in the index. In the Add options field, select the corresponding option to be recognized: all numbers, all letters, all special characters or to customize the set. In that case, in the "Customized" field, enter the characters that will be considered. ▪Except: A specific set of characters will not be recognized in the index. In the Delete options field, select the corresponding option so that they are not recognized: all numbers, all letters, all special characters, or to customize the set. In that case, in the "Customized" field, enter the characters that will not be considered. |
Option
|
Enabled
|
Disabled
|
Remove blank spaces
|
The blank spaces of the recognized value will be removed.
For example, if two separate words are recognized, the system will join them as if they were a single word.
|
The system will keep the recognized values separated.
|
|
|
