|
In this section you will see information about a workflow that can be changed through the Management  Workflow menu. So, to do this, locate and select the desired workflow. After that, click on the Workflow menu. So, to do this, locate and select the desired workflow. After that, click on the  button on the toolbar; at this point the workflow data screen will be displayed: button on the toolbar; at this point the workflow data screen will be displayed:
It is worth remembering that this operation can only be performed by users who have been defined, at the time of process modeling, as process managers or instance managers.
|
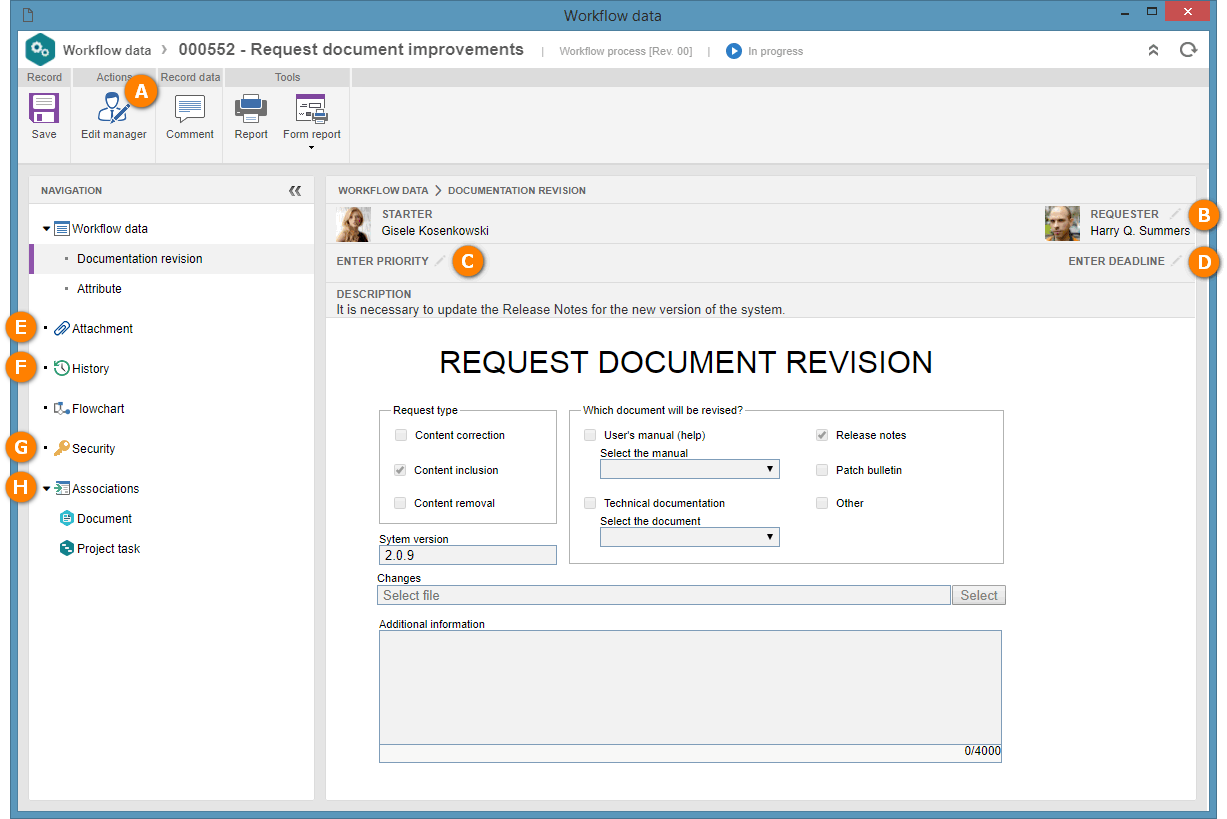
A
|
Click on the "Change Manager" button to change the instance manager.
|
B
|
Click on the  button to change the workflow requester. button to change the workflow requester.
|
C
|
Click on the button to enter or change (if you have already been informed during the execution of workflow activities) the priority of the workflow.
|
D
|
Click on the button to enter or change the execution deadline of the workflow.
|
E
|
In the Attachment section, in the Navigation panel, in addition to viewing the workflow attachments, you can add new attachments in the workflow.
|
F
|
In the History section, in the Navigation panel, in addition to viewing the workflow history, you can add comments about the instance.
|
G
|
In the Security section, in the Navigation panel, change the instance security list.
|
H
|
In the Associations section, in the Navigation panel, the system will display the objects that were associated with the workflow. If no object has been associated, this section will not be displayed. Note: The instance/process manager may add/associate/disassociate objects.
|
To change the instance manager, click on the "Edit manager" button, located on the button panel (Ribbon) of the data screen. Then, select the new instance manager through the screen that will be displayed:
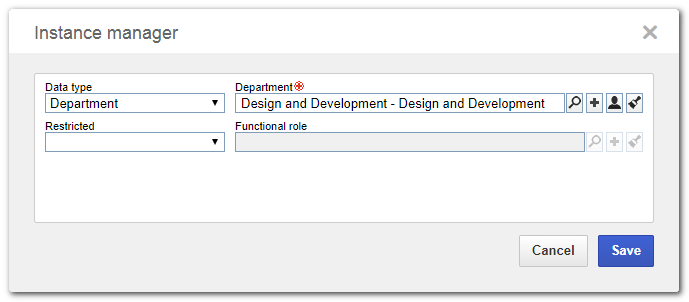
Type: Select the workflow manager type. According to the selected type, the field next to it will be enabled for the selection of the desired Manager. If the selected manager is a specific Department, the following field will be enabled:
Restricted: Select one of the options to restrict the workflow managers that belong to the Department selected before. According to the selected option, the respective field will be enabled for selection of the function or functional role of the users who will be managers of the workflow.
|
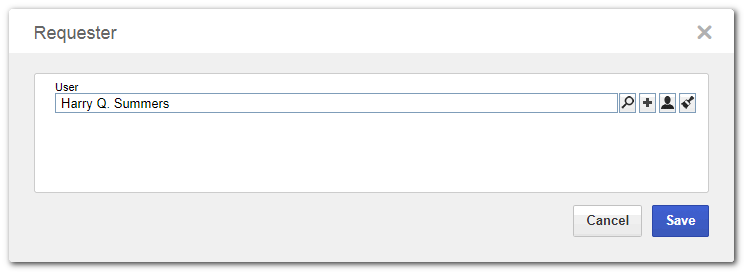
To edit the workflow requester, go to the Workflow data, located on the Navigation panel. After that, click on the button next to the Requester field and, on the screen that opens, select the user who will be the requester of the workflow. It is important to note that this option will only be displayed if, in the process data (Configuration Instance), the option "Allow entering requester" is checked.
|
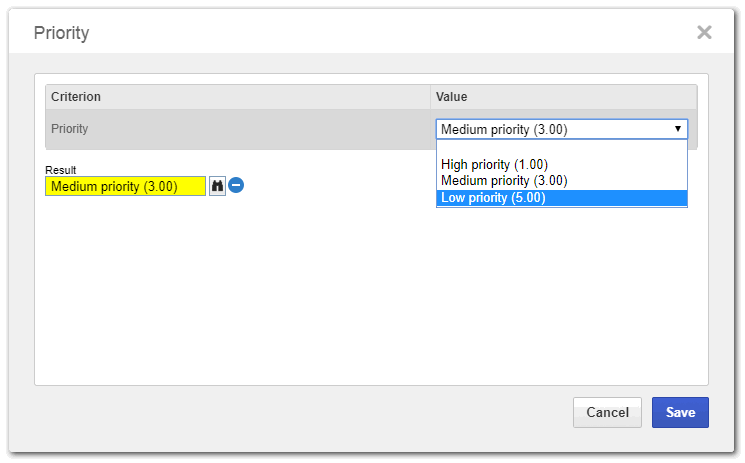
To enter or change the priority of the workflow, go to Workflow data, located on the Navigation panel. Then, click on the button next to the Enter priority / Priority field and on the screen that will be displayed select the value of each evaluation criterion. The method used to enter the values and available criteria will vary according to the configurations performed in the evaluation method set in the process (SE Process). It is important to point out that this option will only be displayed if, in the process data (Configuration Instance), an evaluation method is associated.
|
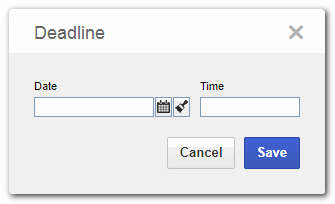
To enter or change the deadline of the workflow, go to Workflow data, located in the Navigation panel. After that, click on the button next to the Enter deadline field and on the screen that will be displayed, enter the date and time limit for the end of the workflow execution. If the Duration of the process data screen (SE Process) has been defined, this option will then present the calculated deadline according to the value entered and the calendar used by the process, but it is possible to edit it.
|
Through the Attachment section, located in the Navigation panel, it is possible to view attachments added to the workflow activities in question. On this screen, the manager can also add new attachments. Attachments added by the manager may be changed and/or removed, but the attachments added during the execution of the activities cannot be changed/removed.
For further details on how to associate attachments with the record, see the Adding attachments section.
|
|
To add comments to the instance, click on the "Comment" button located on the button panel (Ribbon) of the data screen. After clicking on this button, a screen will be displayed in which the comment must be entered, allowing a user to be notified by mentioning them through @user. The comment feature is also available in the History section located in the Navigation panel. Through the History section, it is possible to view the main events that occurred during the execution of the workflow until the current date. By checking the "Show all history" option, all events that have occurred until the current date will be displayed in detail.
On the screen that will be displayed, enter the comment you wish and, if necessary, check the "Set comment as restricted" option so that the comment is not visible to the requester. The comment will be displayed in the timeline. It is possible to edit the comment or delete it from the timeline through the Edit and Delete buttons in the comment event.
Note that:
▪When accessing the workflow data screen through the My workflows task, it will only be possible to edit/delete the comment that you have added, provided that this comment has not been added through the activity data screen. ▪If you are the instance manager, by accessing the workflow data screen, you may change/delete a comment made by any user, as long as the comment was not added during the execution of an activity. |
|
Through the Security section, located in the Navigation panel, in addition to viewing, it is also possible to change the workflow security list. If the "Inherit security list from process" option is checked, it indicates that the determined security configuration for the process (SE Process) will also be valid for the workflow. If the option is checked then the buttons will be enabled:

|
Click on this button to add a new access control to the workflow in question. See more details about this operation in the Security section.
|
|
Click on this button to edit an access control for the workflow in question. See more details about this operation in the Security section.
|

|
Click on this button to remove an access control of the workflow in question. Select the desired record before clicking on this button.
|

|
Click on this button so that the process access control list is copied to the workflow in question, allowing other access controls to also be entered. If, upon clicking on this button, there are records in the workflow security already, the process security list will be added to the existing list in the workflow.
|
|
The other sections of the workflow data screen allow you to view the completed information during the execution of the workflow activities in question.
|
|