|
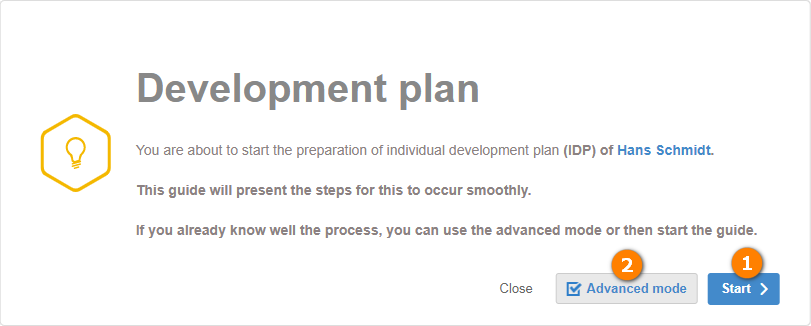
By clicking on the Add option, in the Development plan option, it will be possible to add an IDP in two ways. See below how to use each one of them:

To add the IDP with the help of a wizard, click on the Start button to continue the operation.
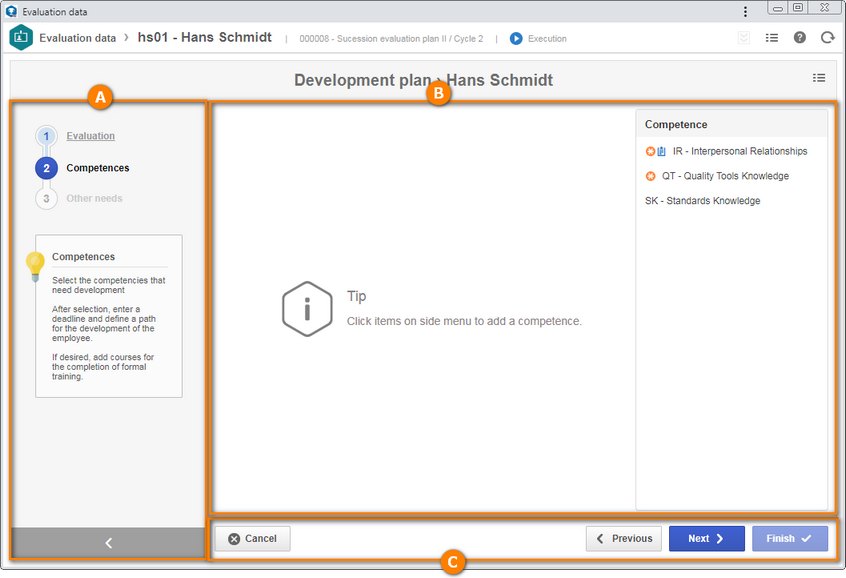
At this point, the screen will be displayed according to the image displayed below. The alphabetical letters identify each available item:

A
|
The side panel will display the steps for adding the individual development plan of the employee. Click on the arrow in the lower right corner of this screen to expand/collapse the survey sections panel.
|
B
|
Use this area to execute the steps to add the IDP. See how to execute each step in the IDP addition steps topic below.
|
C
|
The button bar displays the options that allow manipulating the IDP creation wizard. See a detailed description in the Button bar topic below.
|
Career and succession items
Evaluation
|
This step will display all the evaluations cycles of the evaluation plan which the employee in question has gone through, which had the "Allow development plan drafting" option enabled in its data.
Hover the mouse pointer over the cycle from which you wish to create the development plan and click on the Select option that will be displayed. To undo the selection of a cycle, just hover the mouse pointer over the desired cycle and click on the Remove option that will be displayed.
|
Competences
|
In this step, it is possible to set which competences must be involved in the plan being created.
If, in the Evaluation step, an execution cycle of evaluation plan is selected in the Competence panel, the competences in which the employee has obtained a level of proficiency below the mapped level will be displayed. If no cycle is selected, the competences mapped for the position being exercised will be displayed.
Click on the competence you wish to associate with the plan.
▪Notice that, next to the competences, the system may display icons that indicate whether the mapped competence is required or desirable, whether it is being used in another development plan of the employee in question, or whether the evaluated competence has a development suggestion associated with it. Hover over an icon to identify it. ▪If the selected competence is being used in another development plan, which is open, the system will issue a message asking whether you really wish to associate it with the development plan being created. |
The selected competences will be added to the main panel, identified by their ID # and name. Hover over the  icon to view the information regarding the competence (type, description, related course, learning method etc.). On the right side, the system makes available options which allow the user to disassociate the competence from the development plan and expand/collapse the competence data. icon to view the information regarding the competence (type, description, related course, learning method etc.). On the right side, the system makes available options which allow the user to disassociate the competence from the development plan and expand/collapse the competence data.
For each added competence, it is necessary to define the data of the action that will be taken regarding it. To do that, the following fields are available:
Field
|
|
Start date
|
Displays the current date, but it is possible to edit it. In that case, select the date from which the employee must perform the action related to the competence.
|
Deadline
|
Displays the current date, but it is possible to edit it. In that case, select the date up to which the action must be performed by the employee.
|
Who?
|
Displays the name of the employee to whom the evaluation plan is being added, but it is possible to edit it. In that case, select the user who must perform this action. Use the other buttons located next to this field to fill it in with the logged user data and clear the value in the field.
|
How?
|
Fill out this field to enter how the action related to the competence must be performed by the employee.
|
Why?
|
Fill out this field to enter the reason why this action must be performed by this employee.
|
Where?
|
Fill out this field to enter the location in which this action must be performed.
|
Adding a course
|
Click on the  located next to this field to select the courses which the employee must attend in order to perform this action. The courses are created through the SE Training component and, for this resource to work correctly, the SE Training component must be part of the solutions acquired by your organization. located next to this field to select the courses which the employee must attend in order to perform this action. The courses are created through the SE Training component and, for this resource to work correctly, the SE Training component must be part of the solutions acquired by your organization.
As the courses are selected, they will be displayed in the area right below the field.
To disassociate a course, hover over it and click on the Close option. To disassociate all the courses, click on the  button located next to the field. button located next to the field.
If the competence already has a course associated with it as a development suggestion, the  button will be displayed so that, if other courses are added, it is possible to restore the courses added only for those who are a development suggestion. button will be displayed so that, if other courses are added, it is possible to restore the courses added only for those who are a development suggestion.
|
By selecting a competence, some fields described before will be filled in by the system, according to the data of the selected competence. For example, if the selected competence has already been evaluated and has a development suggestion associated with it, the action fields will be filled in with the data of the evaluation, department, position of the appraiser who proposed the development suggestion, the course suggested for developing this competence, among other information.
|
|
Other needs
|
In this step, it is possible to define other development needs for the employee in question. If the courses and educational levels have been mapped for the employee's position and they did not perform them or are considered unqualified in these aspects, that information will be displayed in this section.
The "Other needs" panel will display the courses and educational levels mapped for the employee's position that was disassociated from the development plan. To once again add the course/educational level to the development plan, just click on it. Use the + Add option to add other options for the employee to the development plan. The fields that will be displayed to be filled in were already described in detail in the Competences step.
|
Category
|
This step will only be enabled for editing if the "Allow changing the default category" option is enabled in the Employee profile  Development plan section of the general parameters. Otherwise, the creation of the development plan can be finished in the previous step and the IDP will be created in the category defined in the data of the evaluation plan cycle or in the general parameters. Development plan section of the general parameters. Otherwise, the creation of the development plan can be finished in the previous step and the IDP will be created in the category defined in the data of the evaluation plan cycle or in the general parameters.
If a default category has been set, it will be displayed selected, but it will be possible to select another. If a default category was not selected, in the displayed hierarchy, select the category that classifies the development plan that is being created. Use the  button from the toolbar to view the data of the action plan type selected in the hierarchy. Refer to the SE Action Plan component specific documentation for a detailed description on how to configure action plan categories. button from the toolbar to view the data of the action plan type selected in the hierarchy. Refer to the SE Action Plan component specific documentation for a detailed description on how to configure action plan categories.
|
|
Button bar
Button
|
|
Cancel
|
Use this option to exit the creation wizard. Note that all the data entered up to then will be lost. To perform this operation effectively, it is necessary to confirm the question asked by the system.
|
Previous
|
Use this option to return to the previous step. This operation can also be performed by clicking on the name of the desired step on the panel on the side of the screen.
|
Next
|
Use this option to go to the next step. This operation can also be performed by clicking on the name of the desired step on the panel on the side of the screen.
|
Finish
|
Use this option to close the IDP creation after executing all necessary steps. At this point, the system will ask whether you wish to enable the development plan for the employee. Click on the desired option:
▪Yes: The actions of the plan will be enabled for execution by the due responsible parties. The actions can be executed through the Action execution task from the SE Action Plan component. ▪No: The actions will not be enabled for execution. This operation can be performed later through the "Send to next step" button displayed when hovering the mouse over the action plan. At this point, the creation wizard will be closed, and the created IDP will be displayed in the "Development plan" section of the employee profile.
|
|
|
Users who are already familiar with the process of creating action plans can create the IDP without the help of the wizard. To do that, click on the Advanced mode button.
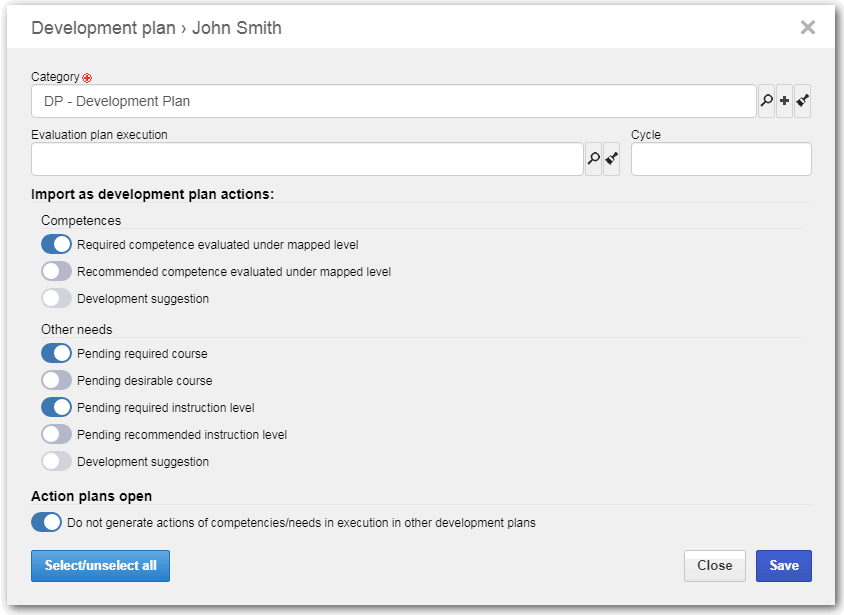
On the screen that will be opened, the following fields are available:

Field
|
Description
|
Category
|
This field will only be enabled for editing if the "Allow changing default category" option is enabled in the Employee profile  Development plan section. Development plan section.
If a default category has been set, this field will be completed with it, but it will be possible to select another. If a default category has not been selected, select the category (SE Action plan) that classifies the development plan that is being created. Use the other buttons next to the field to add a new category to sort the plan and clear the field. Refer to the SE Action Plan component specific documentation for more details on plans and their actions.
If the "Allow changing default category" option is not enabled, this field will be filled out by the system with the category defined in the evaluation plan cycle data or the general parameters and it will not be possible to edit it.
|
Evaluation plan execution
|
Select the evaluation plan to which the development plan will be generated. The selection screen that will be displayed will list all the evaluation plans through which the employee has already passed.
|
Cycle
|
Select the execution cycle of the evaluation plan to which the development plan will be generated.
|
Import as development plan actions
|
Allows defining the Competences and Other needs for development (course and educational level) mapped for the employee position that will be associated with the development plan.
For that, enable the options from which you wish to create development plan actions and keep disabled those which you do not wish to create actions from.
|
Open action plans
|
Enable this option to generate actions for competences/needs that are associated with open development plans. Disable this option so that actions associated with open development plans are not generated.
|
The following buttons are available in the lower part of the screen:
Button
|
Description
|
Check/uncheck all
|
Use this option to simultaneously enable or disable all options listed.
|
Close
|
Use this option to exit the development plan creation screen. All the data entered up to then will be lost.
|
Save
|
Use this option to close the IDP creation after filling out all necessary fields. At this point, the system will ask whether you wish to enable the development plan for the employee. Click on the desired option:
▪Yes: The actions of the plan will be enabled for execution by the due responsible parties. The actions can be executed through the Action execution task from the SE Action Plan component. ▪No: The actions will not be enabled for execution. This operation can be performed later through the "Send to next step" button displayed when hovering the mouse over the action plan. At this point, the creation wizard will be closed, and the created IDP will be displayed in the "Development plan" section of the employee profile.
|
|
|


