|
To add a new service, click on the  button on the main screen toolbar. To edit the data of a service, select it in the list of records on the main screen and click on the button on the main screen toolbar. To edit the data of a service, select it in the list of records on the main screen and click on the  button. button.
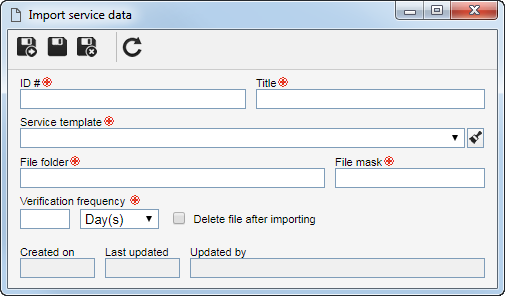
On the screen that will be displayed, fill out the following fields:

Field
|
ID #
|
Enter a number or code to identify the import service.
|
Title
|
Enter a name for the import service.
|
Service template
|
Select the data template that contains the template file with the fields that should be imported.
|
File folder
|
Enter the directory path in the server that will have the files imported.
|
File mask
|
Enter the file masks that will be imported. To enter more than one mask, separate them by a semicolon ';'. For example: *.tif;*.tiff;*.jpg.
|
Verification frequency
|
Enter, in days, hours or minutes, the interval in which the verification will be performed, in the configured folder, of new files for import.
|
File masks provide flexible means for identifying files or groups of files based on their name and extension. They can basically be constructed by combining fixed characters (letters, numbers and other characters allowed in file names), the '?' - a question mark (which can replace a single character) and the '*' - asterisk (which can replace a string of characters). Here are some examples of file masks:
▪*.* - all files with any extension ▪*.doc - all files with .doc extension (for example: file.doc) ▪*.p* - files with extension starting with p (for example: document.pdf, document.ppt) ▪???.?? - files with three characters in its name and two characters in its extension (for example: abc.ai) |
Option
|
Checked
|
Unchecked
|
Delete file after importing
|
The files will be deleted from the folder after being imported by the system.
|
The files will not be deleted from the folder after being imported by the system.
|
Done this, save the record.
|


