|
To start a protocol, click on the  button on the main screen toolbar. On the panel that will be opened, select the type that will classify the protocol and save the selection. To perform this operation, the logged user must have the "Add" control allowed in the type security of the protocol. button on the main screen toolbar. On the panel that will be opened, select the type that will classify the protocol and save the selection. To perform this operation, the logged user must have the "Add" control allowed in the type security of the protocol.
To edit the data of a protocol, select it in the list of records and click on the button on the main screen toolbar. To successfully perform this operation, the logged user must have the "Edit" control allowed in the security of the protocol.
On the protocol data screen that will be opened, the following fields will be available:
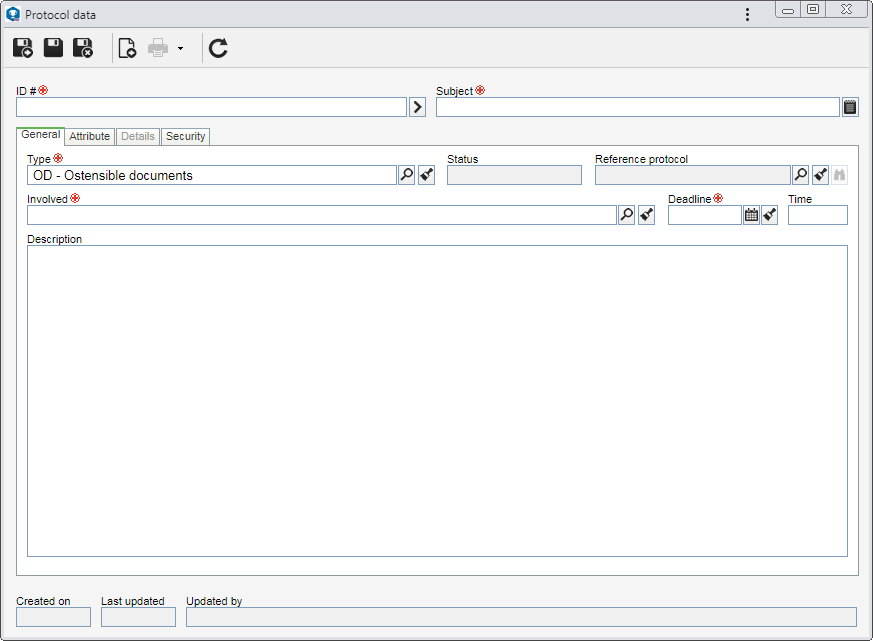
Fields
|
|
ID #
|
Enter a number or code to identify the protocol or use the arrow next to this field to generate an automatic ID #.
If the use of identification mask was configured in the protocol type, at the moment of generating the automatic ID #, the respective mask will be shown.
The ID # generated through the mask can only be edited if the "Disable protocol ID # editing" option is not checked on the data screen of the protocol type. Otherwise, it will not be possible to edit the generated ID #.
|
Subject
|
Enter a subject for the protocol. If you need a longer field to describe the subject, use the  button. button.
|
Note: To successfully add an attribute, it is necessary to fill out the required fields in the General and Attribute tabs. After saving the data for the first time, the other tabs will be available to be filled out.
Field
|
|
Type
|
Displays the type selected during the addition, although it is possible to edit it. In this case, select the desired protocol type.
|
Status
|
Displays the status of the protocol.
|
Reference protocol
|
Fill out this field if you wish the protocol to be based on another protocol. In this case, select a previously registered protocol that will serve as a reference to the protocol that is being started.
Use the other buttons next to the field to clear it and view the selected protocol data.
|
Involved
|
Fill out this field to associate a user with the protocol. To do that, select the desired user.
If the support configured in the protocol type is electronic, filling out this field will be mandatory.
|
Deadline
|
Fill out this field to establish a deadline up to which the involved must perform the protocol processing. To do that, select the desired date.
If the support configured in the protocol type is electronic, filling out this field will be mandatory.
|
Time
|
Fill out this field to establish a time up to which the involved must perform the protocol processing. In this case, enter the desired time in the "hh:mm" format.
|
Description
|
Fill out this field to record important information about the protocol.
|
|
This tab will only be displayed if at least one attribute is associated in the Attribute tab of the type that classifies the protocol. In that case, enter the value of the displayed attributes. Those attributes that are required must necessarily, have their values filled in. The restricted attributes must only be filled out by specific users. The procedure to enter an attribute value varies according to the configurations set when creating it.
|
This tab is divided into the following sections:
Documentation
|
Use this section to associate attachments and documents related to the protocol. To do that, click on the desired option:
Attachment
|
Through this section, itis possible to add, delete, download and view the attachments that will be processed by the protocol being started. For further details on how to add attachments to the record, see the Add attachments section.
|
Document
|
This section is only available if the SE Document component is part of the solutions acquired by your organization. In it, the documents related to the protocol being started must be added or associated.
In order to perform the operations described in this topic, it is necessary to have the due permissions granted on the category and document security list in the SE Document component. Refer to the Configuration  Document Category Security section in the specific documentation of the SE Document component for more details on the security of the category and its documents. Document Category Security section in the specific documentation of the SE Document component for more details on the security of the category and its documents.
On the side toolbar, the following buttons are available:
|
Click on this button to create a new document and associate it with the protocol. On the screen that will be displayed, select the category that will classify the document that is being added and save the record. Then, fill out the other fields on the document data screen. Refer to Adding a new document section in the SE Document component specific documentation for a detailed description on how to fill out the fields on this screen.
|

|
Click on this button to edit the data of a document selected from the list of records.
|

|
Click on this button to associate a previously registered document with the protocol. On the screen that will be displayed, locate and select the desired document. Once done, save your selection.
|

|
Click on this button to disassociate the document selected in the list of records from the protocol.
|

|
Click on this button to view, if any, the electronic file of the document selected on the record list.
|

|
Click on this button to view the data screen of the document selected in the list of records.
|

|
Click on this button and select the desired option to add a text or chart comment in the selected document. Refer to the File Document Adding comments section of the SE Document component specific documentation for more details on how to perform this operation.
|

|
Click on this button and select the desired option to sign digitally or view the signature of the electronic file of the document selected in the list of records. See more details about this operation in the Adding digital signature in electronic files section.
|

|
Click on this button and select the desired option to sign digitally via DocuSign or view the signature of the electronic file of the document selected in the list of records. Note that this button will only be available if signing via DocuSign was enabled in the category of the document selected in the list of records. See more details about this operation in the Adding digital signature to electronic files via DocuSign section.
|

|
Click on this button and select the desired option to sign digitally via ClickSign or view the signature of the electronic file of the document selected in the list of records. Note that this button will only be available if signing via ClickSign was enabled in the category of the document selected in the list of records. See more details about this operation in the Adding digital signature to electronic files via ClickSign section.
|
|
|
Control
|
The fields in this section will be filled out by the system after the protocol is received and its processing is finished. In it, the responsible users for the start and end of the protocol processing will be displayed, along with the department and the date on which the respective event was executed. The Description field displays the data entered in the Receiving field, upon the receiving confirmation of the protocol.
|
Flowchart
|
This section will only be displayed if the protocol status is not "To be started". It allows tracking, through a flowchart, the steps through which the protocol selected in the list of records has gone through, as well as the users who have executed the operation and when the operation was performed.
|
History
|
In this section, the system displays a timeline with the main events that occurred in the protocol, up to present. It will be possible to add comments to the displayed events, but the logged user must have the "Edit" and/or "View" controls enabled in the protocol type security. The user will only be able to edit and delete their own comments.
|
|
On this tab, it is possible to determine the user access configurations of the selected protocol. The following fields are available:
Permission inheritance
|
Checked
|
Unchecked
|
Inherit security list from the protocol type
|
With that, the security list configured in the type will also be valid for the selected protocol. This option will be displayed checked by the system if the "Inherit security list from the protocol type (default)" option is checked in the protocol type.
|
The permissions will not be inherited from the type. In this case, use the Security list tab to configure a specific security for the protocol that is being started. It can only be unchecked if the "Block record user editing" option is also unchecked in the protocol type.
|
Control
|
|
Record user
|
Displays the data of the user who is starting the protocol.
If in the protocol type, the "Block record user editing" option is checked, it will not be possible to edit this field.
If this option is unchecked in the type, it will be possible to select the user who will have unrestricted access to the protocol in question. Use the other buttons next to this field to add a new user and make it the record user of the protocol and clear the field.
|
Security list
|
This tab will only be enabled if the Inherit protocol type security list option is unchecked. With this, it will be possible to customize the protocol security list. On the side toolbar, the following buttons are available:
|
Click on this button to add a new access to the protocol security list.
|
|
Click on this button to edit the selected access data in the security list.
|

|
Click on this button to delete the security list access and thus disassociate it from the protocol.
|

|
Click on this button to import the configured accesses in the type, so that they are displayed in the security list of the protocol.
|
|
|
After performing the necessary configurations, save the record. To dispatch the protocol to its addressees without leaving its data screen, click on the  button on the toolbar. See further details on this operation in the Dispatching/restarting a protocol section. button on the toolbar. See further details on this operation in the Dispatching/restarting a protocol section.
|